
Servus and welcome back, my dear crafting friends, readers and followers!
Time for a new DecoArt tutorial, don't you think?
DecoArt are just releasing their new fabulous media line (which was developed by none less than the fabulous Andy Skinner himself!), which will provide you with a load of new crackle media goodness, fantastic antiquing creams, a new modelling paste or the stunningly vibrant spray paints - to name only just a few.
Experimenting with these I came up with this paintboard:


Materials list:
- white Modelling Paste
- Matte Medium
- white Crackle Paint
- white Gesso
- Raw Umber and Patina Green
Antiquing Cream
- Cobalt Turquoise Hue,
Cobalt Teal Hue,
Quinacridone Gold,
Pyrrole Orange fluid acrylics
- turquoise Shimmer Mister
- white and orange Misters
- other DecoArt products:
- matte Decou-Page
- Raw Umber Traditions acrylic paint
- other materials:
- an 8x8 inch piece of paintboard
- MDF flourish (exclusive design from That Craft Place Ltd.)
- palette knife, fine tip brush, wider brush, baby wipes, water
- metal findings (thanks to dear Uncle Helmut, my stash has once more grown this summer ;), old watch parts xx(available at Retro Kraft Shop)
- scraps from an old dictionary or book
- texture plate or stamp
- idea-ology alpha parts or chipboard letters
- optional: script/pattern stamps and black archival stamping ink
Step 1

Tear scraps from old dictionary pages and glue them to your paintboard using matte Decou-Page.
Step 2

Apply white Modeling Paste to various spots using a small palette knife.

Stamp some texture into these spots. I used a texture plate which I lightly sprayed with water first.
Step 3
Use Matte Medium to glue the flourish to your paintboard and give it a top coat with the Matte Medium too.

Step 4
Once dry paint the flourish with the white Crackle Paint (I used a very thin soft brush as it helps spreading the Crackle Paint more easily) and let dry naturally.

Step 5
Use a small palette knife and also spread some of the white Crackle Paint on your paintboard by scraping it on. This will create beautiful random shapes of crackled areas.

Step 6
Paint the remaining areas with white Gesso. Blend in the glued on dictionary scraps by painting over the edges with diluted Gesso.

Step 7
In the meantime the Crackle Paint should have done its magic on the flourish. Rub in some Raw Umber Antiquing Cream to make the cracks more visible. Let it sit for a minute or two. Wipe off the excess with a baby wipe while the Antiquing Cream is still wet.

Step 8
Glue some old watch parts or gears to your flourish using matte Decou-Page. Paint them with white Gesso to add some "tooth" for the colours we are going to add later.

Step 9
While the Gesso dries, paint the spots of dried Modeling Paste with Traditions "Raw Umber". Blur the edges around these spots by spreading some of the colour with a water loaded brush.

Your project should look something like this so far:

You can see the dried Crackle Paint and how the white Gesso helped with blending in the dictionary scraps with the background.
Step 10
Paint a "shade" around the flourish using a fine tip brush. This will create a better contrast and thus highlight the flourish.

Step 11
Take the new media "Cobalt Turquoise Hue" and paint some areas with it.

You will love the new media fluid acrylics as they really are highly concentrated pigment, which makes a little of it (or even using it as a wash) create a wonderfully intense effect!
Step 12
Paint the watch parts with "Quinacridone Gold" and let dry.

Also spread some of it on the still white spots of your paintboard:

Step 13
Pour some white Crackle Paste into a small container and add some "Cobalt Teal Hue" to tint it to a light teal colour tone. Randomly scrape the tinted Crackle Paste onto your paintboard, overlapping it with some of the already covered spots.

Let dry naturally!


before x xxxxxxxxxxxxxxxxxxxxxxxxxxxxxxxxxxxxxxafter
Step 14
Stencil some texture/text/numbers onto the paintboard using Traditions Raw Umber acrylic paint.

Use the same paint to dab it around the edges of your paintboard to create an irregularly shaped "frame" that will hold your design together:

Step 15
Make a wash with the Patina Green Antiquing Cream and apply it to the previously painted Modeling Paste and the painted watch parts:


Glue on some old and worn metal findings or embellishments using matte Decou-Page. It really is my first choice when having to fix bulkier and heavier items to my canvases! Let dry.
Step 16
After all has dried spray on some splatters of various DecoArt media Misters. I used the turquoise Shimmer Mister and the white and orange Misters for my paintboard.


The white from the white Mister is awesomely opaque:

as is the orange:
Step 17
Add a sentiment using alpha parts or chipboard letters and dab on some Pyrrole Orange media fluid acrylic.


Step 18
(optional)
Stamp on some script or other patterns for more texture.

You're done!
***

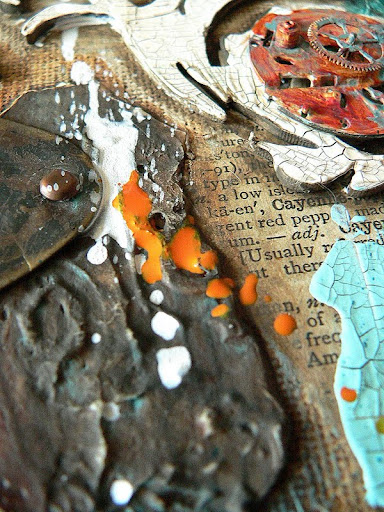
Some close ups as usual:


Thank you so much for reading this far and stopping by! I hope you leave my spot inspired and ready to create your art out! ;)
Hugs and happy crafting!
Claudia
xxx
Two brilliant challenges I enter this paintboard piece to:
The Mirror Crack'd - Anything goes
Anything But A Card - Steampunktember
Ah Claudia,you are one superb artist. I LOVE this,the colours really zing and the details are amazing,I so enjoy looking at your creations and the new decoart stuff looks very tempting too :)
ReplyDeleteBig hugs
Donna xx
Claudia!!!!!!!!!!!!!!! Brilliant absolutely brilliant project!!! I love design, colors, steampunk mood, wonderful!BArbarayaya
ReplyDeleteSigh. So gorgeous! And beautifully explained. Itching to get my hands on this stuff! ;) xx
ReplyDeleteHun this is stunning just love your work hun hugs cheryl xxx
ReplyDeleteI love what you do. Gorgeous.
ReplyDeletehallo liebe Claudia,
ReplyDeleteich bin grad fertig geworden, das meiste hier nachzulesen. du bist ja sowas von fleissig.... bewundernswert. dieser post hier gefällt mit ganz besonders - hier sind sooo viele kreative elemente "versteckt". dank deiner tollen bilder/anleitung kann man es herrlich nachvollziehen.
vielen dank!
alles liebe und bis bald
margit
Mei, ist das großartig! Das ist ja mal wieder eins deiner Meisterwerke, liebe Claudia! Ich liebe ja den Krakeliereffekt und du hast wundervoll damit gespielt :)
ReplyDeleteDeine Farbwahl finde ich ganz toll - und deine Anleitung ist so schön ausführlich, kann echt jeder gut nacharbeiten, vielen Dank dafür!
Ganz liebe Grüße
Evelyn
Ganz, ganz super! Tolle Farben, tolle Struktur und - speziell für mich - ganz tolle Anleitung! Danke!
ReplyDeleteStunning canvas!! Gorgeous texture. I am speechless :)
ReplyDeleteThanks you for sharing your talent with us TMC challenge this month.
Hi Claudia, I am thrilled that you decided to enter the challenge, your work is always amazing.
ReplyDeleteMany thanks on behalf of everyone at The Mirror Crack'd and happy crafting, Angela x
Claudia, this is just too brilliant. I love all the texture and layering. You have the crackle down to a science!!! My favourite parts were the gears with the wire coils, from one grungey industrial parts lover to the next.... Thanks as well for your super comments everywhere. I was so excited for the post today that I barely slept last night.
ReplyDeleteFabulous piece. I love the blues against all the other colours and so enjoyed reading about the process. Thanks for joining in at Anything But A Card this time.
ReplyDeleteLove the crackel paste. thanks for playing in ABAC challenge
ReplyDeleteOh my, what an amazing piece. I really like the blocks of colour, so much texture and fabulous embellishments. The tutorial is really great too.
ReplyDeleteThanks so much for sharing in our first ever challenge. Please do come back and visit with us again
Lin
The Mirror Crack'd
I checked this out on Facebook and now I'm having a second look I am loving even more the colour combinations you choose and the texture you achieved. Thank you for linking to Anything But A Card.
ReplyDeleteLove your rustic feel of your procjeckt. Thank you for participating in our 1sth challenge Anything goes at The Mirror Crack'd challenge blog.
ReplyDeleteMa :)
The Mirror Crack'd DT
Claudia this is BRILLANT. I love all the textures and the color... the way you have built this up is genius... I love it all... really, really a showcase of texture and feelings... GREAT WORK/PLAY. Love, Light and Peace...Bonnie
ReplyDeleteI just love this piece... I love how the paints take to the different mediums. I definitely need to look for some of these products... Thank you for the inspiration
ReplyDeleteSUPER gorgeous! Thanks for sharing with us how you did it! Thanks for joining us at The Mirror Crack'd.
ReplyDeleteI am another participant at The Mirror Crack'd challenge and I simply adore your beautiful canvas. You make fantastic art, and put the project together so well. Beautiful colors and beautiful design. I'm super impressed.
ReplyDeleteAbsolutely wonderful canvas. Your technique is so amazing.
ReplyDeleteMar
Wow so many great techniques, thanks for sharing how you did it, love your wonderful canvas, I found you through The Mirror Crack'd.
ReplyDeleteAnni
This is just amazing... I sat for the longest time enjoying every little part of your creation. I haven't used Decoart Media products before but I am definitely going to look them up. I love the intensity of the paints and the crackle medium is wonderful. Thank you for the great tutorial, lots and lots of inspiration ! Thank you for joining us at Anything But A Card
ReplyDeleteClaudia! This is amazing! Thank you so much for your step by step! I love those colors you chose!! ")
ReplyDeleteThis is really gorgeous! I am new to mixed media and really enjoyed and appreciated your generosity in sharing your techniques. I learned a lot!
ReplyDeleteFantastic tutorial, fabulous artwork!!!
ReplyDeleteLove your canvas
ReplyDeleteThanks for playing along at ABAC
What a great project, enjoyed your step-by-step as well, thanks for sharing it with us at ABAC!
ReplyDelete