Wednesday 8 July 2015

"A House is Made of Walls and Beams...

....a Home is built with Love and Dreams."


Isn't that a lovely quote?
Hello and servus! There's not much going on over here on my blog - due to the heat wave that has hit Vienna last week and while it stayed on let evaporate most of my brain I'm afraid. ;)

Heat and mojo obviously don't go together too well - and a flare of arthrosis (or whatever it is that makes almost all of my joints - especially my fingers' joints - ache and do strange things....I will hopefully know more in about a week or so) doesn't help with this at all. But hey - it could be worse and here I am, trying to enjoy the good things and find my way around the things that might take me down if I waste too much time fighting them. (well....it took me ages and a lot of tears to get to that point honestly...just in case you think these are very wisely spoken words. lol)

So there's nothing new from my studio desk that I could share with you, but I found that I still had images of a project I did for DecoArt for CHA this winter and by now I am allowed to share it with you on my blog - so here it is:


It's an art journal page I did with DecoArt media fluid acrylics, white Crackle Paint, black and white Gesso and Misters.

I started out by applying tiny dots of various fluid acrylics tones directly from the bottles to a sheet of heavy white card (from an old notebook) and then scraping the paints on with an old credit card.


The secret with a satisfying result with this technique is to stop scraping and spreading the paints at the right point (otherwise they start to mix too much and become a mess).

But if you find you overdid your page you can still go in with some additional dots of paint and white (Gesso) after all has dried. You can repeat this step as long as you want or need to. But make sure you finish with the white Gesso.

Spread the Gesso the same way as you did with the paints. This will help brighten and blend in your scraped on paints and also add more depth.


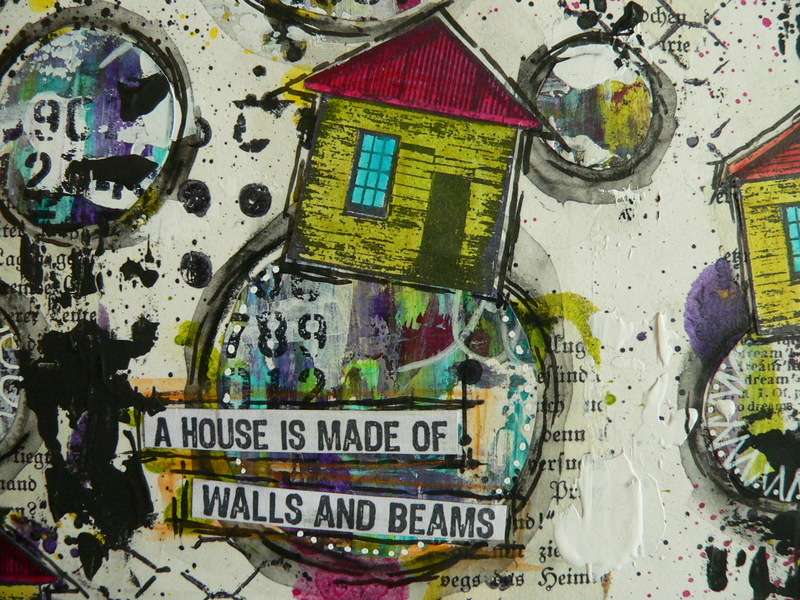
Next I stamped on some small text, numbers and grunge circles in random places, using black archival ink. You can use any texture and text and numbers stamps you like. I used Kaisercraft, Andy Skinner and Red Lead stamps for this step. I also added a bit of doodling with a white Sharpie.

Then I cut out random circles of different sizes. I saw to it that they weren't perfect circles.


I then prepared my journal page by collaging on some torn pieces of old book pages with matte DecoArt Decou-page and stamping on some chicken wire texture in random spots.

After that I sprayed and sprinkled on some of the wonderfully vibrant DecoArt media Mister tones that either matched or contrasted the circles' colours. 

I glued some of the cut out circles to the page and drew an outline with a watersoluble black pencil. I spread the pigment of the drawn lines with a soft water loaded brush.


That creates this kind of "shading" around the circles but still leaves visible lines. I love that effect! On some of the circles I did some doodling with a white Sharpie.


While the page was set aside to dry I stamped the quote and some of the lovely houses from my Darkroom Door "Home Sweet Home" stamp set onto some white card, painted the houses with lightly diluted DecoArt media fluid acrylic paints and cut them out.

I glued them to some of the circles to make them look as if there were a lot of differently sized "floating" worlds or planets with little houses on them. (we all live in our own little worlds or universes somehow, don't we?)


The quote is from the same stamp set and was added the same way as the cut out circles.


To add some more texture I stencilled on the words "Create", "Inspire" and "Dream" using DecoArt media white Crackle Paint, a palette knife and a Red Lead stencil.


For a finishing touch and to fuse all the elements on the page I scraped on some white and black DecoArt media Gesso with a small palette knife, making sure that I also covered part of the circles.


Don't be afraid of loosing lovely detail by covering it up! I promise the more randomly you apply Gesso and paints to your pages and other creations, the more lively and interesting they become!

Our subconscious gets attracted by those spots where things are "in disorder", by everything that is NOT neatly done and NOT symmetrically or otherwise systematically arranged. But of course there has to be some visible order so the disorder becomes visible as a contrast. And contrasts (not only in colour but also in broken "rules" of composition for example) are what attracts our eyes and subconscious and what makes art interesting and "adventurous" and therefore appealing to us.


I hope you liked my journal page (and art theory lesson)! Thanks for stopping by!

Hugs and happy crafting, 
Claudia xxx


Sunday 5 July 2015

"Canvas" - the New Challenge at The Mirror Crack'd

Servus and welcome to the start of the new challenge over at The Mirror Crack'd mixed media challenge blog!

The theme for this month's challenge is "Canvas" and this time I created a little series of three mini canvasses for your inspiration.


 I started with creating a masterboard on some heavy card using old book pages, washi tape, stencils, DecoArt white modeling paste, white scraped on Gesso and Shimmer Misters and some rubber stamping.


The canvasses have about ATC size and I used matte DecoArt Decou-page to glue the cut to size pieces on. Then I smudged some DecoArt Traditions Carbon black acrylic paint around the edges using an old bristle brush to create the scratchy patterns and create a kind of "frame".


Next I glued all my chit chat stickers in place and shaded them in using my black soot distress marker on the still slightly wet Decou-page, smudging it with my finger.


For a finishing touch I sprinkled on some drops of gold spray paint.


The stencil I used is from Red Lead, the flowers stamp is an Indigo Blu design. The chevron pattern was stamped using a Carabelle Studio stamp. The small dots stencil is from memory box.


This month - instead of a physical prize - TMC offer the winner a guest designer spot for a future challenge. And I really would love to see your canvasses (as I am a curious girl and always love seeing art created by others)! So I hope to see you and your gorgeous projects over at The Mirror Crack'd soon!

Hugs and happy crafting,
Claudia xxx 


Saturday 4 July 2015

Alice in Wonderland - 150th Anniversary Blog Hop


Today we are celebrating the 150th Anniversary of Alice in Wonderland, and what better way to do that, than to share lots of creative projects inspired by this wonderful story.

Not only will you see lots of amazing artwork today, but you can also win prizes from the following amazing companies;


Prize winners will be selected from Random blogs throughout the hop using Random.org to select each winner.  In order to be eligible for a prize you must visit all stops on the hop and leave a comment. The prize draws will be open until July 18th, with winners announced on July 20th.

Here's my Alice in Wonderland project for the hop:


I had bought a lovely set of Alice in Wonderland "Quartet stamps" ages ago at ebay and this was the perfect occasion to use them. They are really tiny, so the booklet is too ;)

Its height measures about 1 3/4 inches (4 1/2 cm)!


When it unfolds it reveals all the other lovely images from the set! Aren't they adorable?


As you can see I tried to give my accordion booklet an aged look with cracks and stains and worn edges...it's the 150th anniversary of the story, right? ;)


To achieve that look I first stamped the images in black archival ink and then sealed the whole booklet with a coat of matte DecoArt Decou-page to prepare it for the next step. After all had dried I applied some DecoArt media clear Crackle Glaze around the images and used a fine tip brush that I had loaded with water to dilute and smudge the  Crackle Glaze coat towards the images so there wasn't a sharp edge. 


I left the Crackle Glaze to dry naturally for about two hours and then rubbed in some DecoArt media Raw Umber Antiquing Cream to make the cracks visible. 


After all was dry I sprinkled on some golden and dark brown drops of spray paint and let them dry naturally (which takes quite some time as the surface isn't porous anymore...it took almost half a day...and speeding up the process with the heat tool would have caused bubbles from the layer of Crackle Glaze...so I had to be patient...lol...poor me). 


I applied some DecoArt Metallic Lustre "Gold Rush" around the front and back covers' edges and found a matching ribbon to tie my booklet closed. 


I hope you like it! It really is a rather simple project but the images are so gorgeous that they didn't need much of a show put around them. So here they are...and I never tire of looking at them. 

Have fun hopping and good luck with the prize draws! 

Hugs,
Claudia 
xxx


Blog Hop List

Wednesday 1 July 2015

Steampunk Tic Tac Toe - the Great SASPC Summer Special Challenge

Hello, servus and welcome to today's start of our great summer steampunk special challenge over at SanDee&amelie's Steampunk Challenges!

As most of us will be on holidays during the next weeks we decided to have this challenge run from the start of July until the end of August - which gives you all two months time to create and enter a project! There are also fab prizes to win (yes, prizes!!! ;)

And who doesn't love and enjoy a round of happy, messy, crafty, artsy Tic-Tac-Toe.....!
So my wonderful DT ladies helped me find a lot of yummy ingredients and I made a (rather sketchy) grid for our challenge:

http://sandee-and-amelie.blogspot.com/2015/07/our-great-holiday-summer-special.html
(click on image to enlarge)


Steampunk Tic Tac Toe is played by choosing one of the horizontal, vertical or diagonal lines' ingredients to use them on your project.

I went for the diagonal line the deep sea, metal paints and crackle and created another shadow-box! (those who already know me know how much I love to create shadow-boxes). ;)


My son loves all those mysterious and wonderful deep sea creatures - and so do I! So I created this shadow box for him and it shows his two favourite animals: the giant squid and the sperm whale  (which is one of my favs too).

They are UmWow Studio laser cut pieces which I covered with a coat of acrylic paint and a coat of clear DecoArt media Crackle Glaze after the paint had dried. The white DecoArt media Antiquing Cream finally made the cracks visible and I think it really looks quite close to a sperm whale's skin! Yay!


The images of the aquanaut and the sunken ship are from an Oxford Impressions stamp set and I painted them with diluted DecoArt media acrylic paint before I fussy cut them and glued some thick foam board pieces to their backs.


For the background of my box and for the deep sea landscape I used designer papers and scraps. The silver-y bubbles were stamped on using DecoArt Metallic Lustre and a 3rd Eye stamp.


The aquanaut's helmet, boots and belt were painted with DecoArt Dazzling Metallics paints.


The black smoker was created using a torn scrap from one of my old Gelli prints.


The box I used for my shadow box was a lid from a(nother) chocolate box I had to empty for the sake of art.


The outside of the frame was painted with DecoArt Chalky Finish paint as it adheres to slick surfaces without any preparation. The sunken ship got a coat of DecoArt media Quinacridone Gold. Because of the paint's translucency the stamped image shows through without any loss of detail!


I hope you like my little deep sea adventure! And I would love to invite you to hop over to our challenge blog and check out the creations of my wonderful teamies who have - as usual - outdone themselves!


I wish you all the most amazing, wonderful, happy, relaxing, inspiring, fun,....holidays and hope to see you over at our summer special challenge during the next two months!

Hugs and happy crafting,
Claudia xxx