Monday 26 December 2016

Another Best of 2016...

...this time over at the Calico Craft Parts blog, where the team are sharing their "best of" picks during the next two weeks with you.

Yesterday I have invited you to check out the Emerald Creek Dares blog, today it's the Calico Craft Parts blog. On both you will find some of my 2016 projects and links to the according posts with detailed step by step instructions.

Maybe the holidays are the perfect time to revisit some of them, get inspired and then head off to your crafting desks and enjoy a happy creative me-time!


Hugs and happy crafting!
Claudia
xxx


Sunday 25 December 2016

ECD 2016 - A Year in Review at Emerald Creek Dares

Servus, hi and salut!

I hope you are enjoying a wonderful Christmas - or rather have enjoyed one by the time you are reading this as I suppose you would not spend the 25th round crafty blogland at all... ;)

My wonderful boss, Kim, and me are doing our reviews on our DT projects for this year's Emerald Creek Dares today and I would love to invite you over to the Emerald Creek Dares Blog. The whole team are doing their reviews during these days and will be providing you with a lot of inspiration and links to blog posts with step by steps!  Katelyn has already done her share - so make sure you check out her projects list too!


I have done a collage of the projects I have picked among my sixteen projects as an Emerald Creek DT member so far:


If you go to the challenge blog you will find the link list to all the according posts on my blog. Just click HERE to get there.

Happy holidays! 
Claudia
xxx


Saturday 17 December 2016

"Winter Wishes - Part Two" at Emerald Creek Dares

As already promised here's my last DT project post before Christmas and of course it is all about Christmas as over at Emerald Creek Dares the whole team are bringing out their best

"Winter Wishes" 

(which also is this month's challenge theme) before we all get lost in Christmas preparations and celebrations ;)

Those who have already tried to capture the glittery bling of embossing powders, glitter or other blingish stuff in a photograph will know how hard (and almost impossible) this is! You always have to approach your project from an awkward angle so the light reflects properly and makes the sparkly wonders you have created visible. So this is as good as I could get and I hope you get the idea of the festive bling of my Christmas wreath:


My card was made using six (!) different Emerald Creek embossing powders:

Chinese New Year Embossing Powder (on the poinsettas), St. Paddy's Day Embossing Powder (on the holly leaves), Verdigris Sparkle Embossing Powder (on the berries to the right of the quote), Moss Stone Green Embossing Powder (on the poinsetta and large leaves), Winter's Mistake Embossing Powder (on the pussy willows) and Silvester Kracher Embossing Powder (on the quote).

I also used a clear Emboss It Ink PadEmboss It pens (for the fine details like the leaves and berries) and Distress Ink pads in Evergreen Bough, Festive Berries, Peeled Paint and Iced Spruce and Walnut Stain to tone everything down and ink the edges. 

There are no steps images this time as card making is something I really always struggle with - so there's nothing I could show you that you don't already know or do a lot better than I. lol 
I have taken some close ups though - so you can see the Emerald Creek embossing powders in all their beauty! 


The "Silvester-Kracher" embossing powder that I used for the quote was especially created by Kim for me, the Austrian chick on the DT! Isn't that just awesome?!!! It has the colours of the Austrian flag and "Silvester-Kracher" is the Austrian word for New Years fireworks ;) 


I love the effect of the Winter's Mistake embossing powder!

This image hopefully shows all the different embossing powders together. I like that there are some with glitter, some with glossy and others with matte and textured surfaces!


The Verdigris Sparkle embossing powder is one of my favourites and I think it goes so well with the greens and browns on my card. 


See how the St. Paddy's Day embossing powder glitters?


And those golden sparkles in the Chinese New Year embossing powder are just perfect, aren't they? They definitely add that festive bling to my Christmas card that I was looking for (not too much but not too little of it either ;)


The gorgeous Tim Holtz Alterations "Seasons Greetings"stamp and dies set from Sizzix was a must have and it was great fun to use, die cutting and layering and heat embossing in my studio all afternoon.


To finish up my card I glued some textured ribbon to a cut to size designer paper and layered my wreath on top using matte Decou-Page as well as sticky foam pads for more dimension.


See? No sign of all the glitter and sparkle at that angle (*sigh)...

So what else is there for me to say other than "hope to see you over at Emerald Creek Dares" (so you can check out the challenge and my teamies' makes as well)? Ah, yessss......


To all my dear crafting and non-crafting friends from all over the world, my true blog-followers and -readers and my wonderful DT bosses and teamies 

May the message of Christmas 
fill your life with joy and peace. 
Best wishes to you and your family 
during this holiday season.


Claudia 
xxx


Monday 12 December 2016

Christmas Magic with Calico Craft Parts

Servus and good morning!

As usual on a Monday I would like to invite you over to the Calico Craft Parts blog to check out my latest project and how-to. This time it is a veeery easy and veeery quick project - perfect for the last minute Christmas crafter (like I am). lol

And yes - this wonderful nativity scene is part of my project! Isn't it just awesomely magical?!!!


I would already like to wish you a Merry Christmas as I will only have one more post to share with you before Christmas - and that will be on the 17th. And afterwards I will pretty likely be missing in Christmas prep action. ;)

You and your loved ones have a very merry Christmas
and enjoy the Christmas holidays! 

Claudia 
xxx


Thursday 1 December 2016

Spread Your Wings - SanDee&amelie's December Steampunk Challenge


Servus!

I hope you are all enjoying crafting and baking for Christmas...and maybe also find the time to check out our new "Anything Goes - Steampunk/Industrial" challenge over at SanDee&amelie's Steampunk Challenges!

There's a huge bundle of inspiration waiting for you today as this month the whole team present their makes in one go (except my wondeful friend Kerstin, who will share her project with you a little later this month, so you have a bit of a reminder to play along with our challenge and by doing so maybe win one of our two prizes or make Top 5!). And we also have a wonderful new DT member to introduce to you! Yay!


This is my mixed media steampunk make for December:


I got this fab mechanical wing chipboard set from boozybear - one of our two prize sponsors. And of course it is the mechanical wing of a Christmas angel - just look at the wintery, frosty colours. ;)

But of course the quote on my canvas also is one I hope to be able to live by a bit better in 2017 - to spread my wings and try free myself a bit more and better from the burden challenge of my chronic autoimmune illness. It is hard to find the right balance...if I have too much action going on, the fatigue will take me down even more afterwards. If I try to play it safe and "stay calm" I feel my life is taken away from me by my condition. If I talk too much about it, it makes me feel even more ill than I actually am....and if I don't mention it at all, everyone expects me to be "available" at full speed and power (as my illness doesn't show on the outside...other than the annoying weight gain). So it is tricky to handle and finding that balance maybe even is the hardest part...but still...I hope to regain a bit of that lightness in thinking and acting...and letting go.

But enough earnest talk - being creative always is someting that lightens my spirit and/or makes me forget about pain or stress for  a while. And this particular project totally drew me in during its making - which is the best thing that can happen, right?


I played around with loads of DecoArt media texture mediums....white Crackle Paste, white Crackle Paint, white Modeling Paste...just to name a few.

But let's go into detail:

I added a layer of Raw Umber acrylic paint to the pieces and let that dry.


Then I applied a coat of white DecoArt media Crackle Paint and put the pieces on top of our heating to speed up the drying process.


Once the cracks had appeared I glued the pieces together using matte Decou-Page.

Using a palette knife I scraped and dabbed on some white Modeling Paste to the points of the wings.


The dabbing motion of the palette knife created this fabulous texture:


White Crackle Paste was randomly spread across a canvas and the wing was put right on top. The Crackle Paste also works like glue - so once it had dried the wing stuck to my canvas properly. 


Then I started adding some Stampendous mica flakes in different tones alongside several washes of various DecoArt media fluid acrylic paints like Quinacridone Gold, Burnt Sienna, English Red Oxide, Transparent Yellow Iron Oxide and Cobalt Teal Hue.


The flakes were added by applying white Gesso and/or matte Decou-Page with a brush and sprinkling them on. I used my fingertip to dab a Cobalt Teal Hue border around my canvas.


DecoArt Orange Flickr Metallic Lustre was added to the areas I had put the Modeling Paste on.


I stamped my quote with black archival ink onto a piece of protective paper and cut the words out. Then I glued them in place using matte Decou-Page and traced the outlines with a black watersoluble pencil. With a wet fine tip brush I "smudged" the black outlines to blend the words in with the background.


Et voilá!


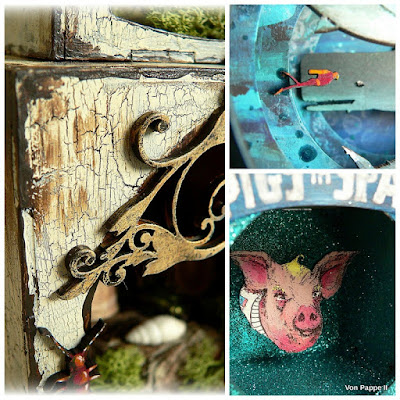
Some close-ups of details I like...


...and the finished canvas:


And now I highly recommend you hop over to our challenge blog to get yourself a heavy dose of inspiration! Thanks so much for stopping by! Enjoy the advent season and I hope to meet you over at SanDee&amelie's Steampunk Challenges soon!

Hugs and happy crafting!
Claudia
xxx

also a