Seiten

Friday, 28 June 2013

Winner of my blog candy!

Thank you all so very much for celebrating with me! And thank you also for all the  congrats and kind words!

So without any further ado I present you the lucky (randomly drawn) winner of my blog candy:

Lillibelle!


Congrats, Gabi! I will try to get your package with the mail as soon as possible (though it may take a while as I am dealing with a rather nasty stomach flu at the moment... )


Hugs,
Claudia xx

Thursday, 27 June 2013

Great teachers...

..are sadly not a matter of course, but our son was so lucky to have two wonderful years with three awesome teachers, who have been putting all their humanity, wisdom, heart and knowledge into their job to make my son a more self confident and happy school kid (after a not too good start with his first two years at a different school and with a different teacher, that had made us face severe problems like school anxiety and great lack of self confidence even though he is a smart boy - which his latest school report gladly shows!).

As a thank-you-gift from the deepest bottom of my heart (being myself a teacher and knowing about school kids' AND teachers' problems), I bought them some gift coupons and made three tags with envelopes on them to put them into.


First I die cut the three envelopes and coloured them with various Distress inks in blues and greens. After I had folded and glued them into shape I stamped some of my lovely hedgerow images onto the tags and envelopes using dark blue archival stamping ink.


The white lace and blue linen ribbon were sewn to the tag and the blossom twigs were fixed to the tag using blue twist. I used the same twist to close the envelopes. Done!


Thank you for stopping by and happy crafting!

Claudia - die amelie x

Saturday, 22 June 2013

Swap with Ana K.!

Great news today! I was so lucky to get wonderfully talented Ana K. to do a swap with me!!!!

We decided to create tags for each other and look what she sent me:


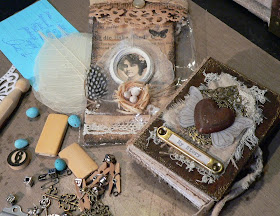
Unbelievable!!!! Loads of awesome goodies alongside her wonderful tiny handmade book (which I have been admiring since I first saw it!!!) and the gorgeous tag she made for our swap!


I haven't removed the package of the tag yet as she also did that in a wonderful way ;)


Isn't that a stunning make!? I love that tiny nest, the enameled mini tag and the lovely portait in the beautiful frame, the feather and the lace and the great background!!! It's a perfect treasure and it is mine!

To have a closer look at her stunning handmade book, click here

I sent her a tag that also has a portait in the centre. I stamped it on a gessoed bookpage scrap, sewed it to a piece of fabric and put it behind a piece of acetate that was treated with alcohol inks and sanded at the edges. All was fixed to the tag using tiny brads.


For the tag's background I created several layers that I blended with some DIs. Especially with the torn edges!
Before adding some spreckles of colour using Distress stains, a soft painting brush and my hands to flick droplets of colour onto the surface, I gave the surface some brushes with a wet painting brush, thus creating "traces" of watercolour alongside some brighter areas.


Then I stamped the Darkroom Door and the BoBunny image onto the tag using archival ink "rich cocoa".


I filled a bottle cap that I had rusted by leaving it on my balcony for some weeks in some vinegar and salt with some "treasures" and UTEE and heated it with my heat gun from below, holding the bottle cap with a pair of tongs.


The top of the tag was stamped with the lovely BoBunny stamp:


and the ribbon was sewn to the tag together with the vintage button.

I also die cut some "tattered florals" and a small banner from various ribbons and glued them to the tag with the bottle cap on top.


I sewed some ribbon and a strip of aged paper to the tag's bottom to create a lovely border. Done! I hope that Ana likes it too, as I sooo LOVE what she sent me!!! I put the treasures she sent me in my new display cabinet, so I can have a look at them every day!


Thank you so much, Ana, for doing this swap with me! It was so much fun and I really loved creating something for you and sending you some goodies along with it (to see what you will create with them ;)

Big hug,

Claudia - die amelie x

Friday, 21 June 2013

"Look left!"

As I love noir comics I also love dark stories - and both is brilliantly combined with the graphic novel "From Hell" from Alan Moore and Eddie Campbell.

Inspired by the book I designed and carved a new stamp today and used it to create this scene with:


Stamps used with this tag: one of my own design and some of Darkroom Door and Artemio.


As this is a "new style", according to a new stamp design, I enter this tag (again) with FSC's "Something New/New Style" challenge ;) and as this is definitely a "Men's Tag", I also enter The Artistic Stampers "Makes for Men" challenge with it.
I also enter Stampotique's "Anything but a card" challenge with it as it is a tag.
Aaaand it also works well with Out of a Hat Creations' challenge "Transport".  ;)
City Crafter's Challenge "Clean and Neutral" seems just to be waiting for my tag *lol.
I also recently discovered PunkyouGirl's challenges - as their first challenge is "anything goes" (as long as it is "dark", "gothic" or otherwise punk), I enter my tag with their challenge too.

Hope you like it!

Hugs,
die amelie x

Thursday, 20 June 2013

Simplify, simplify II

This time I want to present you my very first own stamp design, used on one of the tags I created when playing around with Distress paints for the first time some weeks ago.

I thought the colours of the background were a perfect match with the hot weather - blue sky above, sun heating and you think you can almost see the heat that surrounds you.


As the images are stamped over distress paints, they look somehow transparent with some spots, thus creating a kind of depth combined with a light feel to it.


 For my dandelion leaves stamp
I first made a sketch using a pencil
and a dark brush
felt tip pen. After I had transferred the image upside down to my carving block I cut out the shapes carefully. From time to time I made a print for a test to find out where I had to cut off some more. I trimmed the edges of my leaves and grass until I had the desired look. Then my very first self made rubber stamp was ready for use!!! Coooool and so much fun!


The word stamps are from Artistic Outpost, the tiny dragon fly is from DeStempelwinkel.


I enter FSC's "Something New/New Style" challenge with this tag.

Hugs,
die amelie x

Wednesday, 19 June 2013

SIMPLIFY, SIMPLIFY.

As I was a lucky girl to get to buy the lovely Artistic Outpost stamp sheet "Old Grist Mill" second hand from Rosie AND they already arrived today, I had to use them immediately for a tag.

I also was inspired by Fashionable Stamping Challenges' "Something New/New Style", The Artistic Stamper's - "Makes For Men" and SSSaS's "Kraft" challenges, which I enter this tag into. I also enter the Artistic Outpost's June Referral Program with it.

Something New - yes, to ME my new stamping sheet is as good as new (and Rosie really took great care of it, so it arrived merely as good as new) AND I guess I also did a new style - working with Perfect Pearls for my very first time, creating the background for this tag.

The grungy look and the muted colours work perfectly for makes for men I'd say and Kraft is the material of the tag - a piece of packaging material I kept, as I love the natural Kraft look.


The "create" stamp is one of my self made ones from funky foam (for the how to click here). I heat embossed this image using Ranger embossing powder "walnut stain".

I rusted the bottle cap myself (which was actually a lot of work - I left them in a plastic container with some vinegar and salt on my balcony for some weeks ;).

Then I filled it with some "treasures" and UTEE and heated it from below, holding the bottle cap with a pair of tongs.

It was glued to the tag together with the piece of burlap.


I used a piece from the tag's ribbon (which I won alongside with a lovely assortment of various ribbons as a winner of  Zeus and Zoe's last challenge :) to "frame" my chit chat sticker, and fixed it to the tag with some Chronology brads.


The tag's background was made with the Tim Holtz "Wrinkle Free Distress Technique", using Perfect Pearls alongside some Distress inks.

When the tag was totally soaked, I crumpled it to a ball and rolled it between my palms. Then I unfolded my ball carefully and started to dry the tag. That way I created a kinda "faux leather" effect, which I definitely LOVE! ;)


I highlighted some of the raised areas, blending them with DI "vintage photo", which I also used for blending the tag's edges. Done!

I hope you like it!
Also a big thank you so far to those who have already been celebrating my blog anniversary with me! (See sticky post). I wished you could all be winners ;)


Hugs,
Claudia - die amelie x

Tuesday, 18 June 2013

Mom's little angel

Welcome to another fortnight's challenge over at

This time our theme is 
Angels and Demons

and we were once more provided with some gorgeous Dilly Beans Digi Stamps as they are our sponsor for this month.

Mom's little angels - we all know them....no matter what they do, how they behave or how they may appear to others - for their moms they are always the world's most perfect little angels and that's actually (most of the time) a good thing ;)


This time I used some blow felt tip pens and a stencil cut from a copy of the printed image to create a fun background with a lot of movement in it.
Together with one of the grungy Tim Holtz texture stamps and the die cut bats they were meant to be a somewhat messy and playful surrounding for the little angel with her cute balloon bat. I wrote the words by hand using a black felt tip pen, which I also used for adding the faux stitching border.


I had lots of fun creating this tag for your inspiration and hope you will have fun too creating an entry for our "Angels and Demons" challenge!


See you soon!

Hugs,
die amelie x

Happy mail!

I just HAVE to show you what dear Rosie from Rosie's Bastelwelt sent me as a surprise:


Isn't that a lot of wonderful Steampunkery? Each peace is even more brilliant than the one before... I LOVE the altered tin, the card, the altered playing card and the white tag!!! I already admired them when she first posted them with her blog, but now they are all mine! I hardly can believe it - lucky me!!!

Thank you so much, dear Rosie, for surprising me with all this great stuff! You do Steampunk sooo very well and you really put a big, big smile on my face, that will return each time I look at your awesome makes in the future! (I have put the lovely altered tin on my writing desk, so I see it every time I write my posts or check mails ;):

Big hug,

Claudia xxx

"Flowers" at FunwithATCs

Flowers

is this fortnight's theme at FunwithATCs 
and we would love to see many of them 
with your ATCs you will (hopefully) 
enter with our challenge ;)


As you know I am not very much of a "flower-girl", they always come with some special spin with my projects... this time I used the Tim Holtz tattered florals Sizzix die to create not only my flowers with but also use the card the flowers were cut from as a stencil for my ATC's background. 


I did a lot of layers, blending the white card background with various DI colours.


After that I applied the cut out flowers to the background, overlapping them here
and there. Some final touches with my beloved white gel pen... and heat embossing with clear and white embossing powder and embossing pen...some metal flower brads... done!

I hope you like it and look forward to seeing a whole flower parade over at our challenge blog soon;)


Hugs,
die amelie x


Monday, 17 June 2013

The Key - Tutorial for making your own antique key

Hello and welcome, my dear readers and followers old and new! Today I have something special for you: a tutorial!

During my studies trip in Turkey I stumbled upon some beautifully large and aged looking metal keys and I took one with me as a souvenir. Recently I had the idea of creating my own large antique key using wood, corrugated card, tissue tape, sand paste, some wire and acrylic paints... this is what I came up with:


To make your own antique key you will need:

- DecoArt Traditions Acrylic Colours: Raw Umber, Transparent Red Iron Oxide,
Titanium White, Phtalo Blue and Phtalo Green-Blue


- A 20 to 30 centimeters long wood dowel with about a small finger's diameter

- Fine sand texture paste or DecoArt Texture Fine or DecoArt Dimensional Effects Paintable Texture Paste (if you want your key's texture a bit more grainy you can mix some bird sand into it)

- A small piece of thick corrugated card (I always use packaging material)

- House-painters duct tape

- some thick wire (which should be easy to bend: best  use crafting Aluminium wire)

- Brushes, scissors, a palette, pliers, a handsaw, sanding paper, a crafting knife


***

1. Shorten your wood dowel to your desired length using a handsaw.

2. Slightly sand the ends using sanding paper.

3. For the key's head I bent some aluminium wire to an interesting shape and fixed it to the dowel winding the loose ends of the wire around it several times. Then I covered the whole blank shape with many strips of duct tape. Don't mind the wrinkles - they won't be visible in the end. Just make sure that there are no loose ends or big wrinkles - small ones are welcome ;)


4. To make the key's burr cut some thick corrugated card (from packaging material) to shape and fix it to the dowel using the duct tape. It helps, if you prepare a lot of very thin and short strips at once (I always glue them to my desks edge with the ends and take them from there).  Try to cover all the sides of the burr so they are flat and paintable.

If you want some more texture, you can fix some shashlik sticks to the key's arm, using the duct tape, covering the dowel at the same time with this step.


5. Next I covered my key with DecoArt Texture Fine (you can also use DecoArt Paintable Texture Paste), which I mixed some bird sand into. For applying the paste I used my fingers mainly (and a thin old brush too for the trickier spots). 

I put it to dry for some hours.

It looked like this now:


6. After this has completely dried give it a coat with DecoArt Traditions "Raw Umber".


7. Then apply a wash of DecoArt Traditions "Transparent Red Iron Oxide" and let dry.


8. Give it another (thinner) coat with DecoArt Traditions "Raw Umber" and let dry. You do not have to cover every single spot this time, so the Red Iron Oxide will show through with some spaces.

9. When it is completey dry, mix some DecoArt Traditions "Titanium White" with "Phtalo Green-Blue" and a bit of "Phtalo Blue" until you get the desired patina look. Dry brush your key with that mix paying attention that you only apply colour to the raised areas, not the whole key's surface. Done!

Wallaah: your own antique key (to your own antique castle or just to your fortune...who knows ;)


I hope you have fun creating your own keys! Thank you for stopping by and

Hugs,

die amelie - Claudia x


More Mixed Media and Altered Art Tutorials from some very talented fellow crafters and artists can be found over here.


Follow on Bloglovin

Sunday, 16 June 2013

Bloglovin' stuff

Just ignore this post, as it is only my attempt to claim my blog for bloglovin' .... ;)

Follow my blog with Bloglovin

Saturday, 15 June 2013

OurCreativeCorner Mid Month Inspiration - "Recipe"


Hello, my dear crafting friends and followers (and new readers of course)!

The "mid month team" from Our Creative Corner which I am in is here to present you some more projects for inspiration, so we can see your projects entered with our June challenge soon! ;)

This time we are to choose "ingredients" from a "Recipe". 
(I love this kind of challenges ;).

To see what you may choose from, hop over to Our Creative Corner and find out what Jenny aka Buttons has prepared for you.
I chose ribbon, lace and fabric from list A, metal from List B and inks and paints from List C to create this tag:


I covered the die cut tag first with a layer of old rose acrylic paint and applied a layer of crackle medium after it had dried. Over that I went with beige and pale blue acrylic colours. Then I left all to dry and let the magic of crackling happen ;)

On top of that I stamped the lovely "Fleur de Froment" advert from the Tim Holtz "French Marketplace" stamp sheet using sepia archival ink.

After that had dried I partially stamped the wonderful Redlead damask pattern using embossing ink and heat embossed the patterns fragments with white embossing enamel.

The edges of the tag were distressed and blended using "vintage photo" DI.


I added some shabby looking ribbon I bought at "Depot".


Then I stamped a perfume bottle image onto some white fabric, which I toned down using DI "broken china". I glued the fabric onto the tag, blending the upper and lower edges with a self adhesive lace ribbon.

On top of that I glued a Prima fabric flower and added a small rose to the center.

I stamped the "Nightingale" text image from the lovely TJ Designs "Birds of a Feather" collection onto some beige card using DI "aged mahogany". With the same colour I blended the distressed edges of the small cut out piece of card.

Then I fixed the metal heart (from Redlead) with a sticky pad and some rough cord to the tag and stuck the nightingale snippet behind the heart and the fabric (and fixed that also with some double sided tape to the background of the tag).


Done! I hope you like my take on a shabby chic tag (don't do shabby chic very often as I find it quite difficult to do, but this time the crackling lead the way and this is how my tag turned out in the end). :)

Hop over to OCC and see what my teamies have in store for some more inspiration on our Recipe-challenge! Thank you for stopping by and I look forward to seeing your entries with our challenge! I leave you with some additional close-ups as usual ;)


Hugs,
die amelie - Claudia x