Servus and hi!
I hope by now Spring has arrived wherever you are and that you are full of energy!
What do I have in store for you today? Well, if you have missed
yesterday's post here in my blog (which provides you with a preview and a link to a new DecoArt tutorial which I am really proud of and hope you will like) I would love to invite you over - just scroll down to the previous post after you have read this one or click
HERE.
And today's post is about the actual challenge over at
SanDee&amelie's Steampunk Challenges. If you haven't checked it out yet I highly recommend you do so - we have a great fun challenge theme, great makes from both the Design Teams and
Inspiration Emporium are this month's prize sponsor! Yay!
My first thought that immediately came to my mind when reading our theme for the month was that wonderful adorable curtains-scene from the old "Wizard of Oz" movie when Toto reveals the true "wizard" by pulling aside the green curtain.
I just love when - already being "unmasked" - the "wizard" slightly paniccing and hastily pulling some gears and pressing his buttons yells into his microphone "Pay no attention to that man behind the curtain!!" I sometimes use this quote too when finding myself fiddling with something that somehow goes surprisingly wrong while being watched... lol
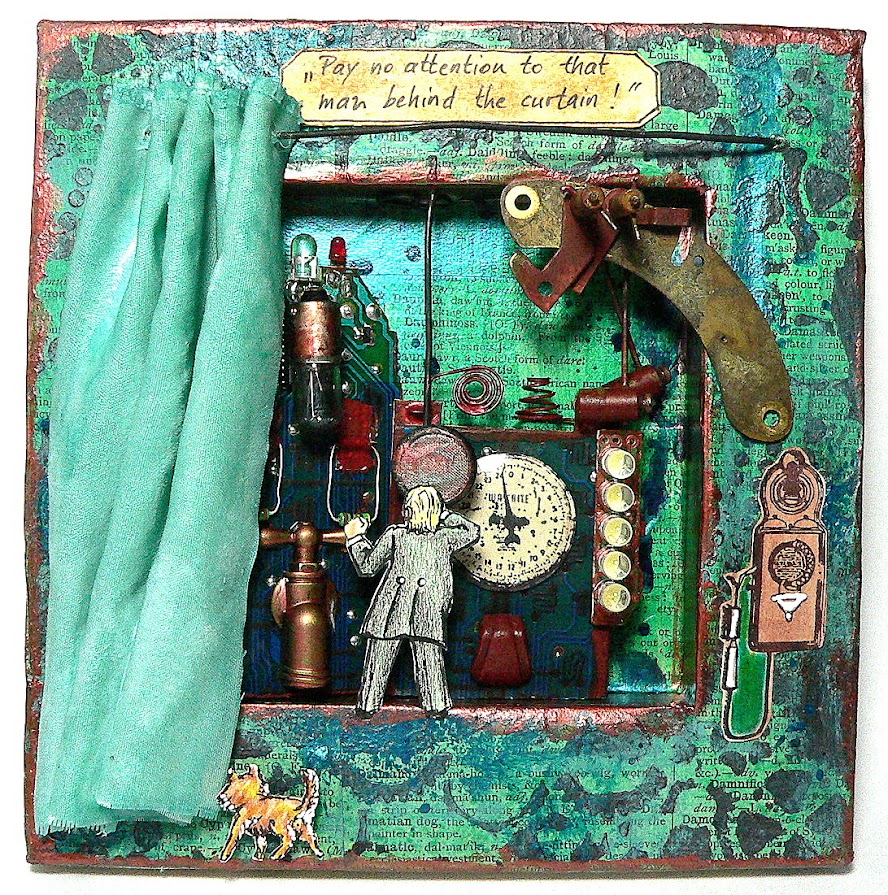
So let's raise the curtains and show you my altered canvas which I turned into the place of Oz the Great and Powerful.
It was really hard to photograph my altered canvas as I hardly ever managed to capture the sheen of the
DecoArt Shimmer Misters and
Interference paints I added, but I think the images give you at least a slight hint of the metallic green sheen that I tried to achieve as it is the main colour of the scene in the movie.
I added a three dimensional curtain of course, which I made from a piece of cloth (cut from an old napkin) that I dipped into previously tinted
Paverpol.
Paverpol is a great new liquid medium for mixed media artists that hardens once dry but stays flexible for quite some time so you can sculpt it the way you want. You can either brush it on or dip your fabric into it. I discovered it at this Spring's creative fair in Vienna and this was my very first go at it (and it worked pretty well for me).
As you can see I fixed my curtain to a real curtain rail I made from wire. The whole shadow frame was done in a reversed canvas which I first coated with old dictionary pages that were glued on with matte
DecoArt Decou-Page to have some tooth for my paints to adhere to and some background texture as well.
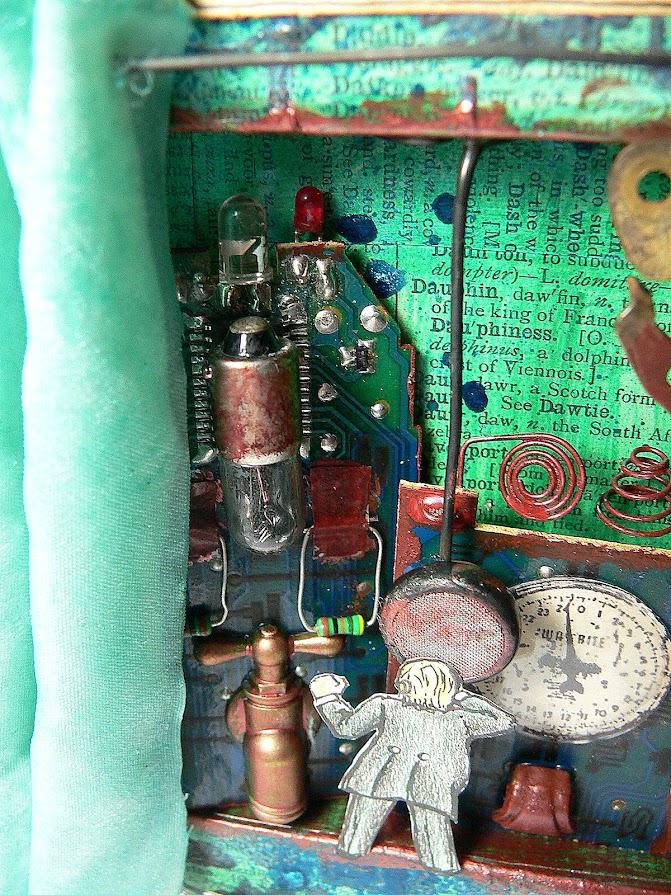
The control desk of Oz the Great and Powerful was made from the circuit board of an old (taken apart) remote control, which I sawed in two and glued some other small parts onto (like resistors (thank you, Brigitte! Yes, I still have some of the ones you sent me! Mwah!X), some LED bulbs, an idea-ology light bulb, a piece of a broken hook from a hiking boot, a Prima faucet embellishment...) to make it look like there were a lot of switches to pull and panels to control.
The microphone Oz speaks into is an old ear plug from a disc man my son found and brought me (he always brings me found metal parts like screws or washers to use them on my projects ;). I glued it to a piece of wire I had bent into shape and glued to the top of the frame (with Decou-Page) so it looks as if it was hanging down (just like in the movie).
The round pressure control panel was stamped onto beige card (using one of finnabairs new stamps), cut out and glued behind a watch glass from my watchmakers cabinet.
Oz the Great and Powerful was drawn by hand and coloured with colouring pencils before I fussy cut him and fixed him to the frame and microphone with Decou-Page.
Brave Toto was done the same.
He's about 3/4 inch tall in real and I used a fine detail cutting knife to cut him out. He is fixed to the frame with two layered and cut to size 3D sticky foam pads.
I really tried to capture all the "drama" there is to this scene....lol...and show that key moment when Toto has just pulled aside the curtain and Oz (finding himself exposed) says his epically desperate sentence.
I admit - if I were able to add sounds and smoke to my make I would have. ;)
The metal piece in the top right corner is a piece from a taken apart alarm clock which I bought at the flea market and enhanced with some dashes of
Viva Rusty Paper. I also used it on some of the wire pieces alongside some
Ranger alcohol inks to make all the pieces blend together and build a warm contrast to the cool green.
The five LEDs to the right are from a broken headlight. The old telephone is a
Stampendous stamp from one of my very first stamp sets I bought. I stamped it onto some beige card and painted over it with a very light wash of
DecoArt Quinacridone Gold.
The quote was written by hand onto a die cut panel (using the fab
Sizzix Tim Holz Alterations "Labels" set) that I had aged with some Distress Stains before.
The gears texture you can see running around the outer frame was done using a mask and Viva Rusty Paper that was stippled on with a bristle brush. Then I painted over the dried texture with
DecoArt media fluid acrylics in various greens and blues (including "
Interference Turquoise" and "
Interference Green")).
For a finish I dabbed some
DecoArt Dazzling Metallics paint around the outer and inner edges of the frame (using my fingertips as always of course) and also sprinkled on some DecoArt Shimmer Mister in turquoise (by unscrewing the bottle and letting some of the paint drip from the nozzle's tube onto the areas I wanted). All silvery metal parts were either treated with alcohol inks or painted with
DecoArt media fluid acrylics Quinacridone Gold or Viva Rusty Paper until I was content with the result.
And once all had dried I added my curtain which I admit was a bit scary as it was the first time I used Paverpol. So I did a test panel first to find out if it was tricky to use and about any dos and don'ts....well, even though I had done a practice piece I still was hoping that I would not mess up my frame with the glibbery, wet cloth. I think I only started breathing again once I found that all seemed to develop the way I had intended...lol.
Toto and Oz the Great and Powerful were added at the very end (because I needed Toto to pull the curtain of course and Oz to speak into his microphone).
I had a great time doing this shadow frame using the backside of a 6x6 inch canvas and I really am very happy with the outcome as I have managed to capture one of my favourite scenes from one of my favourite movies.
I hope you like it too and I would love to invite you to hop over to
SanDee&amelie's Steampunk Challenges to check out the makes of my fabulous teamies who have outdone themselves on this month's theme
"Raise the Curtains!".
I hope to see you join in our challenge soon!
Hugs and happy crafting,
Claudia xxx


