Seiten

Thursday, 24 March 2016

Easter Parade at Emerald Creek Dares!

Hi and servus again! This is my second post today, so if you have missed my invitation to my second appearance as  guest designer for Calico Craft Parts find out about it HERE.

But this post sees me designing for Emerald Creek and my lovely boss Kim Evans! This time I am sharing an Easter project that is a little "different".

Over at Emerald Creek Dares today the new challenge showcases the amazing Emerald Creek "Easter Parade" embossing powder (love it!). You all know me - I am not really good at doing cute, I am more the grunge type of crafter - so even if that embossing powder is a pastel yellow with beautiful blue and lilac sparkle and iridiscence in it and I love it for being all of that, I still
didn't succeed in overcoming my darker, grungier side. lol


I call this my ANGEA - my "Absolutely Non-Girly Easter Assemblage" and it originated from looking at this emptied egg container for quite a long time:


And I swear I was thinking (or rather trying to think) of some cute bunnies and/or eggs, grass and chicks being stuffed carefully arranged into this container, have it embellished with bright and lovely spring papers or colours - and make the Easter Parade embossing powder the perfect addition and star to my little Happy Easter project.

About ten minutes later I found myself having ended up with this - a piece of (thoroughly) cut to size foam board and the cut off back and lid of the egg container. 


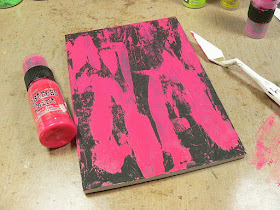
Then I created an Easter-ly black (!) background by spreading black Gesso all over the foam board with a wide soft brush. So much for my cute, bright Happy Easter project.

After the Gesso had dried I started scraping on various tones of Distress paints with a palette knife, letting each colour dry before I added the next.


The egg container parts were painted in a soft purple and heat embossed using the Easter Parade and St. Paddy's Day Emerald Creek embossing powders.


I also randomly dabbed on some of the Distress paints I had used on the foam board onto the egg container with an old hard bristle brush.

Four of the lovely Emerald Creek "Fleur" brads were customized by dabbing on some "twisted citron" Distress paint with my finger.


To make my egg container blend in with the background panel I also added smudges of Easter Parade embossing powder to the painted foam board. 


Next I assembled my painted pieces and smudged some black soot Distress Crayon around the foam board's edges to create a visual frame. I also stamped some scratches on top of the Distress paints for a more industrial and grunge look.


The Distress Crayons smudge perfectly like this and stick really well to the Distress paints!

The outer edge of the foam board was covered with some washi tape of a matching colour.


The heat embossed label was given some outline smudges of black soot Distress Crayon too. And a happy easter chit chat sticker was stuck to the label for a finish.


I added a small Easter egg and some green faux grass - et voilá! 


Please, hop over to Emerald Creek Dares to check out the projects of the team! I would also love to see you play along of course. ;)

Happy Easter to you! 
Hugs and happy crafting,
Claudia 
xxx

http://emeraldcreekdesignteam.blogspot.co.at/


Emerald Creek supplies used: 


Calico Craft Parts - Guest Designer Appearance - Part 2

Good morning everyone!

I am so happy and proud today as I am featuring my second guest designer project over at Calico Craft Parts today and would love to invite you over to have a closer look at what I created from these awesome Calico Craft Parts items:


Of course I chose their fantastic stacked cube shrines...who wouldn't. lol

Here's a little sneaky peek for you as well:


So I hope to see you over there soon. Click HERE to get to the post.

A huge THANK YOU once again to the lovely ladies from Calico Crafts for having me! I had such a wonderful creative time working with your fantastic products!

Also, please, check by my blog later today as I will be sharing my latest Emerald Creek DT project too.

Hugs and happy crafting!
Claudia
xxx

Tuesday, 15 March 2016

Happy Steampunk Easter!

Servus and Happy Easter to you!

Yes, yes...I know...there are still two more weeks to go but I am not early with starting painting some Easter eggs, right?

And as our March challenge over at SanDee&amelie's Steampunk Challenges ends shortly after Easter, I thought I could already send some wishes your way and share a steampunk Easter egg with you:


I used a goose egg as they are larger and harder and therefore easier to work on. The fabulous steampunk chipboard pieces are from the range of our new challenge sponsor boozybear! You really should check out her Etsy store - she has the most fantastic steampunk designs!


 You can see the egg before the painting process. I stamped the cool steampunk image from Crafty Individuals onto some tissue and glued it to my egg with slightly diluted matte Decou-Page from DecoArt. Then I painted over the dried image using Distress markers and DecoArt Media fluid acrylics.


 The rust effect on the winder and jar ring was achieved by first dabbing on some DecoArt Media Sand Texture paste in some areas and then painting over the dried pieces with Quinacridone Gold, Paynes Grey, Diarylide Yellow and Transparent Yellow Iron Oxide - adding some paints directly from the bottle, others as washes and layering them until I was content with the look.


 The pieces were fixed to the finished egg using DecoArt matte Decou-Page.


As you can see I got some wrinkles from glueing the stamped on tissue to the egg as the image was quite large. But honestly I think that it adds to the distressed and worn look. No place for neat 'n tidy there.


I glued one of the gorgeous idea-ology ring fasteners to the bottom so I could add a gear embellishment.


I cut the "happy easter" chit chat sticker in half and stuck it in place. Then I slightly blended the edges with a walnut stain Distress marker.
Voilá!


Have you already started painting Easter eggs (or is this a tradition that is slowly dying out)? I haven't done it for quite some time but I really enjoyed doing this one and think I might do some more!

I would love to invite you over to our steampunk challenge blog to check out the makes of my fabulous teamies and maybe even get a little imaginative spark for a project to enter to our challenge!

Hugs and happy crafting,
Claudia 
xxx


Saturday, 12 March 2016

Guest Designer at Calico Craft Parts! Yay!

Hi and servus!

I am very excited today because I am guest designing over at Calico Craft Parts who generously invited my to do two posts for their blog - which means I was allowed to lay hands on some of their awesome MDF products! Yay!


I had the most wonderful time creating with these fantastic pieces from their fabulously wide range of wonderful MDF parts:


So if you are curious now and want to know what I created with these beauties, hop over to the Calico Craft Parts blog to see the whole finished project and also find out a bit of the process behind it.

Here's a little sneak peek for you:


Hope to see you over there! And I will be doing another guest post over there two in two weeks! So stay tuned!

Hugs and happy crafting,
Claudia 
xxx

http://www.calicocraftparts.co.uk/

Thursday, 10 March 2016

Fearless Spring!

Servus and welcome back to my little creative spot close to the beautiful river Danube!

To me spring is the "fearless" season as it overcomes winter's "death" and decay over and over again each year. I love it when the first greens and little dashes of colour bravely start to reconquer what has been covered in pale whites, dusky greys and rotting browns for months and I tried to capture the nature of this special time of the year in this little altered canvas:


Emerald Creek products used:
EC St. Paddy's Day embossing powder
EC Easter Parade embossing powder
EC Oil Rubbed Bronze embossing powder
EC Fearless Buckle Charm
EC Skull Charm
Distress paints
Distress markers
Distress stains

As the list above already indicates: this is my DT project for the actual challenge 

Ring in Spring!


http://blog.emeraldcreek.ca/


The ladies on this fabulous DT have all outdone themselves once more to show you some fresh greens and first spring colours - so make sure you check out their makes!

I really enjoy being on this DT as it gives me the possibility to use my beloved Tim Holtz Sizzix dies and Ranger Distress products! And this challenge theme was perfect for also using a sheet of Tim Holtz' gorgeous "Wallflower" paper stash (I have been hoarding for ages now).

What I did was flip over a small canvas and use it as a shadow box.


To make the sheet fit in with the canvas opening I took the time to exactly measure and draw a template - but the result was, oh, so worth it, wasn't it?

I have taken steps images of this process and of my sketch for the template and will try to write up a detailed tutorial on this during the next few weeks (promise!).


But for now I will just share some of the steps on how I made this specific altered springtime canvas.


Once I had glued my cut to size designer paper in place I started with blending the edges with brown archival ink using a piece of cut 'n dry foam.


You can see the difference that makes. Using archival ink prevents the dried ink from smudging, tinting or bleeding through when it gets in contact with moisture (e.g. from wet paint or other fluid media) afterwards.


Next I prepared the cool Emerald Creek buckle and skull charms I wanted to use on my canvas by cutting off the loop and covering both charms with a thin coat of matte medium (to add some tooth for acrylic paints to hold on to).


The skull was then covered with some dabbed on picket fence and frayed burlap Distress paint and set aside to dry.


The "Fearless" buckle charm was coated with Distress paints squeezed lemonade, black soot and mowed lawn...dabbing on and off the paints until I was content with the look.


The next step was to add some dashes of dark green Emerald Creek embossing powder to the frame...


...and the gorgeous Easter Parade and St. Paddy's Day embossing powders to the die cut crown and flourish:


As you can see I also scraped on some Distress paints (using a palette knife) to repeat the colours of the egg, crown and bird to help fuse all the elements into a coherent piece of art. I did that before I glued all my pieces in place.

The bird on its branch (like the mini crown and flourish also a Tim Holtz design) was die cut from the left overs of the same sheet I used to cover the back of the canvas with and then coloured with Distress markers and stains. The latter were applied using a fine tip soft brush. Colours used were: old paper, fired brick, broken china, frayed burlap and ground espresso.


The little egg and nest were then glued in place using matte medium.


The two word tiles were stamped onto scraps from the used designer paper sheet, inked around the edges and glued in place using sticky foam pads. I also dabbed on some of the paints I had used on the canvas to make them blend in.

Et voilá!


I have to admit I really like how this piece turned out as I tried to capture the feel of that special (and short) time when spring and winter meet and moist dark soil and rotten, bleached grass and leaves slowly get displaced by fresh greens, yellows and blues of crocus, spring snowflake and liverleaf. It is the time when I feel that spring is at the same time very powerful and yet still tender.

But back to challenge business...lol...if you hop over to Emerald Creek Dares you will find out how my teamies interpreted the challenge theme and get some more inspirational hints on how to create your own pieces for this dare! I hope to see you play along with us soon!

Hugs and happy crafting,
Claudia 
xxx

http://blog.emeraldcreek.ca/