I also wanted to finally try out my newly bought Distress Oxide Spray Inks. I remember I gave the Distress Oxide Inks a try when they came out as ink pads but never really managed them properly. Now that there are Oxide Spray Inks - and after watching Tim demo these and being just like "wow" and "ooohh" most of the time, I decided to give them another try. I am still not fully content with my results but they were perfect for using them to create a fallen leaves fall tag. ;)
Don't ask me which colours I threw on all my papers...I mixed Spray Stains with the Oxide Ink Sprays and mostly went for reds, oranges and yellow tones and added some "frayed burlap" Oxide Spray Ink into the pot as well. Iced Spruce, Peeled Paint, Fired Brick, Fossilized Amber and Pumpkin Spice were in the mix...also Vintage Photo and Rusty Hinge Spray Stains...hm...I'm sure there were some more that I have now forgotten...
My idea for the tag was inspired by a photograph I have taken years ago during one of our autumn hikes...
I remember how much I loved the dew drops on the leaf and wanted to recreate this effect on my autumnal leaves on the tag....some still clinging to the almost bare branches...
...others already having fallen to the ground, gathering in beautiful piles of oranges, browns and reds.
I used Tim's Alphanumeric Classic Uppercase and Lowercase sets alongside the Fall Foliage and the Dimensional Heart dies sets. To die cut my tag once from heavy greyboard and another time from white cardstock I used Tim's BigZ "Tag and Bookplates" die. I also die cut some branches using his new "Branches" BigZ die.
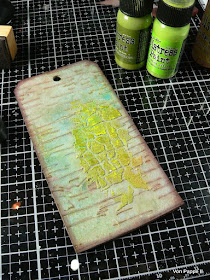
The background base was done using Tim's Birch embossing folder.
The die cut leaves and branches were blended around the edges using black archival stamping ink. Then I went in with some Distress Glaze to make the autumn leaves shine! You can see the difference - to the left the leaves die cut from the papers done with the Oxide Inks - to the right the leaves already treated with the Distress Glaze! So cool!
I glued the embossed Birch texture tag to the greyboard tag and let that dry. Then I used some of the Distress Oxide Ink Sprays again to add some milky birch bark colour...on top of that I used one of the three Mini Stencils from the #43 set to add some Grit Paste. Once that was dry I painted it using Distress Paints Peeled Paint and Twisted Citron.
I finished the tag background off by blending the tag's edges with Gathered Twigs Distress Ink using a blending tool.
As I didn't have any Glossy Accents I used the Liquid Glass from DecoArt instead and created droplets on all the leaves that I had glued in place.
While that was set aside to dry naturally I die cut the small Dimensional Heart from one of my left over "fall colours Oxide papers". That was folded, glued together and fixed in place with some Tacky Glue.
I felt I needed something more at the bottom of my tag, but first wanted to add the quote. I die cut the letters needed using Tim's Alphanumeric Classic Upper- and Lowercase dies sets and glued these in place as well. I used a fine tip black marker to outline the letters.
At that time I had decided on what to put to the tag's bottom - more fallen leaves. This time I glued them behind the tag. To add a thin border on top I cut a thin strip of rough ribbon and glued that on top.
I also decided to add a bit of crackle texture here and there. So I applied that in a few spots with the very tip of a palette knife. The inks from underneath beautifully mixed with the white from the crackle paste - so I didn't have to add extra paint on top of that.
Voilá! My finished "I love Fall" tag!
I hope you like it!
Thanks for stopping by and as always
hugs and happy crafting!
Claudia
xxx


