The theme for our June challenge is once more
"Anything Goes - Steampunk/Industrial"
- so you are free to create and craft away and have some creative steampunk or industrial style fun!
I definitely had a lot of fun and my project for June is another notebook (yes, I never tire of making them...I only have to work on using them too...lol).
When I saw the new "Industrial" Sizzix die (designed by Tim Holtz) I knew I had to have it - finally I could make my own nuts and washers for all my industrial style projects!!! Using the real ones doesn't work because they are way too heavy and bulky...but die cutting them from heavy card and stacking them gets very close to the real thing! I love it!
I also used my beloved "passport" Sizzix die (designed by Eileen Hull) and some card from old packaging to create my notebook with. And not to forget about another "must have" that I used - the awesome Tim Holtz idea-ology "Type Lower" cling foam stamps!
But let's get back to the start:
Often I get inspired by some scrap paper or left overs from previous projects on my desk and this time the idea for making another little book emanated from using up the washes and paint residue on my palette that I used on this project HERE.
I tend to use large white sheets of paper when painting objects and taking pictures for tutorials as they do not reflect the light like the craft sheet often does. It also shows the colours more clearly.
So I already had a lot of marks and other random patterns on my paper, but then I also simply turned over my plastic palette that still held the left overs from several paint washes and let the paint drip on the paper. Even the paint that remained on the edges of the palette during this process was used too by dragging the palette's edge across the paper in various directions. I didn't spend a single thought on where to add paint and in which direction. I just tried to use up all of it. ;)
I ended up with a beautifully randomly patterned paper and loved the colour combo - so I glued the dry sheet to some cardboard (left overs from packaging) using matte DecoArt Decou-Page.
As you can see the dry card tends to warp. But as I was going to use two of these for each cover that would not be visible anymore once both pieces would be glued together.
I die cut four cover pieces and then decided which ones to use for the covers' out- and insides.
I added a beautiful industrial style pattern to the covers' insides using a Carabelle Studio stamp.
The stamped on word on the front cover was outlined with a white gel pen for better visibility.
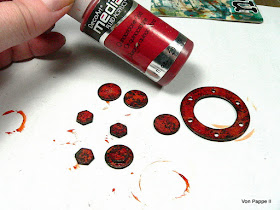
I stacked three die cut nuts each so I had four of these and two of the large rings for the focal piece.
Once the glue had dried I used Andy Skinner's quick rust technique and stamped on some rust texture in black archival stamping ink. I also blended the edges using a piece of blending foam.
I heat dried everything before I added a thin layer of DecoArt media Quinacridone Gold using a soft brush.
I used more Quinacridone Gold to create some beautiful drip lines on the covers.
For the book's spine I used another of Andy's quick rust techniques: I sprayed on some DecoArt media carbon black Mister and made sure I pressed the nozzle only half way down - this created lovely spreckles instead of an even mist - perfect for creating faux rust!
The dry spine was given a thin coat of Quinacridone Gold as well.
Time to assemble my book! Yay!
I used matte Decou-Page and made sure there was enough glue added to all the outer edges so the both pieces for each cover would stick together really well and neatly.
Then I glued the stacked and painted nuts and washers in place.
For my focal piece I chose one of the lovely persons from the idea-ology "photo booth" pictures and glued the cut out image behind the opening. I filled the inner circle to the brim with DecoArt media Liquid Glass and set everything aside to dry thoroughly (at least half a day).
The whole note book was given a thin coat of DecoArt media Ultra-Matte Varnish to make it more durable.
The dry focal piece was glued in place before I die cut my signatures...
...and sewed them to the spine using an upholsterer's needle and rough cord.
Done!
I hope to see you over at our challenge blog to check out my teamies' awesome projects - and to play along of course! ;) The challenge is still open until the end of the month and there are two fabulous prizes by DecoArt media and boozybear to be won - all you have to do is enter a project and be a lucky winner if random.org decides to come up with the number of your entry ;)
Hugs and happy crafting!
Claudia
xxx


Gorgeous book, adore the rust and the background you created. Fantastic. Tracy x
ReplyDeleteAll I can say is, keep making these Claudia! They look like so much fun to make! Love the scratches and drips and the white pen around Notes really adds a great touch! hugs, Maura
ReplyDeleteFabulous book and great tutorial thank you x
ReplyDeletewieder mal total schön !
ReplyDeleteDie Farbkombi gefällt mir besonders gut, mnal was anderes!
Hugs
Alexa
Please tell me more about the die cut for the signatures!
ReplyDeleteThe signatures are part of the "passport" dies set. The info is all there in the post ;)
DeleteFabulous! The background is just amazing: as dynamic than dramatic, I love it!
ReplyDeleteWhat a WONDERFUL 'note' book Claudia! Great abstract design and colors - plus love the look of the way it's bolted on!!! Xj.
ReplyDelete