Lovely Maura, my new co-host, is awaiting you over at our challenge blog to present the new makes of the design team!

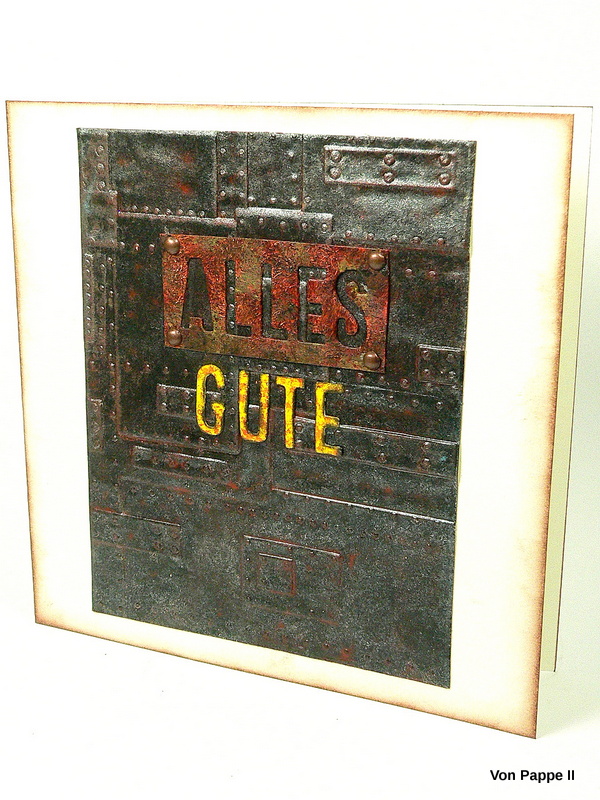
"Alles Gute" is German for "all the best" and as it had to be a male card, that was a great opportunity to play with my newly bought "Foundry" 3D texture fades folder from Tim Holtz's latest release.
The birthday quote was also cut out using Tim's "Alphanumeric" dies set, using both - the cut out letters and the card with the negative space from the cut out letters to create a kind of industrial style sign.
The result from the 3D embossing folder looks really cool! I followed Tim's advice and misted the paper before I ran it through the Big Shot three times. I used the heat tool to dry the embossed cardstock.
For even coverage I sprayed on a coat of Carbon Black DecoArt media Mister and heat dried my background (as I am an impatient girl sometimes).
Then I created my own "Mister" from one part DecoArt Zinc Dazzling Metallics paint and about four parts water. I thoroughly shook the spray bottle so everything mixed well and then sprayed on a thin layer.
While that was set aside to dry, I cut out my birthday quote using the Alphanumeric dies set and some washi tape to hold the letters in place while running everything through my Big Shot.
To create a quick faux rust effect on the sign-like word, I stippled on DecoArt premium paints Carbon Black and Quinacridone Gold Hue. I used a very worn bristle brush and mixed both paints wet on wet on the die cut piece until I was content with the look.
The letters of the second word were first painted with DecoArt Americana Primary Yellow acrylic paint and afterwards I stippled on the left overs from the Quin Gold premium paint on my palette.
The dried background was given a wash of DecoArt English Red Oxide media fluid acrylic paint.
I also blended the edges of the yellow letters with black archival stamping ink. I recently found some drop shaped cosmetic sponges with a cone-shaped tip and these work just perfect to get the ink into all the narrow corners and tiny openings.
I used a fine tip brush and matte Decou-Page to adhere the quote to the background.
I also added some tiny copper brads to the rusty sign's corners...
...before I mounted everything to the card blank with double sided sticky tape.
zum Geburtstag,
mein Schatz!
xxx
Our design team has come up with some very different inspiring projects this month - so hop over to the challenge blog and get your dose of inspiration! I hope to see you play along with us this month!
Hugs and happy crafting!
Claudia
xxx


I am moments away from purchasing that embossing folder, it gives magnificent effects and so much depth. Your painting skills have really brought this piece to life giving it added age and a delight to see. Thank you so much for the inspiration Claudia.
ReplyDeleteCreative wishes Tracey x
super cool!!!! I love the effects you achieved!
ReplyDeleteAll the best is a wonderful description for your card! I love the finish that you achieved for the embossed card, it looks so awesome.
ReplyDeleteI hope your husband has put his birthday card in a prominent place of display, because this is just so awesome, Claudia! I love how you have transformed paper into rusty metal - genius!! Happy birthday to him, and hugs to you! Maura
ReplyDeleteGreat card Claudia. Those 3D embossing folders are brilliant. Happy crafting, Angela xXx
ReplyDelete