...this month - which is really an honour and also great fun. ;)
And like every Monday at SimonSaysStamp...
"Home Decor"
is this week's challenge theme
...and those who know me, know that I love to hunt dollar stores and sales sections of home decoration shops after Christmas (well, honestly all year long but especially after Halloween and Christmas) for cheap left over decoration pieces that can be used as substrates to create altered projects, customised home decoration pieces (and whatever else my mixed media mind can come up with) from. Especially wooden or MDF shapes are great to work on because they can take a lot of mixed media, paints, inks, pastes and other cool stuff ;)
Winter has just gotten into full swing over here in Vienna and is on to stay for about one and a half more months - so a little piece of home decor that adds some shine to the short days and light to the early, long dark evenings is always a good thing to have.
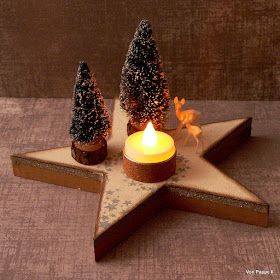
This little starry winter forest scene I've made is sitting on my writing desk and warms my heart whenever needed ;)
Except from the MDF star shape (that's one of my finds from mentioned dollar store) all the items and products used to create it can be found in the SimonSaysStamp online store. To get to the particular item on their shop site, simply click on the items' names in this post.
The original look of the star wasn't thrilling (at least not for me),
so I started with covering up the printed quote and stars with two thorough layers of "Chalk" PaperArtsy Fresco Finish chalk paint. After that had dried, I picked the stars stencil from the Tim Holtz Mini Stencil Set #43, a stencil brush and some Distress Paint "weathered wood" and added my swirling stars to the primed star as shown in the picture below.
(if you look closely you will see that I got a quite smudged result - so I re-did this step on a newly added layer of chalk paint until I got a crisp stencilled image).
The star's edges were inked with gathered twigs Distress Ink, using the mini ink blending tool.
I had planned to glue two of my sisal bottle brush trees and two of the gorgeous Tim Holtz decorative deer and a tea light "holder" to my star shaped base, so I browsed my collection of tea lights to find one that had a slightly larger cup so I could place a real or LED tea light into this cup (to keep it in place safely).
I didn't like the feet of the sisal bottle trees though, so I decided to replace these with two of Tim's idea-ology Wood Slices Findings. I used some tweezers to get the trees out of their original sockets and a hand drill to drill two tiny holes into the wood slices - then the trees were simply glued in place using Tacky Glue. The deer were glued in place by applying tiny dots of the Tacky Glue directly to their feet and then putting them in their spots and letting them sit until the glue had dried. The trees were glued in place using Tacky Glue as well, but I used a Sticky Thumb Adhesive Foam Dot to glue the "tea light holder" in place, so I could easily replace it if needed.
But first I covered the blank dull metal of the tea light cup with some decorative Cork Washi Tape.
As I wouldn't dare leave my little "forest scene with tea-light" unattended when using a real tea light, I decided to use an LED tea light instead for everyday use. Luckily that fit into the holder just perfectly. Yay!
Finally I decided to add a bit of bling to my forest scene, so I glued the gold glitter Washi Tape from the Tim Holtz "Travel" Design Tape set around the star's edge (well, actually it was the gold washi tape from the "Aristocrat" set, but the Travel set has it too and is in stock in the store).
I love the simplicity of the make - this way the focus is all on the gorgeous deer, the trees, the stencilled on stars, the golden edge and the tea light.
And it definitely spreads a lot of cosiness when lit in a not-so-well lit room! ;)
I hope you like it too!
I can't wait to see what you will create and enter to the "Home Decor" Monday Challenge this week!
By playing along you get the chance to win a
to spend in SimonSaysStamp's amazing store!
Thanks for stopping by
and good luck!
Claudia
xxx


I love this Claudia! What a gorgeous decoration and I am sure it looks fabulous on your desk! the little deer are so cute and I love how you used the washi tape around the tealight! Clever!!! :-)
ReplyDeleteHope you have a great week!
luv
Lols x x x
Beautiful little winter scene, Claudia! The light will brighten up your winter days for certain. hugs, Maura
ReplyDeleteclassic, simple and beautiful
ReplyDelete