Thursday, 29 November 2012

It's Top Talent Thursday!


Gosh! I am so excited to share this with you today!


The team from Our Creative Corner invited me to being their spotlight on Top Talent Thursday today! Whooeeehh! I am so honoured! Thank you once again, Ladies, for this lovely opportunity!

When you hop over to their lovely site, you will find a post today, showcasing me and my latest project along with the possibility to learn a bit more about me and my approaches to crafting and arts in general in a breaf question and answer session.

When they asked me to do a project for TTT, I first planned to do something X-massy, as I have some lovely papers and stamps lying around, just waiting to be used in some festive X-mas-crafting. I rolled thoughts about an Advent calendar in my mind for days and sat down at my table to do something appropriate... only to find myself about an hour later or so right in the midst of another steampunk project *LOL.

Here it comes:


I made some pictures for you, showing the wooden box in its' original state and during its' process of becoming something more attractive, but accidentally I deleted them during the attempt to sort my image folders. Sorry about that!  :(
So, sadly, you can't see it as it looked like in the beginning... it was a simple untreated wooden box, originally containing painted Easter eggs - and the compartments were just the perfect size for storing my ATCs in!! But for the last months it was just some wooden box for storing my ATCs.... well, you know what I mean ;)
There had to be finally done something about that!!!


First I painted the box with white Gesso all over, then I mixed acrylic colours brown, black and copper and gave the box some strokes with a broad bristled brush. After that I sprayed some areas with Mr. Huey's "passport" and  Adirondack Colour Wash "Stream" for some contrast in colour. I stamped some gear images with acrylic copper paint onto some areas too. The insides of the box compartments were also painted with copper acrylic colour. At last I embossed some of the edges with Frantage aged embossing enamels.


 Letting that dry, I stamped some steampunk images onto tissue paper and tore them to size. ( I prefer tearing to cutting, as the images' edges blend in better and less visibly than cut edges when being mod podged).


After I had glued the images onto the box, using Mod Podge, I browsed through my "treasure chest" with all those lovely embellishments and found these gorgeous Tim Holtz idea-ology box feet, some gears and wooden chipboard keys (which I painted with paint dabbers and embossed with Fran tage embossing enamels), Artemio keyholes and labels, which were just perfect for a worthy finish.


Hope, you like the box and will also enjoy Top Talent Thursday over at Our Creative Corner, featuring MOI this time!!!
Thank you all so much for stopping by again!


Wishes,
die amelie xx


 As usual some close-ups as well:


Sunday, 25 November 2012

Altered domino booklet

This time I want to share with you my latest "first try" - altered dominoes. There are some amazingly beautiful projects to be found in blog land, which made me want to create one of these tiny treasures myself.

As the main colours used were greens and blues (and there are some red sparkles in the metal leafing too), I dare to enter Vintage Stamping Challenges' "Red/Green/Blue/Purple"-challenge with this project.

I first gave two dominoes a treat with AAI (mainly greens and blues) and afterwards I adhered some metal leaf by stamping a tiny swirl image, using special metal leafing glue instead of stamping ink.
I applied the glue with a small piece of a rough kitchen sponge onto the rubber stamp. After stamping the glue-image onto the dominoes, I immediately cleaned the stamp with soap and warm water, because this glue is very very sticky and the metal flakes should be put on only after some open time. (Otherwise you only wipe off the glue AND the flakes, when you try to rub them in with your fingertip).

I gave the edges the same treatment, applying the glue directly onto the surface with the sponge. The result looked like this:


As I wanted to create a booklet, I had to prepare a tiny accordion, which I cut to size, folded and stamped with images of time pieces, birds and quotes about time flying and precious moments.


The edges of the pages were blended with Distress ink "walnut stain" and were given some sprays of diluted colour wash in green and blue. For a finish I painted the edges with gold acrylic colour. For stamping I used archival inks "jet black" and "sepia".

To be able to close the domino booklet, I fixed two organza ribbons by glueing them to the dominoes together with the first and last page of the inner booklet. But first I attached a hinge to the dominoes, which I had treated with AAI too, to make it look aged and timeworn.


I also fixed a small piece of ribbon to the booklet, that holds a golden eye to provide being attached as a pendant to a chain or ribbon.


I embellished the front cover of the domino booklet  with a tiny ephemera from some of my paper stash and a small key, that was also treated with rust, green and blue AAI to match the pendant.

The whole surface was given two coatings with Gloss Mod Podge. Voila!


Saturday, 24 November 2012

Lucky Me!

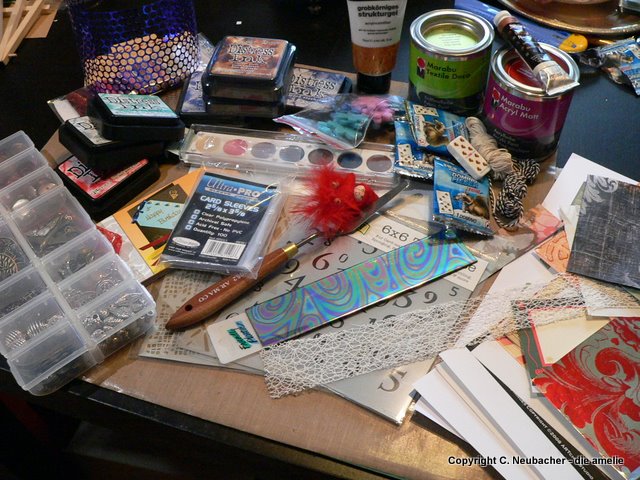
Just have to show you today, what my very dear and wonderful scrap friend Sandra sent me as a surprise candy! I was so overwhelmed when I opened the parcel, that I even teared up a little. Thank you so much, Sandra, for these awesome goodies! They came just in time to rescue me from a state of lost mojo.(As you may have recognised, I already used some of the goodies in my latest project ;)


Incredible, isn't it? A lot of great stuff, as you can see: stencils, metallic rub ons, acrylic colours, distress ink pads, friendly plastic, ribbons, beautiful ephemera (that pile on the right), even some embossing folders and a lot of lovely charms (which I already sorted into the plastic box on the left, feeling like Dagobert Duck playing with his dollars) and so much more!

Pics of her lovely ATCs and a wonderful tag I got from her, will follow, but I haven't managed to do them yet.

You sure can imagine why I feel the luckiest person on earth, when I see and use all these treasures! Sandra, you are a mahatma and I cannot express how your great gift brightens up my very heart and soul. Thank you so much!

Big, big hug,
Claudia xxx

Thursday, 22 November 2012

Foil and Alcohol Inks

Our Creative Corner's actual challenge wants us to use Alcohol inks on foil - one of my favorite techniques! So I decided to join in almost last minute...

So I made another album (have four or five more in my treasure chest, waiting to be altered), using an ATC sized silver metal foil plate, I had made earlier and then put aside, because I didn't actually know how to continue with it. But today its' time had come at last! ;)


I had engraved some swirls into the metal foil, using a mat and an embossing tool. Afterwards I added various tones of alcohol inks to it.


Papers used on the album cover are from a Tim Holtz paper stash and a book about Shabby Chic, which contained a collection of lovely ephemera. I distressed the edges of the cover, the cut to size papers and ephemera and blended them with Distress inks "vintage photo","chipped sapphire" and "walnut stain". Some of them I blended with "antique linen", using a stencil from LaBlanche, I got as a surprise present recently!


It took me quite a while this time playing around with ribbons, brads and embellishments until I was content with the outcome. I had got so many as a present from a very dear scrap-friend of mine, that I really didn't know which ones to choose (or which ones to leave for another project ;).


I hope, you like the result!

Tuesday, 20 November 2012

"The Storyteller"

This fortnight's FunwithATCs' challenge is "Faces".

I like faces that tell stories. Weathered faces. Faces with smile wrinkles. Faces that are like open books. Faces that take you on journeys to far off places.

To Arabian Nights for example.


For this ATC I used a black felt tip pen with a brush tip on white card,"black soot" Distress ink and  "jet black" archival ink from Ranger. Then I added some stamped script for a little depth. As a finish I added the scratched structure with my beloved "Cover A Card" stamp from Impression Obsession.
Hope, you like it and join our challenge at FwATCs.

Hugs,

die amelie x