Showing posts with label calligraphy. Show all posts

Tuesday, 26 April 2016

It's Sneak Peek Time Again!

Servus, my dear and true readers and followers - old and anew!

I am happy to see you stop by again and would love to invite you over to Our Creative Corner where I have a short and easy tutorial for you that is meant to take you further into experimenting with die ink and trusting your own brushstrokes.
Also again I have been creating layers (as I always do) and am taking you through the single steps of the process.

Here's a little close up so you can get an idea (and hopefully decide to hop over and find out a bit more):


To get to the blog post click HERE. I would love to see you over there! Also make sure you don't miss the last few days to enter the fabulous "Gipsy Fayre" challenge hosted by lovely Candice!

Hugs and happy crafting!
Claudia 
xxx


Tuesday, 26 March 2013

"Writing" at FunwithATCs

I am so happy to be able to welcome you to this fortnight's brand new FunwithATCs challenge - 


"writing"!


If it is handwriting or if you use script stamps (or have any other inspired ideas upon the theme) - it's completely up to you...as long as you create an ATC (Artist Trading Card) of the size 2 1/2 x 3 1/2 ''!

I love writing, calligraphy, writing poems and short stories (there's even a once started fantasy novel stored in one of my (virtual) drawers, waiting to be finished some day). I love the look of handwriting. I love that writing is a process of creating images quite similar to painting, stamping or any other art.

So you should not be surprised that I chose a quote by C.S.Lewis for my ATC, that expresses my feelings towards "writing" quite well.


I combined some script (and flourish) stamping (along with heat embossing), handwriting, drawing and - of course - ink blending, use of metal and distressing.

I hope to see your writing/written creations over at the FunwithATCs challenge site soon! And you should have a look at my team mates' awesome creations too!

Thanks for stopping by today! Have a wonderful crafty week!

Hugs,
die amelie x

Friday, 21 September 2012

"Finally Fall!"

As fall is my favourite season of the year, I was already hopefully looking forward to challenges that required autumnal colours and themes. Well, here they come: DragonsDream Tag It On want to see "Misty Autumn Glaze" and Frilly and Funkie ask to "Fall into Fall" and last but not least the gorgeous "Fairy tale challengeblog" that celebrates the beginning of fall as I do. Well, they would not have needed to ask ME, as I love to fall into MY season after a long and (too) hot summer anyway. ;)

So here is my project for them:


I think I have not mentioned yet, that I am interested in children's books and illustrations too (according to my art studies AND my education as a school librarian). Good illustrations in books for children are really hard to find, as they imho should not only visualize a scene from a story to cut off an intimidating long text, but capture the spirit of the essence of the story and create something behind the shown action, that drags the reader in. (I hope, this makes some sense to you and I have explained that right).

So in this tag, I tried to create a scene that would show all the things and sensations I so love about autumn - the especially clear air and lighting, the earthtoned colours, the textures and the contrast of still warm, vibrant colours forming a contrast to rotting and decay. Metamorphosis at it's best!

I punched a stencil out of card for the leaves on the ground and did them with Distress inks "mustard seed", "spiced marmalade", "rusty hinge", "barn door" and "vintage photo". Then I tore stripes from masking tape to cover the upper part, as I wanted to create a glossy and bright space between the trees that were to come later. These spaces I inked with "broken china" and "shabby shutters" and embossed them later with clear embossing powder as a resist to the stamping of the bark and the shading of the trees.

Some of the punched out leaves were embossed in red, copper and gold. I stamped a pine cone, some mushrooms and a snail onto the forest ground and did the bark with my small texture stamp, which I only partially inked with walnut stain to get that fading structure.

Then I carefully sprayed GlimmerMists "Mustard Seed" and "Marmalade" and MayaMist "Espresso Brown" onto some areas (mainly at the edges to create a kind of frame for the scenery). At least I added the stamped owl and the banner on top.

I hope, the close-ups show the glimmer and glaze, that can be seen when you look at the tag from various angles:


Tuesday, 11 September 2012

Emergency kit for Witches

Inspired by Laura Carson's lovely projects on her Arfully Musing blog, I just HAD TO create this altered Altoid's tin box modelled on her gorgeous apothecary! (click the link to see her awesome stuff!)

As I love to write, draw and try to produce most of the afforded stuff myself, I did not use lots of collage sheet scraps or bought embellishments, but thanks to those awesome friendly people out there in the web, I found some wonderful spooky freebies, which were very inspiring and useful!!! Thank you so much at this point!

So behold, honourable witches and sorceresses, our fabulous apothecary: "The practical Witches' Companion"!
Very helpful for witches, who love to travel and have the most essential ingredients and tools with them. A handy accessory for the resourceful, modern mobile witch! To provide full safety, the "Companion" can be locked (key and lock included in delivery)!
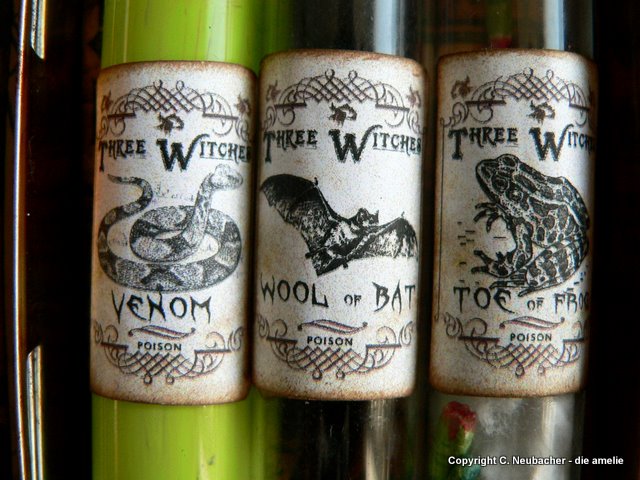
It usually comes with three ingredients, safely bottled in carefully corked, reusable glass vials. According to the witch's individual magic preferences, various combinations of ingredients are available. "Teeth of Wolves", "Muddled Mummy", "Spider Venom", "Devil's hair" and "Eye of Newt" to name only a few. Your witchcraft's success is our goal!

The shown version contains the ingredients "Wool of Bat", "Toe of Frog" and snake's "Venom", our top seller in the popular "Webbed Potions" design.


Once you open the outer cover, which is held in place by delicate metal fittings and a pure leather string, the list of contents on the left, the key and the lid of the travel box come to the fore.


After unlocking the light aluminium travel container, you can easily open the lid, which on its'inside shows a lovely group portrait of the honourable company's foundresses, the "Southwick Witches". On the right - as you can see - the vials are safely held in place, perfectly designed to fit.


The official "Wicked Seal of Approval" on the back guarantees 100 % quality of contents and materials used in our products!


We are looking forward to count you among our satisfied customers!


I entered the challenges from Try it on Tuesday , Fashionable Stamping Challenges , Pin And Tack and Anything But a Card with this project.

Products and techniques used:
Ranger distress inks "rusty hinge" and "vintage photo", Ranger embossing ink, blending tool, black fine tip marker, AAI "rust" and "sunset", embossing powder "copper", heat tool, some halloween print out freebies (labels and witch-photograph), papers from "The Timeless Type Stack" and BoBunny's "et cetera" collection, leather cord, two old pieces of jewelry, stamps from Tim Holtz ("Witch Hazel"), My Mind's Eye (Lost&Found Halloween), flonzcraft (frame) and Prima's "Printery" stamp set, black felting wool, air drying clay, felt tip pens, green acrilyc paint, brush, glue, scissors, Altoid's box, thick cardboard,  white card, an old key, three corks and three glass vials from my friend's lab.