Monday, 31 October 2016

Happy Halloween!!!

Happy Halloween, my dear friends and readers!

Thank you so much for stopping by! I hope you are enjoying a lovely holiday and are having a lot of fun with ghoulish fright and spooky delight!

I would like to invite you over to the Calico Craft Parts blog and check out my latest project. That little sneak peek below is meant to lure you over of course. ;)


It's a rather quick project this time and I kept it very simple...so if you are in need for another quick last minute Halloween-ish project or just an easy autumnal home decor piece, this might be the one for you!

Hope to see you over there!
Happy Halloween and happy crafting!
Claudia
xxx


Saturday, 29 October 2016

Gypsy Fortune Teller Cards

Servus!

Today I just want to share a little somethin' I made for my niece, Rosi, who will have a Halloween party on Monday where she will be wearing a mysterious gypsy woman costume and she still needed some fortune teller's cards - so I promised I'd make some for her.


I had this lovely 7 Dots Studio designer paper with tarot cards on it and cut them out. Then I glued a patterned paper to them for the backside, inked the edges black and ran them through my laminator.

To have something gypsy style looking to tie the cards up in a bundle I twisted some thin wire and various ribbons that I had tinted with some walnut ink solution into a bendable cord. The wire within makes it flexible and all you have to do is wrap it around the cards and it will keep stay in place.


I created a little charm using a 7 Dots Studio rubber stamp and shrink plastic. Then I rummaged my embellies box for some beads and other goodies and found a lovely feather.


The beads were part of a cheap bracelet that I took apart. I threaded them onto an eye pin and attached it to the wire within the gypsy cord.

I hope my niece will have the most wonderful Halloween party!!! I am sure she will look just terrific. And as she is great at putting up a show I am sure she will be a fantastic fortune telling gyspy! (Let's hope I will get to see some pictures of her!)


Thanks for stopping by and Happy Halloween!!!
Claudia
xxx

Thursday, 27 October 2016

Falling Into Celebration! - "All Hallow's Eve" at Emerald Creek Dares

Hi and servus and welcome to the actual "Falling Into Celebration!" challenge at the Emerald Creek Dares blog!

Over there Canadian Thanksgiving and the Diwali Festival of Lights have already been on this month's schedule and the last part rounds it all up with a bundle of Halloween projects - and my make is part of it ;)

I made a Halloween card using some of the gorgeous Emerald Creek embossing powders and embellishments and some of my favourite Tim Holtz Halloween themed Sizzix dies alongside some Distress inks, Distress paints and Distress crayons as well.


The arch shaped background (that was die cut using the Tim Holtz Arch Frame die) is selfmade and I will definitely do more of these layered "forest sceneries" but not cover them up as much next time as I really love how it looks! But with this make I wanted to make the pumpkin and the gorgeous spooky swirls the stars.

To create my arch I started with a scrap of the backgrounds I did with my lovely niece some time ago (in this post HERE). Actually they were done by scraping on various acrylic paints with an old credit card and then adding layers of Distress inks and splattered on Distress paints in black soot and raspberry red.

I used Tim's Birch Trees and Branch Tree dies to create stencils from cardboard and acetate to use on my background for layering a forest scene.


The first layer was done in black soot Distress ink while the second (using the Branch Tree stencil) was done using archival black ink for a darker effect.


I just love the depth of this!

Then I went on with die cutting two borders using Tim's Twisted Edge and Drip Edge Thinlits dies.
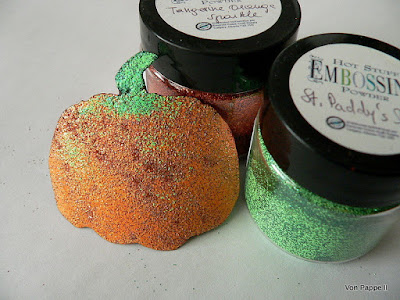
I heat embossed the Twisted Edge border using "St. Paddy's Day" - one of my all time favourites from the Emerald Creek embossing powders!

To blend it in with my grunge look I darkened the edges using a black soot Distress Crayon. It works just perfectly on embossed pieces!


I did the same with a pumpkin that I die cut using the Movers & Shapers pumkin die from the Tim Holtz Mini Acorn & Pumpkin set. This time I used Emerald Creek's "Tangerine Orange Sparkle" embossing powder on it.


As you can see I mixed both embossing powders on the pumpkin which makes it look even more natural.

I took one of Emerald Creek's "Fearless" Buckle charms and heat embossed it with Emerald Creek "Mercury Rising" embossing powder to grunge it up. I also used this embossing powder on a die cut bat to repeat this colour (which always helps with visually fusing different elements on a project).


One of Emerald Creek's fab Skull Charms was painted white using picket fence Distress paint and my fingertip.

The Drip Edge was die cut from red cardstock and given a thorough coat of DecoArt Triple Thick to create a drop like and liquidy impression.


The Fearless Buckle Charm was attached to the background and border using sticky foam pads and some grunged up string.


I highighted the letters by smudging on some white Distress crayon with my fingertip.


Some Halloween designer paper from my stash was cut to size and folded in half to form a card. The edges of the arch and card were darkened by smudging on black soot Distress Crayon before I mounted the finished arch to the card using sticky foam pads again. Et voilá!


I love the mix of a bit of bling and dark grungy edges and shapes! I hope you like my card as much as I am content with its outcome!


If you haven't already done so I recommend you check out the makes of my lovely teamies and the other celebrations themed DT posts over at the Emerald Creek Dares blog!

Hope to see you there playing along soon! There's a $50 voucher for the online store to be won! So don't miss your chance!


If you liked some of the Emerald Creek products featured in this post (they have the Distress stuff as well!) - here's where you can buy these and even more fab stuff (just click on the button to get to the shop):


Happy Halloween and hugs and happy crafting!
Claudia
xxx

Wednesday, 26 October 2016

WOYWW #386

It's time again for me to take part in the inspiring desk hop that lovely Julia Dunnit has been hosting for 386 weeks now ;)

If you haven't heard of the "What's On Your Workdesk Wednesday" weekly event so far, I recommend you hop over to her blog, Stamping Ground, to learn more about it (but only after having taken a look at my workdesk  of course...lol).


As you can see my desk is - once again - crammed with some of my favourite stuff to work with: a vintage wooden cigar box filled with dictionary page scraps to the left, my matte Decou-Page, my favourite tones from the DecoArt media fluid acrylics line, white Gesso, black archival stamping ink and my latest project I am working on - an altered book after an online workshop by wonderful Seth Apter. I have already shared my finished book cover and binding and the first pages yesterday (in this post over here).


My book is all about the magic of trees and I am using rubber stamps as well as image transfers from own tree photographs - and hopefully I will also take the courage and add some tree drawings or paintings as well...(at least that's the plan - creating a mixed media tree lovin' book with variations of techniques and trees).

Luckily I managed to finish another page to add to my book - combining Seth's "paper quilting" technique with my own idea on how to work on this background...


To save my single pages from sticking together I took apart a vintage photo album to use the protective sheets. These have not only fabulously yellowed over time, but also have some embossed texture - so these protective pages give additional texture to my book - which is something I love even more than the fact that now my pages are "safe". lol

The next two finished pages:


On the front I used part of a Crafty Individuals stamp...


...and on the back an image transfer using one of my own photographs. This tree stands in one of my most favourite places to go to - at Castle Bernstein in Burgenland.

Thanks for stopping by today! I (plan and) hope to meet you over at Julia's workdesk soon ;)

Hugs and happy crafting,
Claudia
xxx


Monday, 24 October 2016

My Version of Seth Apter's "Altered Book"

Servus!

I hope you aren't trapped in fog as we are here in Vienna! ;)
It is that time of the year when spending time at my workdesk is one of my favourite things to do and I feel I am a lot more relaxed and patient to follow some good online workshops (maybe because I don't feel I am missing as much by staying inside as I do at other times).

This time I followed another of Seth Apter's - his "Altered Book" workshop.


I especially love about his way of doing the binding that you can finish the book first and then take your time to create and add the pages as you go and whenever you feel one is finished (and good enough) to become part of it. I also love that you use a cover of an old book to give it a new life.


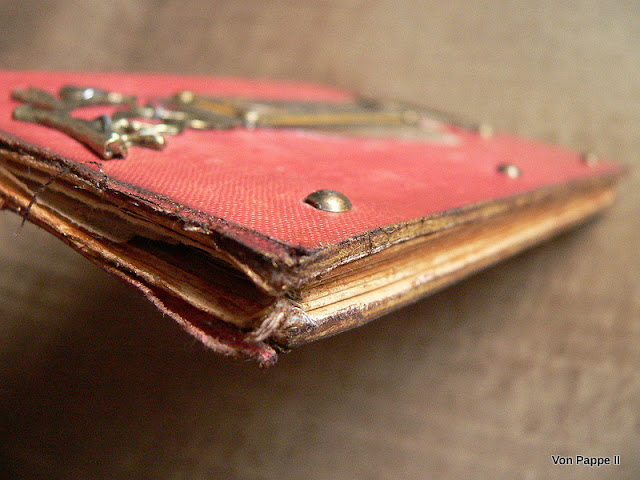
The shabbier the better! And any imperfections from torn pages or damaged edges are more than welcome as they add so much to the character of the book and add to its "story".


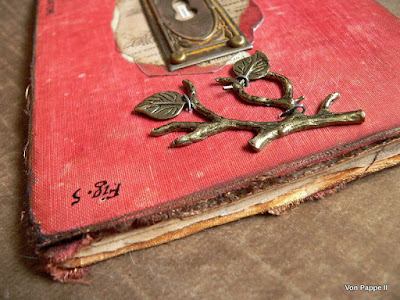
To create my cover I used some rub ons, metal embellishments and fleamarket finds alongside some old book page scraps and a piece of mica.


The first page I created was done using a beautiful IndigoBlu rubber stamp.


The handwritten dedication on the cover's inside was taken from the same dictionary that I used the cover of and also to create my pages from. It dates back to 1922 and I just felt I had to "save" it from getting lost and forgotten.


And this is the first page I did (more are to follow - hopefully soon ;).


And this is how it looks when being flipped over.


As you can see there is still enough room for more pages with tree art on it!


I definitely loved creating this shabby and old looking book! I just love how vintage it looks and that it offers so much freedom in the future process of finishing it up.


Thanks for stopping by and have a good start into the week!


Hugs and happy crafting!
Claudia
xxx

Tuesday, 18 October 2016

A Little Bit of This and a Little Bit of That...

Servus, dear creative friends!

I hope the weather over at your place is sunnier! Here in Vienna it is all grey in grey and rainy. And I have just discovered that one of the windows of our flat is broken so the rain slowly seeps in...*sigh.
I am also still struggling with a cold (which always takes a lot longer with me than with people who don't have an autoimmune desease) - but somehow this is all doesn't bother me too much (which is quite a surprise to myself), so being grumpy wasn't an option today. ;)

I have enjoyed getting messy at my workdesk - and have several things to share with you, that all got finished simultaneously (and also have been worked on simultaneously during the last days) today and yesterday.


But first I would like to share with you a linocut print that my son, Georg, (13) made and that I really, really love!


He had a photograph of the insect as a model - but the whole design and composition is his.
I just love how he only partially displayed the insect, the leaf, the grass and the flower. That way the print gives this fab and lively snapshot feel.

I am also sharing my haul from Vienna's Creative Fair that I visited on Sunday - honestly I was a bit shocked as there were a lot less booths this time and the shops that I have been knowing for several years now also had a lot less stuff on display...(or maybe they just had already sold most of their stuff on Saturday...)

But of course I found some nice goodies to play with...


...some semi-precious stone and coral beads to create some (hopefully) lovely wire jewelry pieces with, some finnabair Mechanicals bits, two ink pads and an Edelweiß sticker to iron-on.

And these are two of the three finished pieces I talked about earlier.


These will both be hung on our Christmas tree (yes, yes, believe it or not - I really have managed to already create some X-mas stuff...ME! Usually I am weeks late to that party...lol).

They are both made from Calico Craft Parts and goodies that my lovely boss Helen sent along with my DT orders as little extra goodies. Yay - I have the best boss of all! :)

The little art doll guy got a wire loop that I glued to the back of his head, but the image was taken before.


I fused all the art doll parts using selfmade wire joints as the holes are quite small for brads and mine weren't tiny enough. But now I think these match the vintage look a lot better!


This is the back side - I simply covered the pieces with black Gesso and stamped a script stamp onto it in opaque white.


His face is part of a large Paper Artsy stamp ("Henry and Harriet") and the pattern of his clothes were stamped using an Indigo Blu stamp from the "Yorkshire Evening Post" set. Then I painted over the dried patterns with diluted DecoArt media fluid acrylic paints and doodled a bit with a black permanent marker and a white gel pen. The edges of the doll parts were inked with black archival stamping ink using a small piece of cut 'n dry foam.

He came to life during the drying times of my little soldered house pendant. ;)


I love little houses, I love shrines - and I REALLY love little house-shaped shrines! lol
I have taken steps images and done a collage for those who would like to know a bit about the how-to:


There's no image of the step where I applied the clear Crackle Glaze (which was before I added black Antiquing Cream to highlight the cracks), but I am sure you all know how to do that ;)

And the last finished piece I would like to share with you today is this little house assemblage. It's titled "Dear God, make me good!"


The little angel (???) is a piece from the Prima Archival Cast Milagros set. He came without horns of course...but I wasn't convinced to be honest....even though he seems to be trying really hard...lol. The other pieces are resin and metal embellishments from my stash box (the gorgeous frame is from lovely Lisa's  That Craft Place shop, the feet are from my friend Agnieszka's "Retro Kraft Shop". The all-seeing eye was bought at ebay (and is from China if I recall that correctly)).


I sculpted the little horns from Aves Apoxy Sculpt. The style of the painting is mainly influenced by Michael DeMeng's fab art!


The wooden house was a find at the sales section of a home decor shop. I am always on the hunt for alterable items and the "cheap or chipped stuff corner" is my go-to zone. Once painted even the cheapest looking things don't look cheap anymore. And the fact that it IS cheap stuff takes away the fear of messing up.


Oh well...doesn't he just look sooo innocent?

It's this time of the year when sitting at my workdesk, enjoying a cup of tea and some biscuits and getting my hands dirty is one of the best things to do. Even for the risk of dipping my paint brushes into my tea... ;)

Thanks for stopping by! I hope you are enjoying good times at your workdesks too!
Hugs and happy crafting!

Claudia xxx

Monday, 17 October 2016

A Toxique Sneak Peek!

Servus and welcome back, dear creative friends,

 to today's invitation to visit the Calico Craft Parts blog and find out what this sneak peek is all about!


A fun post and a short how-to are waiting for you! You get to the post by clicking HERE (or by clicking on the image above). I promise you will love the new Halloween Calico Craft Parts that I have used (and all the others from the wide range of spooky bits too of course)!


I hope to see you over there!

Hugs and happy Halloween crafting!
Claudia
xxx