Showing posts with label fabric. Show all posts

Saturday, 30 October 2021

A Glam Grunge Pencil Case - for StencilGirl Products

 Hi, servus and I hope you are all well and safe these days and enjoying a beautiful autumn!

I am sharing an autumn inspired project over at the StencilGirl Talk blog today. A lot of images and a detailed how-to are waiting for you to be checked out! Simply click HERE to get taken to the blog post. 


I found that a bit of bling goes awesomely well with a truly grungy background and design! 


I did some stencilling, also some printing with stencils and layering to create my Alpine Glam Grunge pencil case - and it was such great fun! The how-to explains in detail what I did and which DecoArt paints and media I have used on my blank cotton pencil case to transform it into a glam grunge Alps Lover's fashion statement ;) 


Hope you'll like the inspiration! See you over there! 

Claudia

xxx

Friday, 24 August 2018

Don't Forget to Shine! - Bubbalux Bangle


Hi, servus and thanks for stopping by! It's Friday evening over here and I wish you all a lovely weekend! Finally temperatures have cooled down. Phew! With lower temperatures my creative muse seems to have returned as well and I would like to share a project today that I made using something new to me - CraftTex Bubbalux Creative Craft Board.

The lovely people from Personal Impressions let me have some for free to play and experiment with. Thank you so much! I had great fun and have yet just started to find out about all the possibilities.

On the package it says that Bubbalux can be cut with scissors (I used large ones and that worked well), die cut (that's on my list), embossed (of course I had to try that!), painted (yes, that had to be tried out too), shaped (Whoa! Cool! That was definitely the first thing to put on my "try this"-list!), stamped on,  screen printed and ...well, I am sure other crafty folks out there will find out a lot more amazing things to do with it.

Of course my aim was to find out if I could also use it and create something Claudia-style...if you know what I mean...something a bit grunge and worn looking.

And here we go:


Voilá - my first Bubbalux Bangle, done with the use of our hair drier and various DecoArt and DecoArt media paints and products. But let me also show you the back and inside of my bangle....


...and then take you through the process.


I received some blue Bubbalux to play with (it comes in six different colours). Packages come in sizes of three sheets of 2mm thickness that measure 215 x 279 mm.


I used my large pair of household scissors to cut a strip of 25 mm width off one sheet. That took a bit of an effort, but I managed to do a neat cut easily. Then I removed the protective clear board-coating from the cut off strip.


I cut the strip to the length of about 16 cm and sanded all the edges and corners with a sanding block.


Of course I had to try some embossing with my Big Shot! That went absolutely smoothly and the result looked really cool!


I carefully heated the embossed strip with our hair drier  (as there's only a little heat needed to soften the Bubbalux to bend it into shape). That was really easy too. You only have to pay attention to not heat it too much,  otherwise the embossed texture might get lost (also pay attention not to flatten the embossed texture when holding and shaping the softened bangle with your fingers!)


For my focal element (and to cover up the edge where the two embossed sections meet in the centre) I also cut out and embossed a single word using a tiny piece of Bubbalux from the left overs and the same embossing folder again. The single word was glued on using superglue.


Next I primed the bangle's outer side with Lamp Black DecoArt Americana acrylic paint. I stippled the paint on with a worn bristle brush to avoid any visible brushstrokes. By stippling on the paint instead of brushing you also achieve beautiful texture and tooth for the following layers of paint to hold on to.


Then I started dry brushing on different layers of acrylic paints. The first layer was DecoArt Titanium White Americana paint.


That was followed by a layer of DecoArt Quinacridone Gold Hue premium paint, ...


...then by some Raw Sienna,...


...some Cobalt Teal Hue...


....and once that had dried, a wash of DecoArt media English Red Oxide fluid acrylic paint.


I let that air dry thoroughly before I went on to my next step - gently dry brushing on a very light layer of Lamp Black here and there and then sealing the dried paints with a matte spray sealant. I finished off my bangle by adding some Orange Flicker DecoArt Metallic Lustre with my fingertip for the final bling.


To cover up the blue colour from the Bubbalux sheet on the bangle's inside, I glued on some fabric using matte DecoArt Decou-Page. I first glued the fabric on, let that dry and then cut off the excess. The Decou-Page also helps to prevent the fabric from fraying.


I added more Orange Flicker Metallic Lustre to all the edges once the glue had dried to finish up my bangle.


And this is how it looks when being worn:


The Bubbalux is so lightweight that you hardly feel it on your wrist and there's a short moment of surprise when you pick it up, because it weighs nothing - the worn metal look even adds to that effect.


I spy some potential for more fun and lightweight mixed media jewellery projects in the future! ;)


I hope you like my heavyweight looking lightweight "metal" bangle as much as I do! I would also love to hear about your experiences and projects with Bubbalux as I have only just started to find out about all the possibilities there are. I am sure some creative geniuses out there have already taken this new crafting substrate to the next level. ;)


Have a nice weekend and as always
hugs and happy crafting!

Claudia 
xxx

Tuesday, 8 May 2018

Stencil it! Wear it! - a StencilGirl® Creative Team Project

Hi, servus and welcome to a short invite over to the StencilGirl® Talk blog, where I am sharing my very first project as a new member of their amazing StencilGirl® Creative Team today! I have already shared the fantastic news on social media yesterday and am totally overwhelmed by all the wonderful and encouraging response! Thank you so much each and every one for the congrats and praise! I promise I will try my best to not disappoint you! XXX


This month the projects from the Creative Team will all go by the theme of "Wearables" - so there will be loads of inspiration and awesome projects with cool stencil techniques and designs to try out and wear! Hope to see you over there! You will find I have not only taken out my sewing machine (that has been lost in oblivion for ages) but also done a short video (my very first to be honest)!

Here's a little sneak peek image:


Click HERE to get taken to the project post. (click on the button below to go shopping).

Hugs and happy crafting!
Claudia
xxx


Thursday, 9 March 2017

A Canvas Tag and a Flower


Servus, hi, thanks for stopping by and welcome to my little creative spot!
It's been a long time since I last made a paper flower...but once in a while a project just screams for one and I have to admit: I had such fun creating it! I used the fab "Tattered Florals" die from Tim Holtz (which is the only flower die I have and one of my very first items I bought when starting this hobby).


The challenge for my latest DT project for Canvas Corp Brands was to work on one of their canvas tags from the "Canvas Shapes" line. It's a large, stitched tag made from pure canvas - so paints and mists and other media behave a bit differently on it than they do with paper. So I experimented a lot - with Gesso, aquarellable pencils, scraped on paint, sprayed and sprinkled on Glimmer Mists....and they all turned out just amazingly!


And of course my tag had to have a jute cord loop! 


If you want to see the finished tag and a detailed how-to with steps images over at the Canvas Corp Brands site (alongside another tag that was done by my crew mate Alicja - one canvas tag - two totally different outcomes) just hop over by following the link:


Hope to see you over there!
Hugs and happy crafting!
Claudia
xxx

Sunday, 3 May 2015

"The Magic in a Timeless Smile" - May Tag for Tim Holtz' "12 tags of 2015"

It seems like ages since I did my last tag, but yesterday, when I saw Tim's actual May tag for his 12 tags of 2015 I was so inspired that I had to directly head off to my crafting desk and get out all my thoroughly hoarded Tim Holtz stuff to involve in several hours of happily messing and creating with Distress paints, modelling paste and stencils, burlap, loads of idea-ology and other treasures from my stash.

And this is the result which I am quite happy with:


As I don't have most of the new stuff Tim uses on his May tag, I had to improvise with some of the older idea-ology bits 'n pieces, which I think still look as intriguing as ever as they are timeless as is the smile of the lovely lady from the photograph ;)

Using white modelling paste and one of Tim's fab stencils I added some texture to the top left corner of my tag. Once that was dry I gave the whole tag  and stencilled areas a rather rough treatment with various Distress paints and water from the spray bottle.


The edges of the tag were darkened using my "frayed burlap" Distress marker while the tag was still wet. That way the paint from the marker got soaked right in and I got a smudged, softer outline.


I created a "rose-y" pendant for my swivel clasp using a sheet from the lovely "Wallflower" paper stash and an idea-ology fragment. As I don't have the new Sizzix florals dies Tim uses on his tag, I wanted to at least incorporate some roses in a way.

To make the game piece match the colour scheme of my tag I painted it with Distress paint "picked raspberry". The other tones I used on my tag (mainly for adding colour to the burlap and stencilled texture) were "mustard seed", "broken china" and peeled paint". I also used them to paint my little wooden button, arrow and heart. 


 The word band was painted the same way and I used broken china Distress paint to make the letters pop out and also repeat the colour from the woman's dress and eye shadow and also the paper rose (which I made using the TH "Tattered pinecone" Sizzix die).


The adorable vintage flower button is an older idea-ology piece too (and I am happy it finally found its perfect home).

The word band was fixed to the tag using a thin leather cord that is glued in place at the back of the tag.


For a finish I glued some creamy white quillings to the bottom of the tag and added a  (previously distressed) ribbon of the same colour to its top. The repetition of that colour helped blend in the accoutrements flower button and the woman's face. And it also draws more attention to the woman's face as it repeats the skin tone.


Repeating shapes and colours you use with your project (in variations of shape and amount) in different spots always helps "fuse" all your elements to a greater "whole" and "keep them in place".


The photograph was coloured with Distress markers the way Tim describes in his post. I sanded and scratched the edges with the TH distressing tool before I glued all my elements and the chit chat stickers (which I blended in with Distress markers) to their advised spots. For a finishing touch I added some drops of DecoArt Liquid Glass for dew drops (which were meant to emphasize the flowery style of the tag). I saw and totally admired that with some of the wonderful creations from my lovely and awesomely talented friend Laura from Laurart and decided to "borrow" that brilliant idea from her. (I am afraid one can guess this was my first attempt....she does them so much better and so beautifully...lol).


I had a great time playing around with embellishments, paints, composition and highly textural stuff! And I really wanted to put her adorable smile in the spotlight (and I hope I succeeded)!

Hugs and happy crafting,
Claudia xxx 

http://timholtz.com/category/12-tags-of-2015/


Wednesday, 15 April 2015

"Pay no Attention to that Man Behind the Curtain!"

Servus and hi!

I hope by now Spring has arrived wherever you are and that you are full of energy!

What do I have in store for you today? Well, if you have missed yesterday's post here in my blog (which provides you with a preview and a link to a new DecoArt tutorial which I am really proud of and hope you will like) I would love to invite you over - just scroll down to the previous post after you have read this one or click HERE.

And today's post is about the actual challenge over at SanDee&amelie's Steampunk Challenges. If you haven't checked it out yet I highly recommend you do so - we have a great fun challenge theme, great makes from both the Design Teams and Inspiration Emporium are this month's prize sponsor! Yay!


Over at SanDee&amelie's Steampunk Challenges we show you the team B makes today to fuel your imagination and remind you of our actual challenge 


http://sandee-and-amelie.blogspot.co.at/
 

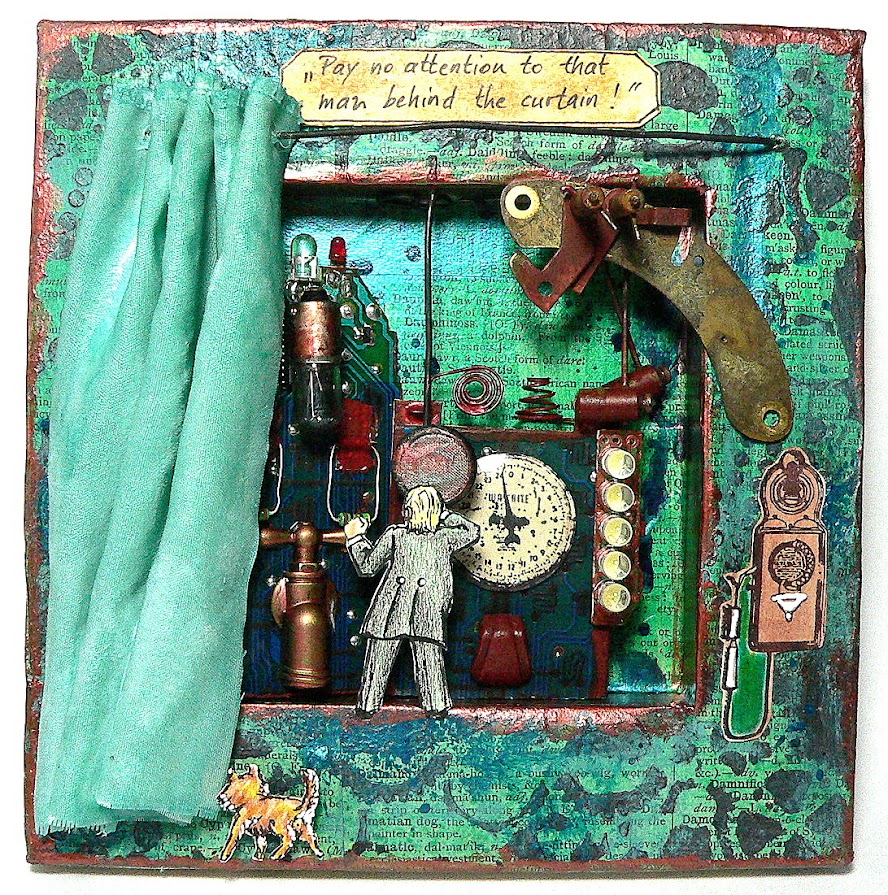
My first thought that immediately came to my mind when reading our theme for the month was that wonderful adorable curtains-scene from the old "Wizard of Oz" movie when Toto reveals the true "wizard" by pulling aside the green curtain.

I just love when - already being "unmasked" - the "wizard" slightly paniccing and hastily pulling some gears and pressing his buttons yells into his microphone "Pay no attention to that man behind the curtain!!" I sometimes use this quote too when finding myself fiddling with something that somehow goes surprisingly wrong while being watched... lol

So let's raise the curtains and show you my altered canvas which I turned into the place of Oz the Great and Powerful.


It was really hard to photograph my altered canvas as I hardly ever managed to capture the sheen of the DecoArt Shimmer Misters and Interference paints I added, but I think the images give you at least a slight hint of the metallic green sheen that I tried to achieve as it is the main colour of the scene in the movie.

I added a three dimensional curtain of course, which I made from a piece of cloth (cut from an old napkin) that I dipped into previously tinted Paverpol. Paverpol is a great new liquid medium for mixed media artists that hardens once dry but stays flexible for quite some time so you can sculpt it the way you want. You can either brush it on or dip your fabric into it. I discovered it at this Spring's creative fair in Vienna and this was my very first go at it (and it worked pretty well for me).


As you can see I fixed my curtain to a real curtain rail I made from wire. The whole shadow frame was done in a reversed canvas which I first coated with old dictionary pages that were glued on with matte DecoArt Decou-Page to have some tooth for my paints to adhere to and some background texture as well.

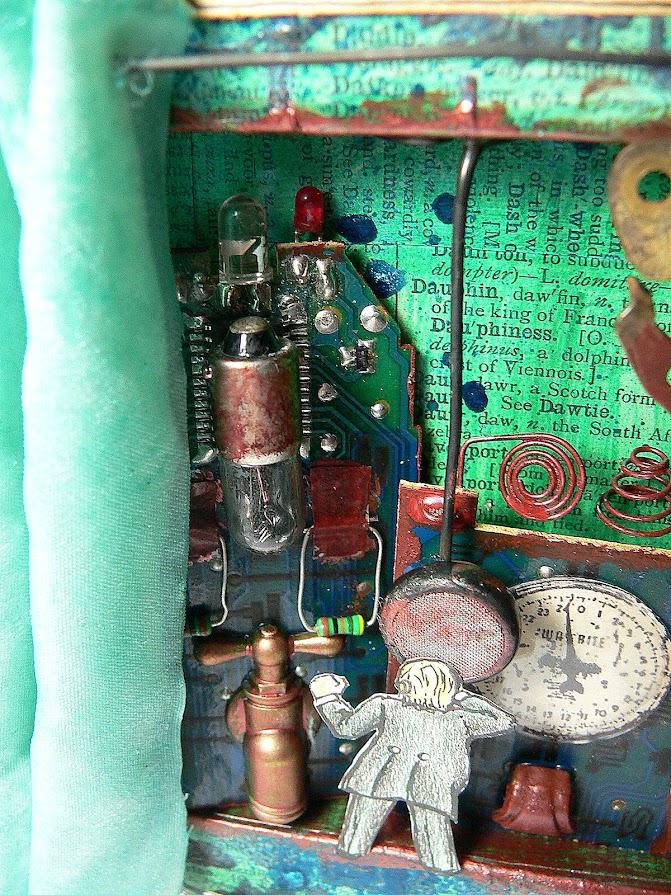
The control desk of Oz the Great and Powerful was made from the circuit board of an old (taken apart) remote control, which I sawed in two and glued some other small parts onto (like resistors (thank you, Brigitte! Yes, I still have some of the ones you sent me! Mwah!X), some LED bulbs, an idea-ology light bulb, a piece of a broken hook from a hiking boot, a Prima faucet embellishment...) to make it look like there were a lot of switches to pull and panels to control.


The microphone Oz speaks into is an old ear plug from a disc man my son found and brought me (he always brings me found metal parts like screws or washers to use them on my projects ;). I glued it to a piece of wire I had bent into shape and glued to the top of the frame (with Decou-Page) so it looks as if it was hanging down (just like in the movie).

The round pressure control panel was stamped onto beige card (using one of finnabairs new stamps), cut out and glued behind a watch glass from my watchmakers cabinet.


Oz the Great and Powerful was drawn by hand and coloured with colouring pencils before I fussy cut him and fixed him to the frame and microphone with Decou-Page.


Brave Toto was done the same. 


He's about 3/4 inch tall in real and I used a fine detail cutting knife to cut him out. He is fixed to the frame with two layered and cut to size 3D sticky foam pads.

I really tried to capture all the "drama" there is to this scene....lol...and show that key moment when Toto has just pulled aside the curtain and Oz (finding himself exposed) says his epically desperate sentence.


I admit - if I were able to add sounds and smoke to my make I would have. ;)

The metal piece in the top right corner is a piece from a taken apart alarm clock which I bought at the flea market and enhanced with some dashes of Viva Rusty Paper. I also used it on some of the wire pieces alongside some Ranger alcohol inks to make all the pieces blend together and build a warm contrast to the cool green.


The five LEDs to the right are from a broken headlight. The old telephone is a Stampendous stamp from one of my very first stamp sets I bought. I stamped it onto some beige card and painted over it with a very light wash of DecoArt Quinacridone Gold.

The quote was written by hand onto a die cut panel (using the fab Sizzix Tim Holz Alterations "Labels" set) that I had aged with some Distress Stains before. 


The gears texture you can see running around the outer frame was done using a mask and Viva Rusty Paper that was stippled on with a bristle brush. Then I painted over the dried texture with DecoArt media fluid acrylics in various greens and blues (including "Interference Turquoise" and "Interference Green")).


For a finish I dabbed some DecoArt Dazzling Metallics paint around the outer and inner edges of the frame (using my fingertips as always of course) and also sprinkled on some DecoArt Shimmer Mister in turquoise (by unscrewing the bottle and letting some of the paint drip from the nozzle's tube onto the areas I wanted). All silvery metal parts were either treated with alcohol inks or painted with DecoArt media fluid acrylics Quinacridone Gold or Viva Rusty Paper until I was content with the result.

And once all had dried I added my curtain which I admit was a bit scary as it was the first time I used Paverpol. So I did a test panel first to find out if it was tricky to use and about any dos and don'ts....well, even though I had done a practice piece I still was hoping that I would not mess up my frame with the glibbery, wet cloth. I think I only started breathing again once I found that all seemed to develop the way I had intended...lol.


Toto and Oz the Great and Powerful were added at the very end (because I needed Toto to pull the curtain of course and Oz to speak into his microphone).

I had a great time doing this shadow frame using the backside of a 6x6 inch canvas and I really am very happy with the outcome as I have managed to capture one of my favourite scenes from one of my favourite movies.


I hope you like it too and I would love to invite you to hop over to SanDee&amelie's Steampunk Challenges to check out the makes of my fabulous teamies who have outdone themselves on this month's theme "Raise the Curtains!".

I hope to see you join in our challenge soon! 
Hugs and happy crafting,

Claudia xxx