Saturday, 30 March 2013

Tim Holtz Time Travelers 3D Pop Up Card


Maybe some of you know that I started my paper passion with Toy Theatres' reprints from British and German publishers (Jackson Pollock or Schreiber for example).Some of them can be seen with my other blog "VonPappe".


So it should be no surprise to you that I love everything 3D like showcases, moving paper cards or paper dioramas. This time I tried to create a mechanical card on my own using my freshly arrived Tim Holtz "Time Travelers" stamp set! (Wow, I LOVE it!) and a model from a book about mechanical cards made after originals of Valentine cards from the Victorian and Edwardian eras.


When closed the card folds flat to fit with an envelope, but when you pull the label on the bottom it unfolds into a 3d showcase with three layers by a card and ribbon mechanism well hidden from sight within the card's design.


First I stamped the traveler, the airplane and the suitcase pile onto white card, coloured the images using watercolours and fine tip brush and then cut them into shape.


They were glued to the cut out and folded frames afterwards and these were then glued exactly into position to provide easy folding for the closing and opening process.

The images work together perfectly with the Tim Holtz "Destinations" paper stash! So I used these for the front of the card, the front of the pull tab and the background of the showcase. The backsides (which are mostly doubled due to aquired stiffness to get the mechanism working without tearing or bending anything) are made from heavy white card.


For the front I did some additonal embellishing with a dry embossed and sanded frame from Kraft Core, some die cut Tim Holtz letters, an idea-ology fastener and an idea-ology hinge clip holding a stamped, cut out and aged ticket.

The explanations in the book were not that detailed and the template way too small so I had to do my own to fit the size of the stamped images. That meant a lot of measuring, calculating, failures and cursing as well....but finally I succeeded!!! Woohoo!

Hope you like it!!!
Thank you for stopping by!!!

With this project I enter Happy Campers challenge "Add Dimension", Our Creative Corner's "designer paper'" challenge and also Simon Says Stamp challenge "anything goes"

Happy Easter to you all!!!!

Hugs,
die amelie x

Thursday, 28 March 2013

Words and Phrases

is the theme of IndigoBlu's most recent challenge. As they want people to use IndigoBlu stamps only I once more had to use my (momentarily only) stamp set: "Sarah's Choice", which I love the most as you can use it in so many different ways (to create texture for example).


This time I used the single words coming from the dictionary explanations for the words ART, DREAM, INSPIRE and VINTAGE to form some sentences.


As I love Shakespeare's works I was very happy to find his name with the stamped dictionary images! The rest of the work consisted in fiddling and puzzeling. My husband saw me doing this and wanted to know if I was doing some blackmail message *lol. But the "message" reads like this:


For the background of the tag I used the script stamp and some heat embossing, blending with ink afterwards and spritzing and stamping to create some depth. Then I glued the sayings onto it and embellished with a philosopy tag and ribbon. Done.


As I think every form of ART (and especially writing) is in one way or another expressed emotion I thought the sentence to be very much up my alley as I write poems or short prose from time to time (trying to do exactly that).

I also enter SSSS's "quotable" challenge  and The Artistic Stamper's "tag" challenge with this tag.

Thank you for visiting!!!

Hugs,
die amelie x

Wednesday, 27 March 2013

WOYWW # 199

Another day here having us feel like in deepest winter... it snowed all the way through the last two days over here and it looks exactly the way you would wish it to look like for X-mas eve.... well, at least my dog cannot get enough of it!

What's on my workdesk today? Well, to be honest - not very much. I tidied it up after finishing my "metamorphosis"-configurations tray yesterday which you can see here.


To the left you can still see the scrap of paper where I noted the measurements of the compartments on - together with my latest purchase: a lovely Crafty Individuals stamp sheet!

You can also see the bowl holding my seaside findings and the remains of the paper I stamped the words for decorating the tray on. The opened slide film box in the left upper corner held the collected beetle who found a worthy home yesterday too. So nothing really exciting to see today.

So, What's On Your Workdesk this Wednesday ?

But a lovely occasion to wish you all a wonderful Workdesk Wednesday!!!

Hugs,
die amelie x

Tuesday, 26 March 2013

"metamorphosis" - Tray

I have been wanting to do a configurations box for quite a while now, but they are not easy to get here in Austria and shipping costs (even from Germany) are rather expensive due to the size.

As we will get a brand new kitchen at the end of May, we have been browsing through our kitchen cupboards to get rid of everything too much (which was quite a lot to be honest). On this occasion I found a wooden box that once held three knives. I thought it to be the perfect size for a wall hanging configuration tray (or whatever one should call it).

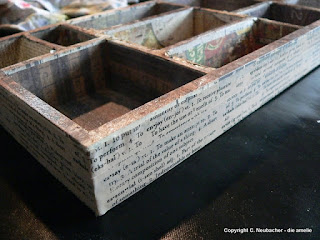
I made the compartments using glue, thick corrugated card and Tim Holtz tissue tape. Then I filled the compartments with Tim Holtz papers cut exactly to size and covering all five sides of each single "box". The outside was covered using a dictionary style washi tape.


At that stage it looked way too clean and
neat (even though I chose the TH
papers for a rather grungy look) - so I gave the whole tray a rough treatment with Mr. Huey's color mists opaque white and dark calico and a lot of dapping and whiping, adding colour here, taking some off there. (I admit I really was afraid of spoiling hours of work with that step - but it worked out - even better than expected! The tray looked pretty grungy and timeworn by then.

I created a wire hanging for the tray trying not to be too exact with bending and curling.

There - my wall hanging tray was ready.
At that stage I still did not know what to fill it with. Maybe a lot of TH goodness? Or do some heavy embellishing with tickets collected on our various holiday trips? Hm.


I started to browse through my beach findings again and then the idea just hit my mind: I have been collecting fossils, stones, shells and nature finds in general since I can think and my son does the same now. In his room he has two showcases filled with self gathered "nature treasures" and "loaned" finds and more treasures from me and my husband.

I decided to use some of them for my wall hanging. And voila!


I very much enjoyed translating Ovid's "Metamorphosis" in school and have been loving the meaning of this word ever since (and use it quite often to be honest ;). So I enter SSSS's "quotable" challenge with this project. I also enter Country View Crafts' challenge "Pick and mix - anything goes" and also Simon Says Stamp challenge "anything goes"

Most of the treasures were collected during our hiking trips, some of them were bought at the annual fossil show and some are very special "specials" :)

For example the stone my son painted when he was maybe four or five years old, trying to make it look like an insect enclosed in amber:


Or the beetle I collected in the
lovely Wienerwald.

Except the big trilobite all the fossils are "self-found"! We have a great spot near Vienna where one can find them quite easily.

The shark tooth and the pearl are from a geological museum site a bit up the Danube, where a huge prehistoric mussel bed was discovered which proves that there once was ocean nearby our place! Kids can filter shark teeth and pearls in a huge sandpit there.


The deserted cocoon in the upper right box is from a Death's Head Hawkmoth we found as a huge (really huge!) caterpillar when cutting our hedges. We took it home with us and prepared a container with some soil and leaves from the hedge and it dug itself in after two days of feeding. It spent the whole winter this way stored on our bedroom's window sill as this is the coldest room of our flat. We could see it at the very bottom of our container, twitching from time to time. One day in spring (when we had stopped to believe that it had survived) we had a really beautiful big hawkmoth sitting in the container. I learned that Death's Head Hawkmoths appear quite rarely at our regions and travel far distances from Africa to southern Europe.


Just HAVE to show you the image! Isn't he beautiful (and big)?
As we found the caterpillar in our garden on the very first day we entered it and this is such a wonderful thing to remember I hope it will be okay if I enter the Craft Room challenge "In Our Garden - Anything but a card" with this project.

Back to the wall hanging: I stamped some words that came to my mind while watching the filled tray onto card that I had given an aged look in advance, cut them out and glued them to the frame.


Done!

Some more close-ups which I hope you will enjoy:


I hope you will forgive me my picture- AND word-heavy post this time! Thank you very much for stopping by!!!

Hugs,

die amelie x

"Recycle It!"

is this fortnight's theme over at Try it on Tuesday!

(The regular visitors among you know that Tuesday is my "Challenge Day", so if you want to know what challenge the DT from FunwithATCs have prepared for you, please, scroll down to the previous post :)

But what do we want you to Try on Tuesday for now?
We want you to recycle or upcycle discarded stuff, maybe use old packages, plastic boxes string,  etc.

I was inspired by a cookie packing, holding "Linzers" and "Ischlers" (do you also have cookie names that sound as if you were eating inhabitants of your own region's towns?)... er... a cookie packing that - after emptying it - just looked like it had the perfect size for storing ATCs or other cards - and I was right!
Unfortunately I accidentally deleted the first "before"-image of the packing and found out too late, so I had to buy another one (and empty it all by myself!) to be able to show you the before and after stages of my project.

Well, sometimes you have to face the truth and make rather selfless sacrifices for art!


But I guess I should start by showing you the original state of my card index box! So this is how the cookie tray looked in its' original state:


and this is how it looked after I gave it some rough treatment with Gesso, stamped tissue paper and Mod Podge, stamping directly onto the tray and spraying some areas with dark Glimmer Mist tones.


Then I cut four dividers from black cardboard and cut four labels using the Sizzix Alterations die "Tiny tabs and tags". The dividers were inserted into tiny incisions I made to the sides of the box.


The project was the perfect occasion to use one of my awesome handle pulls!


 And you can see the various textures I tried to create by stamping some texture stamps right onto the already covered box.


I am really curious what you will be creating by upcycling or recycling and hope to see you over at the challenge blog!

And remember - all who enter our challenge are eligible for our monthly piize draw and this month's prize will once more be sponsored by 


and it's a £10 store voucher!

So happy recycling and good luck!

Hugs,
die amelie x

"Writing" at FunwithATCs

I am so happy to be able to welcome you to this fortnight's brand new FunwithATCs challenge - 


"writing"!


If it is handwriting or if you use script stamps (or have any other inspired ideas upon the theme) - it's completely up to you...as long as you create an ATC (Artist Trading Card) of the size 2 1/2 x 3 1/2 ''!

I love writing, calligraphy, writing poems and short stories (there's even a once started fantasy novel stored in one of my (virtual) drawers, waiting to be finished some day). I love the look of handwriting. I love that writing is a process of creating images quite similar to painting, stamping or any other art.

So you should not be surprised that I chose a quote by C.S.Lewis for my ATC, that expresses my feelings towards "writing" quite well.


I combined some script (and flourish) stamping (along with heat embossing), handwriting, drawing and - of course - ink blending, use of metal and distressing.

I hope to see your writing/written creations over at the FunwithATCs challenge site soon! And you should have a look at my team mates' awesome creations too!

Thanks for stopping by today! Have a wonderful crafty week!

Hugs,
die amelie x

Sunday, 24 March 2013

"Water"

SSSS have a lovely challenge this fortnight called "Water". I am quite last minute on entering, but Mr. Mojo gave me some hard times during the last days. I also enter the Country View Crafts challenge "Pick and Mix" with this project.

As I love the sea and water in general, I was inspired to create a canvas when browsing through my beach findings collection from the wonderful holiday at Paradise Island two years ago. I made long early morning walks on deserted beaches with the warm wet sand beneath my feet and my eyes fixed on the ground hunting for treasures while enjoying the ocean breeze.


As you can see some of my loot went into this project and will make a wonderful memory keeper of (sadly too few) really happy days in the Carribbean.


I used crackle medium between a blue and coffee cream coat of acrylic colours on the canvas and blended the edges with Distress inks and Inka Gold.


The matchboxes were rusted, filled with three of my treasures and glued to the canvas. The words were stamped using my HeroArts alphabet stamp set.

Done.

Close ups will follow as usual!

Thank you for stopping by and have a wonderful Sunday!

Hugs,

die amelie x


Wednesday, 20 March 2013

MOMWW = Mess On My Wednesday Workdesk

I am sure most of you know Julia Dunnit's lovely community desk hopping "What's On Your Workdesk Wednesday". Well, and Wednesday it is again and I already missed the last two of them and didn't want to miss this one again even though I am in hurry today too (as it was with the last two Wednesdays...but getting a new kitchen is a good excuse I guess ;).

So here's me Wednesday Workdesk Mess - on the desk you can mainly see all the stuff I used yesterday to create this tag booklet:


(too see more pages please scroll to the previous post).

As I didn't find the time to clean up the desk it looks as it always looks after a visit from Mr. Mojo and some happy messy chaotic crafting:


I hope I will find the time to visit you and your workdesks in the afternoon! But now I have to head off to the kitchen studio for last details on the planning. Enjoy your Workdesk Wednesdays in the meantime!

Hugs,

die amelie x