Showing posts with label 3D. Show all posts

Monday, 15 May 2017

The Happy Prince - guesting at Calico Craft Parts

Servus, hi and welcome to the first of my posts on here for today!

It is my bi-weekly invitation to my project that is being presented over at the Calico Craft Parts Blog and I hope that I can lure you into taking a closer look.

My make is all about "The Happy Prince" by Oscar Wilde - and those who don't know the short story can find it over HERE.


Meet the prince and his friend, the swallow and a full step by step tutorial over at the Calico Craft Parts blog. I have used the middle sized of the three cubes of Calico Craft Parts' Stacked ATC Cube KitThe largest cube was used for this project HERE and the smallest for that project over HERE. (which will go live in 90 minutes on my blog).

So I hope you will not only visit the Calico Craft Parts Blog and Shop but also come back to my place for more inspiration in about  ninety minutes when I will be presenting my project for this month's challenge over at SASPC

Thanks for stopping by
and

hugs and happy crafting!
Claudia
xxx


Saturday, 15 October 2016

My Own Little Farnsworth! Yay!

Servus, hi and welcome! I am so glad you're stopping by!
Today I have a little somethin' to share with you that I had wanted to do for a long time...but haven't dared to approach...until now!

Fans of the awesomely charming and fun TV series "Warehouse 13" already know what I am talking about as they know that awesome steampunk-ish communications device that Archie's team use to update each other on the latest artefacts and their powers and effects - the Farnsworth!
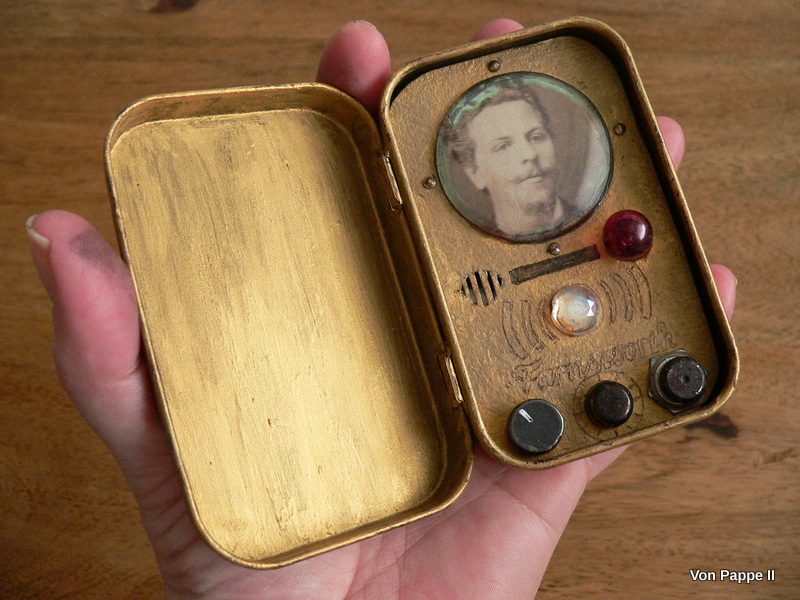
And here's my version of it - made from an altered tin.


It is my project for this month's "Anything Goes - Steampunk/Industrial" challenge over at 


- and I would love to see you play along with us soon! 


Don't ask me who this guy is that's talking on the phone...I haven't seen him before...maybe a new member of Archie's crew...


I started by searching my bits 'n bobs box for small buttons, screws and switches that I could use for my Farnsworth. A watch glass from my old watchmaker's cabinet was perfect for the little circle screen and the light bulb was turned from white to red using alcohol ink.


To help the DecoArt Metallic Lustre adhere to the tin I first gave everything a coat of matte DecoArt Decou-Page and then a coat of DecoArt media black Gesso. That luckily provided enough tooth for the Lustre to cling to. I used the Metallic Lustre like paint - applying it with a soft wide flat brush.


I cut out the openings for the light bulb and for the speaker.


Then I glued on all the pieces after I had "engraved" the "Farnsworth" logo using a black ball pen.


I stacked some thick corrugated card pieces to insert my finished operations board into the tin and added four gold half pears around the circle screen.

Voila! 


 This is the size of my Farnsworth - a bit small, but I couldn't find a larger tin so far. So a mini version will have to do for now.


It was great fun to make and the result looks astonishingly convincing! Well, at least to me...lol

Our Anything Goes - Steampunk/Industrial challenge over at the SanDee&amelie's Steampunk Challenge blog is still open until the end of the month! Make sure you check out the makes of Team A and B and let yourself be inspired by the variety of projects made by my awesome DT which I am so proud of! ;) Just click HERE to get to our challenge blog and I hope to meet you over there soon!

Hugs and happy crafting!
Claudia
xxx


Wednesday, 15 June 2016

Time Travels in a Box - SanDee&amelie's Steampunk Challenges Mid-Month Reminder

Servus and welcome to my little creative spot!
It's time for our mid-month reminder post over at SanDee&amelie's Steampunk Challenges!

Those who know me a bit, also know that I looooove found objects. Beautifully aged and timeworn bits and pieces that would tell stories from the past if they could only speak. And I love assemblage art!

Assemblage art originates from the late 1800s, when sculptor Auguste Rodin already started to use casts made of his already finished pieces to combine these parts to form new pieces of art.
Pablo Picasso and Marcel Duchamp did assemblages too and now there are a lot of contemporary artists who create wonderful assemblage art. And I especially love the magical art of Joseph Cornell!!!

For today's project I wanted to create a piece of assemblage art that consisted of found objects that could "speak for themselves" (instead of having to be altered or done over with special media to make them more appealing).

I decided to use a beautiful little black box that I was recently given to by dear friends (who keep the good lookin' emptied boxes for me - which makes me a really lucky person to have such thoughtful and caring friends!) and some of my long hoarded treasures alongside a few bought embellishments to create this time travel box...


The guy in the blue jumper was a collectible pin from a series that came with the Julius Meinl Coffee tins back when my grandma and grandaunts were young girls.  I have an old tin with some more and an old diablo game that belonged to one of my grandaunts. But what good are these treasures if you don't put them out there so they can be looked at?

So I decided it was time to shine some light on some of these old originals (like the pin, the threaded and other vintage buttons, the watchmakers tools in the little corked glass vial, the rusted spring and ring and the frozen charlotte) alongside some embellishments from Prima and the idea-ology range.

The background and also cover of my box show my great-grandmother's passport!


I made colour copies and sealed them with matte Decou-Page. I also used the Decou-Page to fix all the items to the box.


Now I have some of my beloved treasures in a box nearby (instead of hidden away in tins and drawers), and if I take off the lid, I also have a little assemblage frame. As the objects are beautiful as they are, I decided to not add any paints or other media and keep their original state.


I just needed to alter the look of the idea-ology "Salvaged" word band using alcohol inks to make it match the other objects' colours.


I think the original colour from the yellowed passport paper, the shabby white of the frozen charlotte and the vintage buttons, the orange tones on the finnabair pieces and the rusty spring alongside the red from the thread that holds the passport pages together and from the stamp in the top right corner all go together really well! And the black box frame repeats the black of the writing - so all the elements fuse together beautifully. Only the blue jumper forms a little contrast - but that makes the oranges, browns and pale yellow-ish colours pop even more.


Playing around with colours, shapes and composition was not only fun but also a very relaxing thing to do. And browsing my treasures in all their boxes and little drawers was very enjoyable too. ;)


I hope to see you over at our challenge blog, where you will find all the other fabulous projects of Team B today! And of course I hope you will join in our challenge and have a lot of steampunk creating fun!

Hugs and happy crafting,

Claudia
 xxx


Grab our badge for display on your blog!

Monday, 30 May 2016

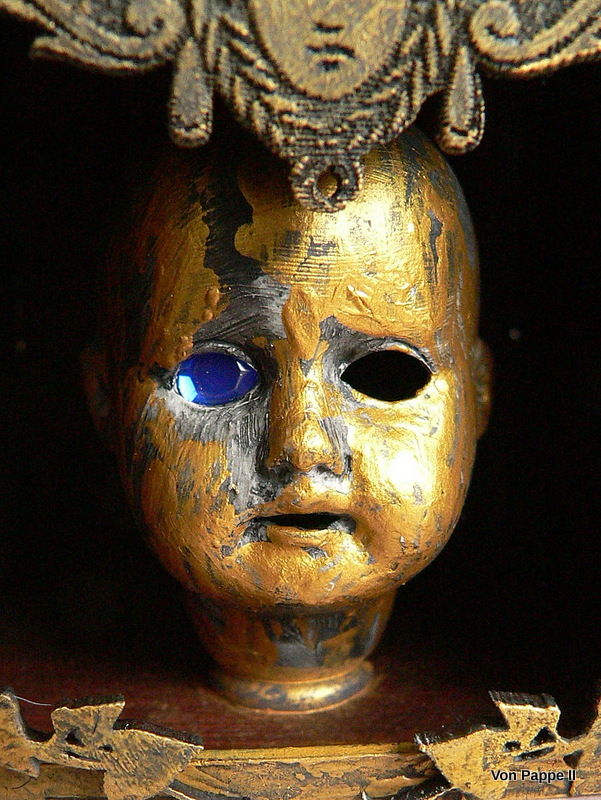
Welcome to the Freak Show!!!


Well, well....are you ready for a dare? If you feel you are in for some mysteriously weird and disturbing sights I recommend you hop over to the Calico Craft Parts Blog to find out more and take a look behind the curtains! A detailed tutorial awaits you too. ;)

If you are simply in the mood for some online shopping then the Calico Craft Parts Shop is the right place for you!


I hope to see you over at the blog of course!

Hugs and happy crafting,
Claudia 
xxx

Thursday, 19 May 2016

Let's Hit the Beach! The New Dare at Emerald Creek!

HI and servus!

It's time for a new challenge over at Emerald Creek Dares and this time it is all about summer, the beach and water fun themes.


I recently stumbled over some cheap wooden houses at a dollar store - so I decided to create one of these gorgeous beach houses I adore so much from one of them:


Emerald Creek products used:


I also used various Distress Paints, Distress Spray Stain "broken china", a Tim Holtz idea-ology Chit Chat sticker, an old book page, a black permanent marker and Ranger Matte Medium.  

Here's how I did it:

First I used some masking tape to create a stripe pattern and mask the roof and door:


Next I dabbed on some embossing ink using an embossing dabber and poured some of the fantastic Chinese New Year embossing powder over the whole piece. I heat embossed my red stripes:


Then I masked off the red stripes - covering them with masking tape and did the yellow stripes with the Easter Parade embossing powder. 


I painted the door and roof using Tim Holtz Distress Paints. I also covered the sides of the beach hut with red Distress paint.


Next I chose the lovely waves stamps from Nicole's lovely "Upstream" stamp set to create my ocean waves.


I stamped them onto some blue designer paper using white opaque stamping ink and heat embossed the images with Ultra Puff White embossing powder:


To increase the contrast and make my waves more visible I sprayed on some "broken china" Distress Spray Stain:


I also used Distress Paints "mowed lawn" and "black soot" to customize the lovely key charm and hearts brad to add to my beach hut.


Some "mustard seed" Distress paint was smudged with my fingers onto some yellow patterned paper to prepare my background for the "Carmen" stamp which I intended to use to create my sun.


The image was torn into shape (instead of fussy cut) - so I had some white border around the stamped sun. I glued the sun to the back of my wooden house using a strip of transparent acetate (which was a left over from some packaging). 


The waves were fussy cut and glued to my strips of beach sand (which I had cut from some old book pages that had been glued onto some heavy card to make it more sturdy). 


A little fish that is jumping for summer joy was added the same way as the sun - using transparent acetate that was glued to the back of the house block. 


I stole borrowed one of my son's "Kappla" bricks to mount all my pieces to. 


The key for the beach hut and the welcoming heart sign were glued on using Matte Medium and left to dry naturally. 


I love how the Emerald Creek embossing powders sparkle....that reminds me of the sun sparlking and dancing on top of the ocean waves and its dancing reflections on beach houses, old boat houses and piers (which is pure summer feeling for me):


So now that you have seen my project I would like you to hop over to the Emerald Creek Dares blog to also check out the fabulous summer beach projects my talented team mates have created! And maybe we can even lure you into playing along! ;) 

Hugs and happy crafting,
Claudia 
xxx