Showing posts with label altered art jewelry. Show all posts

Wednesday, 1 July 2020

Victorian Style Brooch & Pendant - for SASPC's Summer Special Challenge

Hi, servus and welcome to the kick off of our annual summer special challenge over at SanDee&amelie's Steampunk Challenges! I hope you will join in our two months long summer challenge again this year!

My project for your inspiration this time is inspired by an upcoming murder mystery dinner on a beautiful castle with our best friends, that will throw us back into Victorian times. Yay! I will be playing the murdered lady's chambermaid - so I am looking forward to having lots of fun and joyful role playing!

Of course I will need some personal belongings for my character (my friends and me all being passionate and true role players) - so I decided to make a brooch and pendant showing some of "my" ancestors that I like to keep close to my chambermaid's most innocent (!!!!) heart ;)


But back to the project and the challenge! The rules apply as usual - the only small change for our summer special is that you can enter up to five makes during the two months instead of the usual three. So two more chances to win one of our two fabulous prizes (being generously sponsored by DecoArt and boozybear chipboard)!!!!

To create my jewellery set, I used DecoArt matte Decou-Page and Raw Umber Americana paint alongside DecoArt media clear Crackle Glaze, Liquid Glass, Raw Umber, Interference Gold and Metallic Gold fluid acrylics, Titanium White Antiquing Cream and Americana matte spray sealant.

The arches and tiny shields MDF wood shapes are from Calico Craft Parts.


The papers I've cut the backgrounds and portraits from are from older Spellbinders designer paper pads designed by wonderful Susan Lennart Kazmer.

I also added some texture using the 3D Impresslits "Lattice Trim" designed by Tim Holtz.
The loop on the pendant was made using a thin strip of linen ribbon that I glued in place with matte Decou-Page.


(by the way...have I already mentioned that I am NOT the murderer of my poor lady?...I am sure it must have been the gardener!!!)


The Lattice Trim pieces were first painted in Metallic Gold and then given a wash of Raw Umber fluid acrylic.


The arches were first painted with Raw Umber and then given a coat of clear Crackle Glaze. Once that had cured, I went in with Titanium White Antiquing Cream and only wiped part of that back with a damp cloth for an aged look. Before I went on, I sealed the two pieces with DecoArt Americana matte spray sealant (otherwise the Antiquing Cream could be reactivated by any moisture or come off with time).

The third arch shape was covered with some script designer paper and then painted with Interference Gold.
The tiny shields with the glued on portraits were given a thorough coat of DecoArt media Liquid Glass each and left to cure over night.


Once all the pieces were dry and cured, I painted around all the edges with Metallic Gold fluid acrylic and then diluted the left overs on my palette and sprinkled that onto the pieces as well.


I used a simple safety pin for my brooch. It was glued to the back using matte Decou-Page and a piece of linen ribbon. I made sure the ribbon was glued tightly around the pin, so it would stay in its exact position. Gold Metallic Lustre was added to highlight the raised areas from the Lattice Trim pieces where the wash had toned it down too much.


Done!


I love how much dimension the Liquid Glass and the Lattice Trim add to the pieces! And the depth and weathered look from the sprinkled on Gold and the Antiquing Cream was just what I had hoped to achieve! A thin purple velvet ribbon from my stash was the perfect addition to the more colourful pendant. Yesss!!!

I love it when things come together just nicely! 


I hope you like my little jewellery set too and are inspired to play along! There's time until the end of August to enter your creations to our challenge. Over at our challenge blog the teamies' fabulous makes are waiting for you to be checked out as well - please, take some secs to visit their blogs and leave them a little love. Thank you!

Hugs and happy crafting!
Claudia
xxx


Tuesday, 15 October 2019

Dressed It to Wear It - Stencilled Bubbalux Bangle for StencilGirl Products

Servus! I am so happy you're stopping by my little creative corner today!

I am especially happy you're here as today I am sharing one of my first full process videos that comes with this special bangle I created from bubbalux Craft Board and fabric that I had decorated with DecoArt paints and fabric painting medium and StencilGirl Products stencils. The video gives infos on the products used and shows how I create my layers on the fabric and how I put the bangle together and add some wire wrapped shell scraps...


So if you want to find out, simply hop over to the StencilGirl Talk blog to watch the twelve minutes long video I've done for you.


I hope you will like the video and that it encourages you to create your own non-sew fabric bangles!
Simply click HERE to get taken to the blog post with the tutorial and loads of images.


Hugs and happy crafting!
Claudia
xxx


Thursday, 14 March 2019

Hand Painted Folklore Style Jewelry - a DecoArt Mixed Media Project

Hi, servus and welcome to a short invite over to the DecoArt Mixed Media Blog, where I am sharing my latest project.

DecoArt have recently released a new product - "Stylin" Multi Surface Fashion Acrylic.
Being a hoarder of all sorts of alterable stuff I luckily (hahah!) had some leather scraps hidden in the backs of my shelves that now called to be used for trying these out and creating some gorgeous wearable fashion mixed media art.


I have recently started to explore folklore art because I love that it is close to doodling but also combines this with a playful way of designing and an exuberant painting style that is related to the tradition of former painters' "horror vacui", which is a Latin term used in art history for "fear of the empty space" and describes painting styles that aim for complete coverage of a surface with loads of detail, shapes and patterns instead of have filled and painted in space contrast some empty or negative space (as is more usual with contemporary art). 

As you can see folklore style even makes me, the grunge girl,  go for bright and joyful colours. ;) 

More info about the Stylin paints, the full tutorial and many detailed steps images are waiting for you over at the Mixed Media Blog
I have also taken steps images of the painting process so you can follow and recreate the cuffs if you don't want to go for an own design. 

Hope to see you over there soon!

Hugs and happy crafting!
Claudia
xxx


Friday, 24 August 2018

Don't Forget to Shine! - Bubbalux Bangle


Hi, servus and thanks for stopping by! It's Friday evening over here and I wish you all a lovely weekend! Finally temperatures have cooled down. Phew! With lower temperatures my creative muse seems to have returned as well and I would like to share a project today that I made using something new to me - CraftTex Bubbalux Creative Craft Board.

The lovely people from Personal Impressions let me have some for free to play and experiment with. Thank you so much! I had great fun and have yet just started to find out about all the possibilities.

On the package it says that Bubbalux can be cut with scissors (I used large ones and that worked well), die cut (that's on my list), embossed (of course I had to try that!), painted (yes, that had to be tried out too), shaped (Whoa! Cool! That was definitely the first thing to put on my "try this"-list!), stamped on,  screen printed and ...well, I am sure other crafty folks out there will find out a lot more amazing things to do with it.

Of course my aim was to find out if I could also use it and create something Claudia-style...if you know what I mean...something a bit grunge and worn looking.

And here we go:


Voilá - my first Bubbalux Bangle, done with the use of our hair drier and various DecoArt and DecoArt media paints and products. But let me also show you the back and inside of my bangle....


...and then take you through the process.


I received some blue Bubbalux to play with (it comes in six different colours). Packages come in sizes of three sheets of 2mm thickness that measure 215 x 279 mm.


I used my large pair of household scissors to cut a strip of 25 mm width off one sheet. That took a bit of an effort, but I managed to do a neat cut easily. Then I removed the protective clear board-coating from the cut off strip.


I cut the strip to the length of about 16 cm and sanded all the edges and corners with a sanding block.


Of course I had to try some embossing with my Big Shot! That went absolutely smoothly and the result looked really cool!


I carefully heated the embossed strip with our hair drier  (as there's only a little heat needed to soften the Bubbalux to bend it into shape). That was really easy too. You only have to pay attention to not heat it too much,  otherwise the embossed texture might get lost (also pay attention not to flatten the embossed texture when holding and shaping the softened bangle with your fingers!)


For my focal element (and to cover up the edge where the two embossed sections meet in the centre) I also cut out and embossed a single word using a tiny piece of Bubbalux from the left overs and the same embossing folder again. The single word was glued on using superglue.


Next I primed the bangle's outer side with Lamp Black DecoArt Americana acrylic paint. I stippled the paint on with a worn bristle brush to avoid any visible brushstrokes. By stippling on the paint instead of brushing you also achieve beautiful texture and tooth for the following layers of paint to hold on to.


Then I started dry brushing on different layers of acrylic paints. The first layer was DecoArt Titanium White Americana paint.


That was followed by a layer of DecoArt Quinacridone Gold Hue premium paint, ...


...then by some Raw Sienna,...


...some Cobalt Teal Hue...


....and once that had dried, a wash of DecoArt media English Red Oxide fluid acrylic paint.


I let that air dry thoroughly before I went on to my next step - gently dry brushing on a very light layer of Lamp Black here and there and then sealing the dried paints with a matte spray sealant. I finished off my bangle by adding some Orange Flicker DecoArt Metallic Lustre with my fingertip for the final bling.


To cover up the blue colour from the Bubbalux sheet on the bangle's inside, I glued on some fabric using matte DecoArt Decou-Page. I first glued the fabric on, let that dry and then cut off the excess. The Decou-Page also helps to prevent the fabric from fraying.


I added more Orange Flicker Metallic Lustre to all the edges once the glue had dried to finish up my bangle.


And this is how it looks when being worn:


The Bubbalux is so lightweight that you hardly feel it on your wrist and there's a short moment of surprise when you pick it up, because it weighs nothing - the worn metal look even adds to that effect.


I spy some potential for more fun and lightweight mixed media jewellery projects in the future! ;)


I hope you like my heavyweight looking lightweight "metal" bangle as much as I do! I would also love to hear about your experiences and projects with Bubbalux as I have only just started to find out about all the possibilities there are. I am sure some creative geniuses out there have already taken this new crafting substrate to the next level. ;)


Have a nice weekend and as always
hugs and happy crafting!

Claudia 
xxx

Tuesday, 8 May 2018

Stencil it! Wear it! - a StencilGirl® Creative Team Project

Hi, servus and welcome to a short invite over to the StencilGirl® Talk blog, where I am sharing my very first project as a new member of their amazing StencilGirl® Creative Team today! I have already shared the fantastic news on social media yesterday and am totally overwhelmed by all the wonderful and encouraging response! Thank you so much each and every one for the congrats and praise! I promise I will try my best to not disappoint you! XXX


This month the projects from the Creative Team will all go by the theme of "Wearables" - so there will be loads of inspiration and awesome projects with cool stencil techniques and designs to try out and wear! Hope to see you over there! You will find I have not only taken out my sewing machine (that has been lost in oblivion for ages) but also done a short video (my very first to be honest)!

Here's a little sneak peek image:


Click HERE to get taken to the project post. (click on the button below to go shopping).

Hugs and happy crafting!
Claudia
xxx


Friday, 9 June 2017

Metal Tag Pendants for DecoArt Mixed Media

Servus, dear creative friends from all over the world, and thank you for stopping by my blog!

I would like to invite you over to the DecoArt Mixed Media Blog to check out my latest project and tutorial that I have made for you.

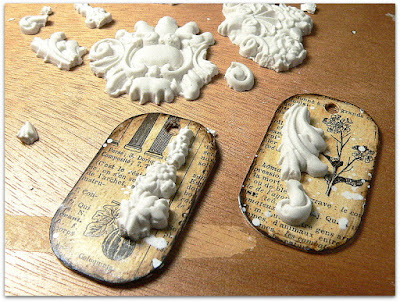
You know me - I can never throw away anything - so I had some broken plaster cast left overs that I had put aside some weeks ago without any idea back then on what to use them for...and then the right moment and project came along so they found their "home"...


...on these two metal tags that I had almost forgotten about. (I know I still have to practice a lot when it comes to using moulds and plaster...but hey - as long as the "failures" can be turned into something "right" everything's fine...lol).

If you want to find out about the finished pieces simply hop over to the DecoArt Mixed Media Blog. I would love to see you over there and I hope you'll like my project!

Hugs and happy crafting!
Claudia
xxx


Monday, 6 March 2017

Get Those Cogs Spinning!

Servus, hi, thank you for stopping by and welcome to today's short invite post for another project and short how-to over at the Calico Craft Parts blog!

Calico Craft Parts have just launched some of the most amazing new steampunk designs and of course I couldn't resist laying hands on them.

If you want to know what it is that I used the tools and technique shown below for, simply hop over to the Calico Craft Parts Blog to find out!  ;)


Hope to see you over there! 

Hugs and happy crafting!
Claudia
xxx


Saturday, 29 October 2016

Gypsy Fortune Teller Cards

Servus!

Today I just want to share a little somethin' I made for my niece, Rosi, who will have a Halloween party on Monday where she will be wearing a mysterious gypsy woman costume and she still needed some fortune teller's cards - so I promised I'd make some for her.


I had this lovely 7 Dots Studio designer paper with tarot cards on it and cut them out. Then I glued a patterned paper to them for the backside, inked the edges black and ran them through my laminator.

To have something gypsy style looking to tie the cards up in a bundle I twisted some thin wire and various ribbons that I had tinted with some walnut ink solution into a bendable cord. The wire within makes it flexible and all you have to do is wrap it around the cards and it will keep stay in place.


I created a little charm using a 7 Dots Studio rubber stamp and shrink plastic. Then I rummaged my embellies box for some beads and other goodies and found a lovely feather.


The beads were part of a cheap bracelet that I took apart. I threaded them onto an eye pin and attached it to the wire within the gypsy cord.

I hope my niece will have the most wonderful Halloween party!!! I am sure she will look just terrific. And as she is great at putting up a show I am sure she will be a fantastic fortune telling gyspy! (Let's hope I will get to see some pictures of her!)


Thanks for stopping by and Happy Halloween!!!
Claudia
xxx

Thursday, 15 September 2016

Steampunk Necklace Tim Holtz Style

Servus, my dear creative friends and followers!

Today I am sharing a little steampunk style necklace with you that I made using Tim Holtz' rectangle Ornate Frame Sizzix BigZ die with shrink plastic, DecoArt media Liquid Glass and some of the cool Tim Holtz idea-ology bits (the cog and the jump rings).

It is also my inspirational project for our September challenge over at SanDee&amelie's Steampunk Challenges (being part of Team B who always present their makes in the middle of each month).


I got the idea while I created this altered steampunk notebook, so I went ahead and die cut the lovely ornate frame from shrink plastic too (mainly because I wanted to find out if the detail of the ornate frame would get lost during shrinking...which it didn't. Yay!).


Before I went to shrink it using the heat tool, I sprayed the die cut frame using the turquoise DecoArt media Shimmer Mister.


A bit of a golden sheen was added using Gold Rush Metallic Lustre after the frame had shrunk to pendant size.


Then I gathered some small watch parts, a very (!!!) clean non stick craft sheet and the DecoArt media Liquid Glass. I simply placed the frame on the craft sheet and filled the opening with the liquid and placed my cogs and gears and other bits into it using a pair of tweezers.


Then I added some IndigoBlu gilding flakes....


...and put some more Liquid Glass on top. As you can see it looked quite uneven at that stage but as the Liquid Glass is self levelling...


... it had all turned into a flat surface after a few minutes.


All I had to do now was wait and let my pendant dry naturally. And be very very patient! *sigh
After I had used quite a thick layer of Liquid Glass I left my piece untouched for two full days. And I really managed not to touch it too soon!!!!
It would have been such a shame if I had left a fingerprint by testing too early!!!


Then I gathered my idea-ology jump rings, some idea-ology cogs and a turquoise bead from my stash and played around with all the bits until...


...I was content with the look of my necklace. Et voilá!


I hope you like my little easy-to-make pendant and the necklace! Please, hop over to our steampunk challenge blog to check out the makes of my teamies AND the projects already entered - there's so much inspiration there to gather! I hope to see you play along with us soon!

Hugs and happy crafting,
Claudia
xxx