Showing posts with label Color wash. Show all posts

Monday, 1 June 2020

Steampunk Birthday Tag for SanDee&amelie's June 2020 Steampunk Challenge

Hi, servus and welcome to the launch of our June challenge over at SanDee&amelie's Steampunk Challenges! Over at our challenge blog a new challenge and some new inspirational projects by my wonderful design team are awaiting you!

The theme is as always "Anything Goes - Steampunk/Industrial" - so just enjoy some steampunk or industrial style fun the way that makes you feel best and play along! As always we will give away two prizes from our generous sponsors DecoArt and boozybear - so don't miss the chance to win one of these! ;)

My make for June is a birthday tag with loads of delicious crackle and a special mechanical heart!


I had been given a lovely dies set to create a steampunk heart with loads of cogs and gears quite some time ago and now it was finally time to play with it!


A lot of paint layers, dry brushing, toning down and highlighting again went into my steampunk heart and I really loved building my own mechanics by die cutting some of the gears several times and combining the many different parts in a playful way. Next time I use this heart it will for sure have a different mechanism ;)


I started by die cutting the heart's base and all the cogs and gears from heavy black cardstock. To make the heart even more sturdy I cut another heart shape from some cardboard packaging to glue it behind the die cut heart.


I used the "Foundry" 3D embossing folder to add some texture to the die cut heart before I glued the sturdy back to it. Then I started building "clusters" of cogs and gears. As some of the pieces were really tiny, I used diluted DecoArt matte Decou-Page and a detail brush to apply the glue and to fix the small bits to their proper spots.


This is how my finished heart looked once it was ready to get painted:


I started by dry brushing on layers of DecoArt premium Titan Buff and Burnt Sienna acrylic paints.


Then I went for a rusty, brown-ish look and added more dry brushed layers - this time I used Titan Buff, Burnt Sienna, Quinacridone Gold Hue and Transparent Yellow Iron Oxide.


I actually liked that, but I wanted to go for something a bit brighter - so I decided to add a bit of "patina" by dry brushing some spots with Cobalt Teal Hue.


I loved that version too...but for this particular tag I had a background in mind that would need something more contrasting and bright...so I decided to try a third version (isn't it a good thing that you can paint over acrylics again and again?).

I toned everything down with a subtle dry brushed on layer of Carbon Black and then kind of started anew - though the layers that were already there were definitely adding a lot of depth to the end result - so these weren't done in vain.

This time I started by dry brushing the centre of the heart with Titan Buff first, letting the intensity of the layers fade out towards the outer edges. I added about three layers of Titan Buff this way, making sure they all faded out nicely and turned the very centre brighter and brighter. Next I made the centre the brightest spot by adding Titanium White and not spreading that too much. That was the base for the colours to follow: mixes of Titan Buff and Diarylide Yellow, Diarylide Yellow and Vermillion Hue, Vermillion Hue and Pyrrole Red but also the pure colours in between to achieve a kind of blend with the most intense red in the centre.


Yep! I definitely liked that and it was perfect to contrast the background colour I had in mind for my tag. But first I added DecoArt Metallic Lustres Black Shimmer and Radiant Red here and there using my fingertip.


My tag (which was die cut from very thick grey board) first got a thorough layer of DecoArt Americana Lamp Black acrylic paint and one that had dried I applied a generous layer of DecoArt Weathered Wood. I made sure I changed direction while brushing on the crackle medium - this way I would get nice variations of the cracks' directions.


Once the Weathered Wood had dried to the touch I used a very soft wide flat brush to gently apply a layer of DecoArt Chalky Finish paint "vintage". I didn't cover the tag's edges so a black border would remain visible.


The crackling happens so fast that you shouldn't work over the same area twice! 

I definitely liked the result! The very tiny cracks where there is only a very thin layer of paint - and the larger ones where the paint was applied thicker.


To repeat the red from the heart I sprinkled some drops of red DecoArt media Mister to the tag.
I also applied some Black Shimmer Metallic Lustre around the tag's edges.


Next I toned everything down with a very thin wash of Transparent Yellow Iron Oxide media fluid acrylic paint.


The background was still missing some interest - so I added a bit of stencilling  using some of Andy Skinner's DecoArt stencils and DecoArt Americana acrylic paint French Vanilla.


On top of that I added another thin wash - this time of English Red Oxide.
To finish off my tag I added a word sticker that I shaded in using my Stabilo All pencil and a wet brush. The heart was fixed to the tag using very thick sticky foam pads for additional dimension.


Done! 


Some detail shots: 


I hope you like my tag! There are a lot of different dies sets out there to create this kind of layered steampunk heart - so I am sure you will find the one you like best. And of course the techniques shown and the design can be used on any other kind of theme.


I hope to see you over at SanDee&amelie's Steampunk Challenges soon! And I promise you will love the team's inspirational projects this month!

Hugs and happy crafting!
Claudia
xxx


Monday, 3 February 2020

Meet the better half....

...of "The Emperor", who has been starring in my latest project for SanDee&amelie's Steampunk Challenges on my blog here two days ago (simply scroll down to the previous post to check him out)

- "The Empress"! 


She is my make for this week's inspirational project post over at the Calico Craft Parts Blog.

So now they're united as a couple it is time to share the how-to and the list of Calico Craft Parts and DecoArt media products and paints I have used to create this empressing duo. ;)


Simply click HERE to get taken to the blog post with the detailed tutorial and loads of pictures.


Have a good start into the week!
Claudia
xxx


Thursday, 14 November 2019

Autumnal Splendor...

...is what I love especially about this time of the year.

Even when in late autumn the leaves have almost all fallen to the ground and start losing their warm red, yellow and orange colours and Vienna seems to drown in a foggy soup of cotton wool most of the days I love the tranquillity that comes along with a slowed down pace at everyday life.


It''s time to light candles again and have a cuddly time in front of a fireplace after returning home from a refreshing walk with my dog.


On our walks we usually meet the crows...sometimes when it is very foggy outside I am rather hearing than seeing them, but they are always there and I love hearing how they communicate or when they come close and drop me their walnuts so I can crack them open for them...they have also already made friends with my dog girlie,
Bluna, and often they come down and tease her, touching her lightly at her back and landing not too far away from her, waiting for her to chase them (but Bluna knows this is a game she can't win, so she sometimes just kind of fakes she's starting to chase them and just stands and watches them fly away).


I tried to capture this special mood and time of year in a tag that I made for the DecoArt Mixed Media Blog.

Over there I am sharing the whole process in detailed steps (as always). This time I have used chipboard and laser cut MDF shapes (from Calico Craft Parts and Creative Embellishments) that I used various DecoArt and DecoArt media products and paints on to create different textures and effects (like the "feathers" for the crows). I especially tried to create a foggy sunset background - which maybe was the hardest part when creating the tag.

But I think it all came together quite nicely in the end...and I hope you will think that too when you hop over to the DecoArt Mixed Media Blog ;)


What is your favourite time of the year and what is it that you especially love about it? What would it be that you would want to capture on a tag about your favourite time of the year? 


Hugs and happy November crafting!
Claudia
xxx


Sunday, 1 September 2019

Upcycled "Inventor" Project for SanDee&amelie's Steampunk Challenges

Hi, servus and welcome back after our little summer break with the two months long summer special challenge over at our steampunk challenge blog. The start of September brings us back to normal (=monthly challenges over at SanDee&amelie's Steampunk Challenges) and this is my project for your inspiration and to kick off our September challenge:


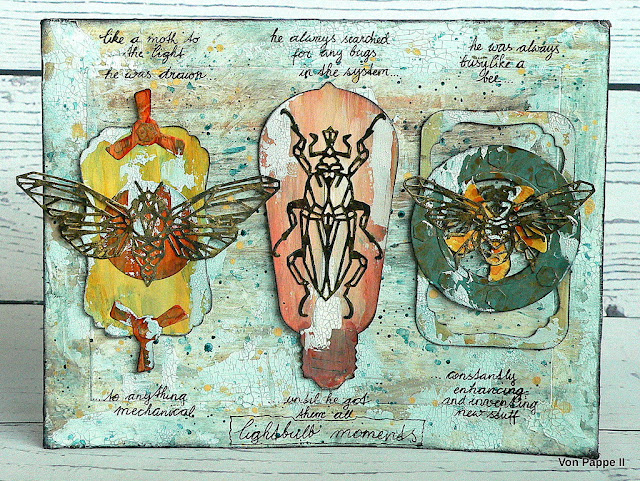
As you can see the picture was taken on the balcony of our summer holiday place and this means I created this project with what I had at hand and the few media and tools I had taken with me this summer. In the last years I didn't even try putting together a bundle to take with me for some crafting and mixed media fun on a rainy day or when taking a break from too much sunshine - simply because I couldn't decide what to take with me and what to leave at home. But this year I managed to prepare some larger die cut shapes and tags and the Sizzix Sidekick I gave to myself (as a reward for over a year of bravery with several dental surgeries) also allowed me to pack some of the smaller Thinlits dies.

The Sidekick "travelled" in a small plastic container where I also stored the cutting pads and some other thin bits like the acrylic blocks for rubber stamping in.


And I used one of my oldest and also very first "luxury" craft items I bought when I started this hobby - the Tim Holtz Cargo Case Toolbox and filled it wih some of my favourite tools and media:


...some Distress and Distress Oxide Ink Pads and refillers, of course a black archival ink pad, a blending tool and several sponges for the different inks, a tiny bottle of DecoArt matte Decou-Page (in the middle section...the perfect size for travelling!), some tacky glue, some clear stamp sets, a palette knife, some Distress Crayons, assorted brushes, two PITT artist pens, a collection of my beloved DecoArt media fluid acrylic paints (these have the perfect height to store them in the bottom section) and media white Crackle Paint and Gesso, a tube of DecoArt premium Titanium White acrylic paint and lots of Sizzix Thinlits dies sets (almost all designs by Tim Holtz). As these are so thin and flat, I could put them in the bottom compartment of my cargo case too. Yay! I was so happy when I found that it all fit into this one toolbox.


I also had taken with me (in a wooden cigar box filled with various paper scraps) some larger die cut shapes done with BigZ dies I could not take with me (like the "Steampunk Parts", the "Trinket Frames" and the bulb from the "Filament" die) and also some die cuts done with Thinlits dies that were too wide to use with the Sidekick.


So I had a mix of various larger die cut pieces (also including some plain larger tags) and Thinlits dies sets, acrylic paints, Gesso and Crackle Paint, some markers, clear stamps and designer paper scraps to play with. But of course the tags I had prepared were too small for what came up in my head when I looked at all the stuff and possibilities to combine what I had...so what should I do?

I knew I wanted to use a lot of crackle media and paint washes and such, so I needed a substrate that could take all of these well and also be of matching size with the design I had in mind...gladly we had ordered a card playing game some days earlier and the sturdy card the envelope it came in was made of was just perfect!

I even managed to cut a kind of easel from the backside! Not beautiful to look at, but it worked just fine!


The front of the sturdy envelope was first covered with a glued on designer paper and then I scraped a lot of DecoArt media white Gesso across the whole front using a palette knife. Once that had almost dried I added washes of DecoArt media Prussian Blue Hue and Transparent Red Iron Oxide fluid acrylic paints. On top of that (after I let it dry in the sun) I scraped some white DecoArt media Crackle Paint here and there and let that dry and crackle in the sun again).

Once the crackle layer had dried I added a wash of Prussian Blue Hue to make the cracks more visible. I also added some Prussian Blue Hue and DecoArt Metallic Lustre "Gold Rush" splatters to finish off the background.


As you can see I got really messy. I used a styrofoam tray (from some bacon wrapped cheese sticks) as a palette to mix the paints and washes on.


detail shot: 


During drying times I had already primed and painted the die cut pieces I wanted to use. Here's a picture of how I had combined the die cut pieces.


I used DecoArt media Prussian Blue Hue, Titan Buff and Transparent Yellow Iron Oxide fluid acrylics on the piece with the porthole and ship's propeller, Quinacridone Gold, Titan Buff and traces of Prussian Blue Hue on the Filament light bulb and Transparent Yellow Iron Oxide, Titan Buff and Transparent Red Iron Oxide fluid acrylics on the piece with the left over shape from the "Trinket Frames" die and the cool propellers from the "Steampunk Parts" set. I also added DecoArt premium Titanium White acrylic paint to some of the mixes, where needed.


Once the paints had all dried, I glued the pieces together and then added washes of Prussian Blue Hue and/or Transparent Red Iron Oxide and Quinacridone Gold to tone all the parts so they would visually fuse. On top of that I scraped traces of DecoArt media white Crackle Paint here and there and later highlighted the cracks with another wash of Prussian Blue Hue.


The Geo Insects were painted with Prussian Blue Hue media fluid acrylic paint...


... and then I dabbed on some DecoArt Gold Rush Metallic Lustre using my fingertip.


I added some hand writing using a PITT artist pen with permanent black china ink.


Then I used cut to size snippets of sticky foam tape to mount all the pieces to the panel with the crackle and splatter background. 


My "Inventor" panel was done!


I hope you like it! I definitely had great fun improvising and up cycling packaging materials to turn them into a piece of steampunk mixed media art.


I highly recommend you hop over to our Steampunk Challenge Blog now to take a closer look at my wonderful team's projects! And of course I can't wait to see what you will come up with!

Hugs and happy crafting!
Claudia
xxx