Thursday, 26 July 2018

My Notes, Thoughts and Plans - a DecoArt Mixed Media Blog Project


Hi, servus and thanks for stopping by! I hope you are enjoying the summer holidays!

Summer calls for bright and vibrant colours and light and fun projects, right? So I have come up with something really bright and fun and altered a plain cardboard notebook to turn it into a journal to make notes to myself in so I don't forget to think positive and hold on to my dreams and wishes....just in case I loose self-confidence (which I tend to do way too often). 


There's a full detailed tutorial waiting for you over at the DecoArt Mixed Media Blog. Simply click HERE to get taken to the post with loads of steps images and the solution to the secret of how I have made the vibrant background ;)

I hope to see you over there soon!
Enjoy your holidays!

Hugs and happy crafting!
Claudia
xxx


Monday, 23 July 2018

Shelling with Calico Craft Parts

Hi, servus and thanks for stopping by today! I hope you are having a wonderful summertime, good weather, loads of fun and relaxation!

This is my bi-weekly invite over to the Calico Craft Parts Blog, where I have done some shelling (and a bit more).


To find out more, simply click HERE to get taken to the Calico Craft Parts Blog and the full project tutorial. (a small hint: if you are in need for a small, self made summer holiday themed present, this might be useful ;).


Hope to see you over there soon!

Hugs and happy summer crafting!
Claudia
xxx


Wednesday, 18 July 2018

Beachtime at Emerald Creek Dares!

Hi, servus and thanks for stopping by! When have you last been at a beach? Do you love to be at the seaside as much as I do? If so the actual challenge theme at Emerald Creek Dares is for you - it is all about

The Beach! 


The perfect theme to use long hoarded seaside treasures from strolls along the beach (or use bought ones - from the Emerald Creek online store for example ;) on a little keepsake canvas...


My canvas measures 6'' x 6'' and I have used the following products on it:


I started with gluing a designer paper sheet onto my canvas using matte DecoArt Decou-Page. I also sealed the paper with thinned Decou-Page, so the crackle medium would work properly.
On some white cardstock I created a Distress Oxide ink background to stamp my shells on.

(as always click on the images for a larger view)


I stamped the shells in black archival stamping ink and then went in with some Distress Stains and a detail brush. 


Using a white gel pen I added highlights to make my shells look more dimensional. 


I scraped white DecoArt media Crackle Paste onto and around the edges of the canvas and let it air dry. 


Next I added Dirty Sand Baked Texture embossing powder in some spots. To do so I smudged some embossing ink across the canvas with my fingertip.


I repeated the step with Vintage Beeswax Baked Texture embossing powder.


Then it was time to play with the lovely  Shoreline Shells, the Amazonite gemstones, the fussy cut sea shell images and the brads and charms.


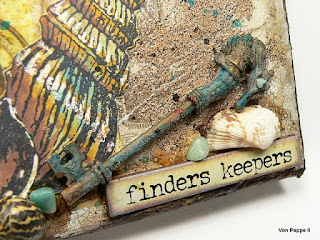
The seahorse key charm got a make over with DecoArt media Texture Sand Paste and Raw Umber Antiquing Cream (once the Texture Sand Paste had dried).


(before)


(after)


I like to prime metal charms with a thin stippled on coat of matte Decou-Page before I use acrylic paints or paint washes on them. The little anchor was given a rusty look with Quinacridone Gold media fluid acrylic paint, while I went for a wash of Cobalt Turquoise Hue with the seahorse key charm.


Once all the pieces were "aged" the way I wanted them, I glued them in place with more matte Decou-Page glue. The idea-ology word panels were inked with dark brown archival stamping ink and a piece of blending foam around the edges before I glued these in place.


To finish off my canvas I loosely painted a dark edge with Raw Umber fluid acrylic paint around the canvas' edges and also around the word tiles and the shell and charm clusters to fuse them with the background and add some contrast and definition.


I hope to see you enter our challenge at Emerald Creek Dares soon! You can win a


voucher to spend at the Emerald Creek online store and just for entering our dare you get 10% off your next purchase there by using the code given in the challenge post over at the Emerald Creek Dares Blog. How cool is that?! And you will find more amazing inspiration if you check out the previous blog posts over there - my lovely teamies' have created some awesome "Beach" projects for you!

I leave you with some detail shots (if you click on the images you will get a larger view) and with wishing you good luck for the challenge and happy summer holidays!


Hugs and happy summer crafting!
Claudia
xxx


Monday, 9 July 2018

Lost in the Pipework Maze - a Calico Craft Parts Project

Hi, servus and welcome to my usual invite over to the Calico Craft Parts Blog, where I (almost) got lost in a pipework maze again ;)

My last project HERE was a pipework maze project as well, but with this new one I used different products and techniques to achieve a different effect and look. Maybe, if I do a third pipework maze project one day, I will try to go for a rusty and weathered look...the possibilities are endless.


Well, obviously I found my way out, so I can write this post to lure you over to the Calico Craft Parts blog to find out about the whole project and the (quick and easy) steps. I hope to see you over there soon!

Hugs and happy summer crafting!
Claudia
xxx


Monday, 2 July 2018

A Little Lodger - Part Two

One and a half weeks ago my son brought home a little swallow he had found unharmed but dehydrated on the concrete ground in front of our apartment building.


Swallows have been nesting at our house for several years now, which is great as their number has halved in Austria during the last twenty years or so. Now they are coming back, founding new nesting colonies. For me their return after the winter always is something very special that makes me happy. I have been used to having swallows around in summer since I can remember (having spent almost all my summer holidays on a farm in the Austrian lake district, where swallows have their nests in the cow barns and around the farm houses). For me summer and swallows just belong together.

Well, this little fellow had fallen out of its nest obviously - maybe it was an accident, maybe it happened when it first tried to spread its wings and fly. As it was one of the hottest days of the year so far, it was very weak due to dehydration.


We fed it water with dextrose which helped immediately. Then my son went out hunting for insects - grasshoppers mainly (as we had read in the internet were the best food for swallows). As he only managed to catch six grasshoppers in about forty minutes, we switched to buying house crickets in the pet shop, which we deep-froze and brewed on demand. Our little guest was very hungry! I guess it ate about twenty crickets per day!

We put it in a plastic container...a small one during the day (so it could climb the edge and have a look around or get its food), a larger one during the night.


My son had it sit on his shoulder most of the time (where it learned all about Hearthstone and Overwatch), so it could train and spread its wings (which it did quite often), but it felt especially cosy and safe in the hood of my son's hoodie shirt ;)


When it started to flutter really hard, we took it out into our large living room with the open kitchen...just in case it decided to fly around....


....which it finally did on Saturday evening. So we took it out on Sunday morning, so it could join the flock again.

It needed some minutes, watching the other swallows do their acrobatic flight manoeuvres, but then it gave a little call, fluttered, spread its wings...and flew with the others as if it had always been doing nothing else than that.


I went out several times that day, just in case it had returned or not found a nest for the night, but everything was okay as no swallow was left out in the cold after the sun had set. (I admit it wasn't easy for me to let go ;). It's heartwarming though, knowing that one of these cute little agile acrobats is "our" little lodger, when watching them now do their helter-skelter rounds in our courtyard and around the building. 

As the swallows' nests are quite close to our flat, I wake up to the sound of their calls. I will miss them (even more this year) when they will be gone - heading south to warmer countries. 


Sunday, 1 July 2018

SanDee&amelie's Steampunk Summer Special Challenge 2018

Hi, servus and welcome to this year's "Summer Special"  at SanDee&amelie's Steampunk Challenges! As every year we are having a two months long challenge throughout the months of July and August, so our players and the design team can enjoy the holidays and have a great time outdoors!

My wonderfully creative design team ladies have done their best as always to inspire and spark new mixed media steampunk and industrial style ideas! There's a link to the challenge at the bottom of this post and I hope to see you over there and play along with us!

In summer my husband and I enjoy sitting on our balcony in the evenings and having a good glass of wine, candle light and some relaxed chatter. I have plenty of tea light holders, but as you can never have enough, I decided to make an industrial style one. The idea comes from a most wonderful tea light holder my friend Kerstin made last Halloween (see her project and post HERE) and I immediately had to buy some wooden tea light holders right after reading her post (thinking of X-mas themed holders mainly)...and then I forgot about them...until now!


 I have used nothing but a wooden tea light holder, matte DecoArt Decou-Page. Metallic Lustre, a few DecoArt Americana premium acrylic paints and some of Calico Craft Parts' really cool Steampipe Maze sheets.

It is great fun to build a steampipe maze around the entire holder - connecting pipes across edges and along corners and using taps and valves from the add on sheets! It is especially great fun if the pipe maze goes round corners and across the edges, including even the top side of the tea light holder!


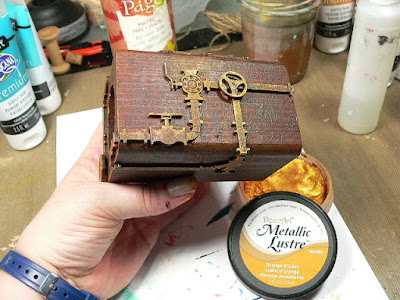
I played around for some time before I started gluing the first pipes in place (with matte Decou-Page). I started on one side, trying to lead the pipe maze from there across the top to the next side.


Where I had to shorten some of the longer pipe pieces to make them fit, I covered these junctions with taps that I glued on top:


Once the glue had dried, I stippled on some Burnt Umber DecoArt Student Acrylic paint with an old bristle brush.


Once that had dried, I dry brushed the pipes, taps and valves and the edges of the tea light holder with thin layers of DecoArt premium Quinacridone Gold Hue, Transparent Yellow Iron Oxide, Vermillion Hue and Diarylide Yellow until I was content with the look. (the picture sadly doesn't show the subtle rusty tones - but they're there! You will see them with the images of the finished holder). 


 I finished off my piece with adding Orange Flicker DecoArt Metallic Lustre with my fingertip to the pipework and holder edges. 


Done!


I love the subtle rusty tones from the dry brushing against the hints of metal sheen from the Metallic Lustre and the golden glittery tea light was the perfect addition! 


As promised: HERE is the link to our summer special challenge! I hope you like my pipework maze tea light holder and I hope you will like my teamies' makes as well! If you want to make them happy, please, take a minute and leave them a short comment on their blogs. Thank you!

Have a great summer holiday
and don't forget to play along! 

Claudia
xxx