Showing posts with label mixed media. Show all posts

Saturday, 9 January 2021

New Year , New Paths, New Hopes and a New Steampunk Challenge

 Hi, servus and thanks for stopping by my quiet creative corner! I hope you've all had lovely holidays and I wish for us all that 2021 will bring everything we've been hoping for! 

Those who have been following me might already know that I have been struggling hard with health issues (mainly caused by menopause in combination with my chronic thyroid illness) during the last twenty months or so - panic attacks and nervousness with shaky hands having made crafting almost impossible at times. I am now trying to tackle that differently (after having tried different ways of medication during the last months which turned out to cause severe side effects instead of improving health) by seeing a therapist (so much better than flooding the body with chemicals it obviously cannot take) and I believe that things will get better step by step - maybe slowly but for good and with a lot of improvement on the personal side. 

That will very likely also lead to new, different ways of living and expressing my creative side I guess...my main goal with this is that I will get back to enjoying the creative process - free from any pressure or struggle with shaky hands and nervousness. During the last months I have already cut back when it comes to design team work, but luckily my favourite design teams I am on are very understanding and wait for me to return! 

Speaking of design teams - our first challenge for 2021 has just launched over at SanDee&amelie's Steampunk Challenges and there are some changes there as well: due to Corona pandemic DecoArt cannot send out prize bundles for now. As requests on certain products have exploded during Corona pandemic, they had to adapt to that and cut back on other specific product lines - one of these being our prize bundle paints and products. DecoArt and I have decided to switch to two-months long challenges until everything is back to normal (which we all hope will be in or around April) and prizes can be shipped out again as usual. We will of course draw prize winners for all our challenges, but ask our DecoArt prize winners to be patient as their prizes will be sent out later this year. 


My mojo is still on vacation - not only because of my health issues...but also because I am currently busy with moving in our newly bought holiday home at Lake Atter in the beautiful Austrian Salzkammergut!!! My husband and I were incredibly lucky to find and buy our dream house in our dream location this autumn - I am still pinching myself! It's not a big house - but it has everything we need and is a modern house made totally of wood! I love that! And it offers everything I had wished for - located close to a lot of hiking trails and even a skiing piste, just a two minutes drive from the lake, with forests and mountains and the view at the lake (and the very top of the amazing Dachstein glacier) just around the corner! 

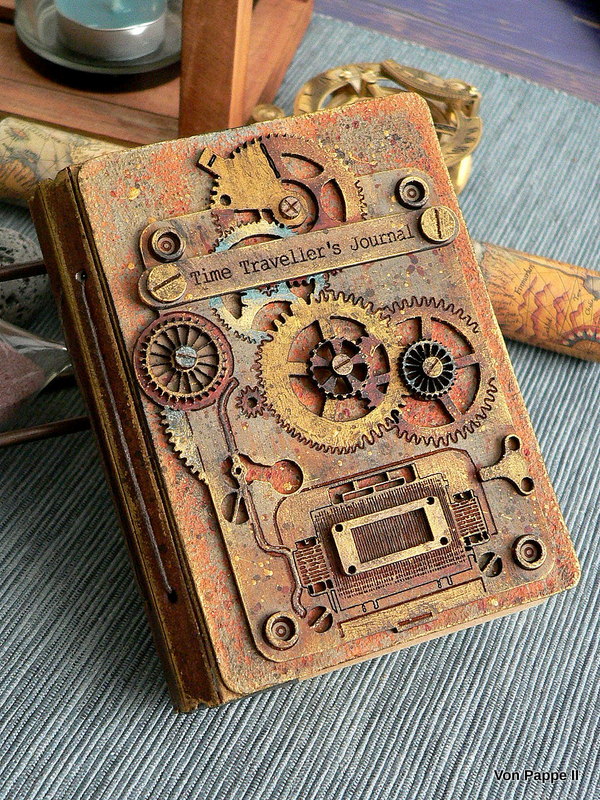
But back to mojo and challenges - I am sharing this older steampunk project to inspire our steampunk challenge players; one that hasn't been shared via the challenge blog but on the Calico Craft Parts blog - HERE. There is a full tutorial to find there as well as loads of images and a list of products used. 


It's a notebook I've made using one of Eileen Hull's cool book dies and Calico Craft Parts. The metal and weathered effects were created using DecoArt and DecoArt media paints and products (more info on these in the blog post over at Calico Craft Parts). 


The covers were die cut from heavy grey board and I found some little journals that fit perfectly as signatures (so I do not need to make my own). 


Well, that's it from me so far! The team over at SASPC are waiting for your visit and entries! 

Make sure you check out the different rules that apply for our two-months long challenges (Maura, your current challenge host for January and February, explains everything in the blog post)! Good luck and joyful crafting!

Hugs and a successful, healthy and happy 2021!


Claudia

xxx


Wednesday, 25 November 2020

Step Right Up! - Artist Trading Block for Calico Craft Parts

 Hi, servus and thanks for stopping by! 


My usual Monday invite over to the Calico Craft Parts blog is two days late, because this Monday my husband and I got the keys to our new home in the beautiful Austrian Salzkammergut region! We found a lovely modern (and affordable!) wooden house with a small garden at my beloved Attersee (or Lake Atter)!!! So instead of crafting, my time is being filled with planning furniture and organising. 

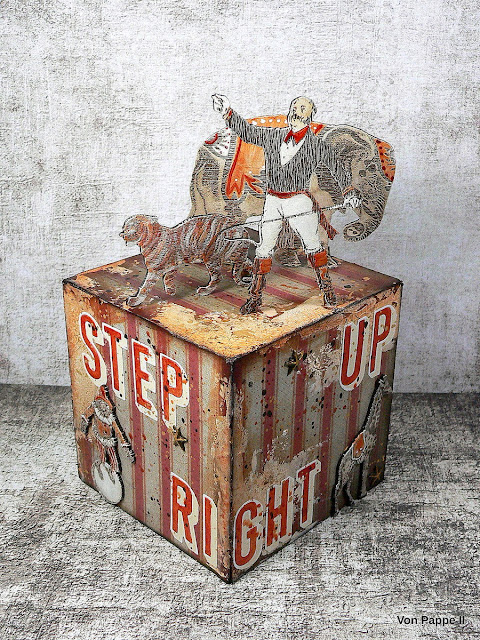
But I even found the time to indulge in a joyful mixed media session - which led to this circus themed ATB (Artist Trading Block)!


I fell in love with the circus themed new craft parts at first sight (well, who wouldn't, right?). As always there's a tutorial over at the Calico Craft Parts blog to check out, as well as the list of craft parts and products used. 


I hope to see you over there soon!

Stay safe! 

Claudia

xxx


Sunday, 1 November 2020

Snarky Cat's Dapper X-mas - for SanDee&amelie's Steampunk Winter Special Challenge 2020

 Hi, servus and thanks so much for stopping by! 

I am sharing my make (and tutorial) for our annual two-months-long Winter Special Steampunk Challenge over at SanDee&amelie's Steampunk Challenges and as you can see I am already in Xmas swing. 

I recently bought a cheap Christmas themed dome kit and decided to customise it by using one of the absolutely adorable and fun cat stamps from the Tim Holtz "Snarky Cat" stamp sets (in this case I've used one of the cats from the "Snarky Cat Halloween" set). 

And of course I wanted to have lights - so I used one of Tim's Tiny Lights as well! 


Snarky Cat had to dress up for the festivities on Christmas Eve (as is the custom in my family...well, not for the pets actually, but for the human family members of course) - so I decided to give it a dapper hat and bow tie (from the Tim Holtz "Distinguished" stamp set)! 


You can tell from his look that he obviously doesn't like wearing a hat and a tie, but there is a little present for him under the tree - so it is worth the little suffering, right? Or maybe he is already planning on some climbing the tree with its temptingly dangling baubles and the shiny star at the top and doing what most cats love (or would love) to do at Christmas ;) 


Our Winter Special Challenge at SASPC will ("Same procedure as every year, James!")  be open from 1st November until 31st December and instead of the usual three entries each player is allowed up to five this time. Two more chances to win one of our two prizes!!!! And if you need some inspiration, there is a link to the challenge blog at the end of this post, so you can hop over and check out my teamies' fabulous makes too! 

I've created my Christmas tree using an older Tim Holtz Bigz die - the "Evergreen" one (which is still my favourite tree die to be honest). As a base I die cut one tree shape from thick grey board. That was going to be mounted to the dome's base by cutting a wood slice (found at the home decor section of a Dollar Euro store) in two and gluing the finished tree between these two. 


Then I cut two more tree shapes from a piece of white card stock that I had first coloured using Distress Inks, Distress Oxide Inks and Distress Oxide Sprays and Tim's technique of creating this kind of beautifully splattered backgrounds with loads of lovely depth. (Make sure you die cut one of the two tree shapes with white side face down and the other with the coloured side face down so you get two different tree shapes for the front and back sides!)


I added a bit of Distress Glaze on top to preserve the colours and speckles and to intensify them. 


Finally I glued the coloured trees to both sides of the grey board tree using Tacky Glue. 


Next I die cut my dimensional star for the tree top using my beloved Sidekick and the smallest die from Tim's "Dimensional Stars" Thinlits dies set


I then folded the little star into shape and glued it to a piece of left over white card stock. Only AFTER I had painted the star with DecoArt Extreme Sheen "Vintage Brass" acrylic paint, I cut off the excess! This way the small star was easier to hold while being painted and my fingers stayed clean. 


Snarky Cat was stamped onto white card stock using black archival stamping ink and then I used my coloured pencils to colour him (as I find it easier for me to use these instead of Distress Inks and a watercolour brush). 


I also coloured the bow tie and dapper hat and then fussy cut all my shapes. Snarky Cat also got his tail chopped cut off - which explains the look on his face I guess. 


But he got to keep it of course - I just needed it to stick out at a different angle. 

So far, so good. 


Time to prepare the decoration for the tree! I used more white card stock, Tim's "Deck the Halls" Colorize dies set, his "Festive Things" dies set, Distress Oxide Inks and the ink blending tool on my media glass mat


I also added a generous amount of DecoArt media Liquid Glass on top of the baubles (to give these a dimensional and glossy look) and put everything to the side (on the central heating to be more precise) to dry naturally while I went on with decorating the dome kit base. The inner platform got a coat of DecoArt Americana Arbor Green acrylic paint, while the edge was painted using DecoArt Extreme Sheen "Vintage Brass"


I die cut some cogs in different sizes and shapes from white card board, painted these with more Vintage Brass (on both sides) and glued three of them to the back and one as a front piece around the base. 


I also added a self adhesive gold foil trim around the base that was die cut using Tim's 
"Star Trim" 3-D Impresslits folder. 


To create a stand for the Christmas tree, I sawed the wood slice in two (but first I made sure the tree would still fit into the dome when being put between the two pieces) - the smaller wood slice piece pointing towards the back. Next I used my rotary tool to drill two holes - one into the smaller wood slice piece and another through the base (at the exact same spot where the wood slice hole was going to be). 


I also engraved a notch into the bottom of the base - leading from the drilled hole to edge right at the centre of the three glued on gears at the back of the base. I made sure it was wide enough to hold the thicker part of the Tiny Lights' cable. 


Then I glued the wood slice pieces with the tree pinched between them (and more glue) in place and after that had dried I inserted the string of Tiny Lights. 


I used my small hot glue gun to glue the thicker part of the cable into the notch and to fix the Tiny Lights chain to the wood slice in some places. As it got wrapped tightly around the tree it stayed in place pretty well and I only needed two glue spots to fix the lights chain to the wood slice base and one at the tree's back. Snarky Cat, his present and the stamped quote got glued in place using little pieces of MDF left overs at the backs as little stands. 


Before I filled the dome with "snow" (from the kit) and glued it in place permanently, I checked the lights of course. Then I added glue around the dome's edge and put the base with the tree face down in place (otherwise the snow would fall out from the dome) and let that dry. 


Finally I added four pieces of self adhesive felt floor protectors to the base. 


Done! 


Our steampunk/industrial style challenge is open until the end of December - the team and I hope to see you play along with us! Simply click HERE to get to the challenge blog with the actual challenge post. 


Stay safe, enjoy the advent season, merry Christmas and a happy new year! 

Claudia
xxx


Tuesday, 20 October 2020

Take the Scenic Route - for Marte Savona

I love this time of the year!

And I love to travel by train - I can sit and look out of the window for hours! There's so much to see and each house I pass by is inhabited by people who have their very own stories. Each forest the train rushes through is inhabited by animals who have their own stories too. Each falcon I see standing midair above a huge field is looking for prey. How long has he already been looking out for food? What will it be this time? A tiny mouse or a common hamster?
And before I can continue to think of the falcon's possible story, we pass by some allotments - new stories start to unfold in my head...


When we go by car, my husband and I also sometimes love to take the scenic route instead of the motorway - just because this way the journey becomes the reward...


There is of course a step by step waiting for you over at the MarteLAB blog - as well as lots of steps images and the list of all products used (which are all available in the Marte Savona online store).

Hugs and happy travelling crafting!
Claudia
xxx


Thursday, 17 September 2020

StencilGirl® and Seth Apter - Wow! - Blog Hop

Hi, servus and welcome to an especially exciting blog post today!


As the banner indicates, it's time for another blog hop - this time "WOW!" and StencilGirl Products have teamed up to showcase the new fabulous embossing powders (and Mixed Media Embossing Brush) designed by wonderful Seth Apter and to demonstrate how well these can be used together with StencilGirl stencils to create the most amazing projects with the special wow-factor (sorry, couldn't resist the pun).


Designers from the WOW! and StencilGirl Products design teams are sharing their projects (WOW!'s designers have shared theirs already yesterday...today it's StencilGirl's turn) to inspire you and introduce several ways on how to use Seth's cool WOW! embossing powder Trios and - my favourite - the Mixed Media Embossing Brush (I will tell you why I love it so much a little later in this post in the tutorial section).

At the bottom of this post you will find the links to the other teamies' blogs and projects and learn how to participate in the blog hop and about the great  GIVE AWAY that is waiting for three lucky persons...


But first let's take a close look on Seth Apter's new WoW! embossing powders and how they go together with StencilGirl stencils!
This is the project I have created for this blog hop:


It was all done using - of course - Seth Apter Wow! embossing powders, StencilGirl stencils...and DecoArt Americana acrylic paints.
The panel my altered brush sits on is an old bamboo chop board that I created a background on using Seth's "monoprinting-with-paper" technique (one of my favs).

And as I love to use found objects and left over snippets of previous projects in my work (that I keep in a little wooden box on my desk for inspiration), there is also a left over piece of self made Dresden trim (done with one of the 3D Impresslits folders designed by Tim Holtz), a frozen charlotte, some dictionary scraps and a small piece of linen ribbon to find.


Here are the products and substrates I've used...I always love to have quite a stash of stencils at hand when I start a project so I can pick the ones that fit best while the project evolves and takes me on its own journey (so some of the ones shown here weren't used in the end).


 I've used these StencilGirl stencils to create my altered brush panel: 


- ATC Mixup Apter stencil by Seth Apter
- medium sized stencil from the October 2016 Stencil Club Set by Mary Beth Shaw


The two WOW! embossing powder Trios designed by Seth hold six amazing powders that go by the intriguing names of Blue Moon, Sea of Tranquility and Space Dust (from the "Cosmic" Trio) and Etched Platinum, Weathered Gold and Crusty Copper (from the "Metalz" Trio). The thin bottle with the yellow liquid to the left holds Seth's "Mixed Media Embossing Brush" and an embossing liquid that can be applied to almost any surface by using the brush that is included in the lid.

On my project I went wild and tried the powders and the Mixed Media Brush on as many different substrates as I could - on wood, on paper, on top of acrylic paint, on the brush's bristles and also the metal part, on left overs from chipboard tokens from some board games and on some linen ribbon...and it all worked like a dream!


What I especially love about the Mixed Media Brush is that the liquid has an extremely long open time (compared to other embossing liquids from embossing dabbers) and you can vary the thickness and amount of liquid applied by spreading some of it with the brush on a palette first and using a cosmetic sponge for dabbing only a really thin coat of that onto a surface (which also works extremely well with stencils).
A little of the liquid goes a long, long way and applying too much of it can cause your embossing powders to kind of swim on top and drift away during the melting process. So less is more in most cases, but on certain substrates - like the brush's bristles or fabric for example - you need a thicker coat than a dabber would provide. So the Mixed Media Brush is really versatile and opens up a lot of new possibilities (which makes my mixed media heart sing).

My bamboo board and the ugly red brush were primed using DecoArt Chalky Finish paint "primitive". 


Then I picked some DecoArt Americana acrylic paints and put together one of my go-to colour schemes. I applied layers of paint by first brushing it onto a piece of card stock and then pressing that onto the board - a kind of mono printing technique that is perfect for layering and creating depth and that I've picked up with one of Seth Apter's great online classes.


Voilà - the base for my altered brush and for the next layer that was to be done with stencils and embossing powders was finished!


To tone down my brush I dry brushed it with some dark brown acrylic paint. Then I used the Text and Texture Transform stencil and orange acrylic paint to add the focal word to the brush's handle. I applied the paint through the stencil using a very small stencil brush.


I added more orange words from the stencil to the bamboo panel. Before the paint was completely dry I sprinkled some Sea of Tranquility embossing powder on top, tipped off the excess and heat embossed the traces left on the stencilled words. This added a kind of patina look as it didn't adhere to the whole design.


To create a kind of metal rivets I used two different sizes of left over circles from board game chipboard tokens and heat embossed these with Weathered Gold and Crusty Copper.


The label was heat embossed using Space Dust embossing powder.

Then I fused the smaller "metal" bits with the larger ones by simply putting them together and re-heating. This way the bits on top sank into the molten embossing powder below and once everything had cooled down it was beautifully fused without the use of any glue.


Two stripes of embossing powders (Space Dust and Sea of Tranquility) got added to the very ends of the brush's bristles.


More heat embossing on the panel was to follow! I used Sea of Tranquility again together with a stencil to create the beautiful drip lines. You can see the cosmetic sponge to the very right. Right left to it I had spread some embossing liquid from the Mixed Media Brush flask on my palette (but that doesn't show in the picture). From there I picked some up with the sponge and applied it thinly through the stencil. It gave perfectly crisp outlines!
(I used the left overs on the palette about half an hour later and it still worked smoothly - that's what I really call a long open time!!!)


You can also see the crisp lines from the design from Seth's Urban Insiders Bar stencil - this time done in "Blue Moon" embossing powder.  I had again used the cosmetic sponge through the stencil to apply the Mixed Media Brush liquid from my palette.


Etched Platinum went to the widest section of the metal wrap of the brush and was also used to fix the frozen charlotte in place.


I added some more heat embossing here and there - trying to repeat all the colours used in at least three different spots to fuse everything visually.

Using a fine tip Faber Castell PITT artist pen I outlined some of the designs for better visibility and more interest.


I finally found I needed a kind of frame for my frozen charlotte, so I die cut a circular label holder from heavy cardstock and heat embossed that with Weathered Gold (using the still not dried out left overs from the Mixed Media Brush liquid on my palette!). The label holder looks almost like the real metal thing, doesn't it?!


Three more tiny circle chipboard left overs were heat embossed with Crusty Copper for two nail heads for the label holder and one nail head that was to go on the end of the brush handle.


The piece got finished off by adding some text from the dictionary page scraps and gluing everything in place. Before that I had also added thin stripes of Weathered Gold and Blue Moon the the brush - the latter was applied to the linen ribbon (to the right). With the Mixed Media Brush that was no problem at all.

The brush got fixed to the panel by using thick heavy duty sticky foam pads. The other bits were glued in place using tacky glue and matte DecoArt Decou-Page.


Some close ups: 


My panel tells about stories lost, stories within, stories that are yet incomplete (the stories of our lives), the acceptance of incompleteness in general, it tells about the "principles of trusting" - that come into play when we take a "leap" and put our art (and soul) out there and only dare to do so because we are able to "lean" on our faith in the quality of our own art.


And now let's finally talk about the ...


There's a $35 Gift Certificate to StencilGirl® Products,
a $35 Gift Certificate to Seth Apter’s Shop
AND a $25 Gift Certificate to Wow!

Enter to win by leaving a comment below.
Then be sure to visit the other blogs in the hop and comment to win.


Tina Walker
Debi Adams
Mary C. Nasser
Claudia Neubacher (you are here now)
Kate Yetter


The more blogs you comment on, the more chances you have to WIN!
Three winners will be chosen at random from all blog comments!
(Only one comment per blog please.)

You have until Tuesday, September 22nd at 11:59PM Central Time to leave your comments.
Winners will be announced on Wednesday, September 23rd.


Good luck, everyone,

and as always

hugs and happy crafting!

Claudia 
xxx