Monday, 29 May 2017

Jaws at Calico Craft Parts!


Just imagine yourself swimming in the ocean. The weather is perfect and the water feels just wonderful! Suddenly there's this strange repeating sound....starting slowly at first........Duh duh...........duh duh........duh duh......duh duh.....duh duh duh duh duh duh......

Well, we have all seen and been scared by "Jaws" - one of those movies that still give me the creeps, even though it first hit the screens back in 1975 (oh, jeez....has it really already been so long?!) and is of quite some age today. But still it makes you check if there isn't a fin out there...cutting the waves..., doesn't it? 


My son loves sharks - he wants to become a marine biologist as you all may know by now ;) - and one of his goals as a grown up is to help ban shark fishing and especially the cruel hunt for shark fins.

We have been renovating and switching rooms lately so now he has a new room - and I just had to use the fab shark wood shape from Calico Craft Parts' awesome "Aquatic and Marine Wood Shapes" range to create a little "room-warming" something to give to him.

If you want to find out what it is that I made for my son, simply click HERE. There's a tutorial too. ;)

Have a wonderful start into the week and thanks for stopping by!

Hugs and happy crafting!
Claudia
xxx


Tuesday, 23 May 2017

Quickly Customized Gift Box - for Canvas Corp Brands

Hi, servus and welcome to a quick and short invite today over to "The Creative Studio" from Canvas Corp Brands.

I sometimes create jewellery to give away for birthdays of good friends - and most of the time I don't have a wrapping at hand that matches the gift properly. So I hoard little cardboard boxes of all sizes to decorate them when in need for a new gift box.

This time I used several of Tattered Angels' mists and paints and a broken left over piece of an old plaster cast (really...I just cannot through away anything - not even a plaster cast that went wrong...lol) on an old business card box.


And of course I had to use one of my newly bought Tim Holtz design tapes on it! It just went perfectly well with the necklace that I gave away with the box (as it had self made paper beads from old dictionary pages - the tutorial on how to create that can be found over HERE).


To see the full (but quite short) tutorial, please, head over to the Canvas Corp Brands Blog. I hope you will like it!

Thanks for stopping by!
Hugs and happy crafting!
Claudia
xxx


Monday, 15 May 2017

The Horror from the Depths of the Sea - for SanDee&amelie's Steampunk Challenges

Those who are familiar with H.P. Lovecraft's stories about the Old Ones (of which Cthulhu may be the most well known) and other invented horrors, know that these godlike creatures have conquered Earth billions of years ago (and maybe even have sparked life...who knows?) - but they have never occupied our planet completely (noone really knows what - or who - interrupted their seizure). The old continent R'lyeh for example sunk and now lies somewhere deep on the bottom of the ocean. And this is the place where the Great Old One "Cthulhu" is supposed to rest - waiting for some mad scientist or archeologist to speak the spell that will awaken him again...

By the way H.P.Lovecraft purposely gave his Outer Gods, Old Ones and their lairs names that are unspeakable. He even wanted their language to be as outer-worldly as possible - and he succeeded, didn't he? ;)

My friends and I love to play pen and paper role playing games from the world of Cthulhu. It is great fun to play a character that does not have a clue what it is that he is stumbling into...and later finds him- or herself simply trying to survive and not go mad facing unspeakable horrors.

But enough introductory blurb...(I'm afraid this is going to be a text heavy post anyway, so maybe you might want to get yourselves a cuppa)...my project for this month's challenge over at SanDee&amelie's Steampunk Challenges is inspired by Great Cthulhu, lying on the ocean ground, sometimes rising to spread his horror across unlucky humans who get in his way. The diver's helmet is what is left from one of these encounters. And Cthulhu still holds it in his tentacles while lying in slumber on the ocean ground.


He only awakens now and then when he thinks he has heard someone calling...and opens an eye. Only to fall asleep again (hopefully), waiting, dreaming.


Welcome to our May challenge over at 

We are once again having an 
"Anything Goes - Steampunk/Industrial" 
themed challenge - so you are free to create whatever you like as long as it has at least a steampunk or industrial twist to it. 


I got the idea for my project while rummaging through my "bits 'n bobs" box with old bottle caps, metal findings, trash and left overs from other projects and stumbled across two tentacles that I had done months ago when I accidentally had prepared too much Apoxy Sculpt clay. As the two components harden within about 40 minutes after being kneaded with each other you cannot store it for later use. So I quickly decided to make tentacles - but with no idea for a project in mind.

The large magnifing glass maybe was a gift from my husband's uncle who is renovating old-timers (cars and motorcycles). The box I used is the middle sized one from the Calico Craft Parts ATB Cube Kit that I have already partially used HERE. And I bought the diver's helmet on the internet last year or so.


How to make the tentacles: 

Sadly I forgot to take any pictures when I formed the tentacles, but it actually is quite easy: you take a small (maybe walnut size) lump of your clay - you don't have to use the Apoxy Sculpt; a cheaper air hardening clay does the trick as well - and roll it between your palms until you get a long roll. Apply more pressure to one end while rolling so you get a pointy end on one side of the roll. Tear or cut off as much as needed from the other side and flatten.

Then roll really tiny pairs of balls in growing size and stick them to the tentacle. Use an embossing tool with two differently sized pointy ends to press it into the centers of these balls. There you have your suckers!

Bend the tentacle in the desired shape and let harden.
If the clay starts to get cracky dip your fingers into water and smoothen out the surface.
Allow at least two hours for your clay to harden. The thicker the tentacles, the longer it will take.


How to create the Cthulhu Box:

Paint the insides of the ATB cube with DecoArt Teal Dazzling Metallics paint. Set aside to dry.


In the meantime apply some "Navy" DecoArt Americana paint to the tentacles as a base colour. You can speed up the drying process with a heat tool but you can as well let them air dry and assemble the ATB cube in the meantime.


Use matte DecoArt Decou-Page and a thin brush to assemble the box.


Dry brush some DecoArt media fluid acrylic Titan Buff onto the tentacles. Use a soft wide brush and wipe most of the paint off it on a piece of kitchen roll. Only the remains on the brush are used for dry brushing. With a gentle motion and no pressure swipe the brush across the tentacles in different directions. Repeat that until you are content with the result. Let dry or heat dry. 


Create a thin wash of DecoArt media fluid acrylic Green Gold and apply to the dry tentacles.


Next apply a coat of Raw Umber heavy body acrylic paint to the outsides of the assembled box. Let dry.


While the painted box dries take out your Alcohol inks (I used Ginger, Rust and Latte) and apply them to the metal ring of the magnifying glass and the helmet to get a rusty look. 


Rub some DecoArt media Texture Sand Paste onto the box using your fingertip. Use dabbing motions to create a rough surface. Let air dry.


Apply washes of DecoArt media fluid acrylics Raw Umber, English Red Oxide, Transparent Yellow Iron Oxide and Diarylide Yellow. Use a kitchen roll to dab off the paint in some spots after each wash. Work from darkest to lightest colour.


The helmet needs a stand: use a cork that fits into the opening at the bottom and cut off the end. Paint the cork with DecoArt Navy Americana paint. 


Use a hot glue gun to fix everything into place.


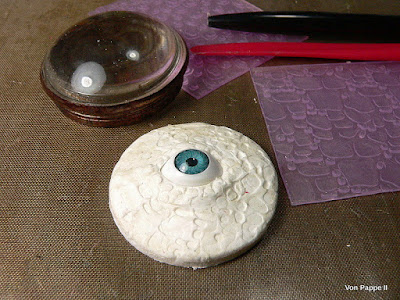
Sculpt Cthulhu's eye from white air hardening clay. Use whatever feels handy to create a reptile-like surface for the eye to sit in. (I had some texture plates and modelling tools and I used the opening of the tip of a ball point pen around the eye to create smaller circles).


Let dry thoroughly (this may take up to several hours - depending on outside temperatures). Then repeat the same process as with the tentacles - starting with "Navy" and then dry brushing with Titan Buff...


...and adding a wash of Green Gold. Use a fine tip brush to apply a wash of English Red Oxide around the eye.


(you can see that I made a third tentacle as I found that two weren't enough).


Use some rough sisal string and the hot glue gun to fix the eye and the magnifying glass on top.


I found that the box needed some feet - but most of what I had was too big, too high...not appropriate. Finally I found a necklace that was made from coconut discs and these were perfect. Yay! 


Et voilá!
Great Cthulhu and whatever remained of that poor diver...


Oh dear! I hope he doesn't see me! 


Thanks so much for stopping by and reading this far, dear creative friends and visitors! I hope you liked the little excursion into the realms of the Old Ones and their horrors.

Please, let me invite you over to our challenge blog to check out my teamies' makes (they're fantastic!!!) and the challenge itself. I hope to see you play along with us soon!

Hugs and happy crafting,
Claudia
xxx


The Happy Prince - guesting at Calico Craft Parts

Servus, hi and welcome to the first of my posts on here for today!

It is my bi-weekly invitation to my project that is being presented over at the Calico Craft Parts Blog and I hope that I can lure you into taking a closer look.

My make is all about "The Happy Prince" by Oscar Wilde - and those who don't know the short story can find it over HERE.


Meet the prince and his friend, the swallow and a full step by step tutorial over at the Calico Craft Parts blog. I have used the middle sized of the three cubes of Calico Craft Parts' Stacked ATC Cube KitThe largest cube was used for this project HERE and the smallest for that project over HERE. (which will go live in 90 minutes on my blog).

So I hope you will not only visit the Calico Craft Parts Blog and Shop but also come back to my place for more inspiration in about  ninety minutes when I will be presenting my project for this month's challenge over at SASPC

Thanks for stopping by
and

hugs and happy crafting!
Claudia
xxx


Tuesday, 2 May 2017

Gypsy Travels to my Home with Canvas Corp Brands

Servus and welcome to my blog AND my flat too today!

I am taking you on a tour through my private collections over at "The Creative Studio" Canvas Corp Brands blog to share some of my travel souvenirs, flea market finds, inherited treasures and other beautiful inspiring bits and pieces from my three (!) cabinets and writing desk.

I grew up in a home where my mom (and my grandma) surrounded themselves with beautiful things like porcelain, silverware and knickknackery in general and I have not only inherited some of the pieces but also the love for having my own little "private museum" at home.

In my cabinets visitors will find a mix of beautiful crafted gifts from wonderful and creative friends, inherited porcelain and silverware as well as gifts my lovely sister sometimes brings home from her travels and treasures like souvenirs, flea market or nature finds that I collected myself.


The large keys were a souvenir from our fantastic trip to Turkey and the assemblage to the left was given to me by my SASPC team member and friend Brigitte from France (merci beaucoup, Brigitte! Bisous!)


The little green house was a birthday gift from my sister and the cups and bowls are things I have taken over from my mom's collection. 


And there's a little beautiful story to tell about the small yellowish figurine in the left back: it is a handmade candle that I was given to by one of my pupils before I left my hometown Linz and moved to Vienna to live with my husband. The candle is meant to resemble me and it really looks like I looked back then (with very short yellow hair, my favourite orange shirt and two earrings in my right ear.) The wings aren't visible on this picture, but believe me - I have a pair of beautiful wings!!!! So she made me an angel - how adorable is that!!!! It is one of my most loved treasures that reminds me of my wonderful time as an arts teacher there back in the nineties. ;)

If you want to see more, just hop over to the Canvas Corp Brands Blog.
There are more treasures waiting for you to be discovered. 

Hugs and happy crafting!
Claudia
xxx


Monday, 1 May 2017

Dreams at Emerald Creek Dares

Servus and welcome to the start of this month's challenge over at Emerald Creek Dares!


This time we want to see and learn about your

Dreams!


and/or any fantasy you can dream up. 


Mine is rather a memory than a fantasy. My grandma that I love and miss dearly used to read to me when I was little and my favourite book was a collection of poems and short texts on the seasons of the whole year. It had the most charming poems and watercolour illustrations showing flower fairies, elves, gnomes, lizards, bugs, moths and many other nature creatures that inhabit meadows, forests, ponds and hedges. It was those "tiny wonders" that I never got tired of looking at. And when I had finished my DT project for this challenge I found that obviously my inspiration originated from these memories...


The fairies in the book looked totally different from mine of course. But I remember how I loved to watch them sleep. So I just had to draw a sleeping - and dreaming! - fairy too. ;)


 My fairies are trying to catch dreams that evolve from the soil as twinkling stars or huge dream bubbles (the brads) and gently rise up to the sky where they drift along to "find" their humans that will dream them. 


Emerald Creek products used:


other products used available at EC:


I started with a plain white cardboard (a left over from some packaging) and added white Gesso to it using a palette knife. While the Gesso was still wet I sprayed on some Broken China and Squeezed Lemonade Distress Spray Stains and dabbed off most of it with a baby wipe. Once that was dry I used the gorgeous Tim Holtz "Wildflower" stencil and some modeling paste to create the meadow for my fairies. I left the paste to dry naturally.


Next I sprayed on some Gathered Twigs Distress Spray Stain and also dabbed off the excess after half a minute.  My board now looked like this:


I let everything dry really well before I went on to the next step. I unscrewed my embossing dabber's top and poured a little glob of embossing ink onto my craft sheet. Then I picked up some of that with the tip of my palette knife and scraped it randomly onto my board.  

I sprinkled on a thorough coat of Emerald Creek Fractured Ice embossing crystals and heated it with my Ranger heat tool. 


I love that that embossing enamel has transparent crystals as well as lightly tinted ones, glittery and dark ones and some that melt to a chunkier consistence than others. So the Fractured Ice crystals added a beautiful green-ish tint here and there but also highlighted the sprayed on colours underneath and made them look brighter. 


Then it was time to sketch my fairies with a precision pencil.


I unscrewed my Picket Fence Distress Paint Dabber and used a fine tip brush to paint my fairies. I also used a bit of Gathered Twigs Distress Spray stain from my non stick craft sheet. 


I glued some Mossanite, Aventurine and Pyrite gem stones to the blossoms using matte Decou-Page.


Using my fingertip I added some dark brown acrylic paint to the board's edges for a frame. I also added a bit of doodling with a white gel pen (swirls, dots).


I poked some holes and inserted the brads. Then I doodled some white circles around them to create my "dream bubbles".


The alpha part letters were glued on using matte Decou-Page. Afterwards I applied some DecoArt Iced Espresso Metallic Lustre to make them match the embossing enamel's look.


In whimsy handwriting I added the word "fairy" with the white gel pen...


 ...et voilá!


I hope you like my little dreamed up fairies realm! I am already impatient to find out what you will come up with!!! And also check out Cassandra's make over at the Emerald Creek Dares blog!

Don't be shy  and play along! You can win a $50 voucher by doing so! How cool is that?

(And last but not least I would like to ask you to scroll down to my previous post as there is another project and tutorial waiting for you  - this time over at the Calico Craft Parts blog. Hope to see you there soon too! )


Thanks for stopping by and
hugs and happy crafting!
Claudia
xxx

http://www.emeraldcreek.org/

http://blog.emeraldcreek.org/