Wednesday, 31 October 2018

Come on-a my house, my house a come on...

Last chance to post a Halloween project...so here we go!


The design team of Calico Craft Parts recently did samples showcasing the Book Box Kit and as this was a feature for the October issue of Craft Stamper Magazine, some - including me - went for Halloween themed projects (using more Halloween wood shapes from the Calico Craft Parts range).
(Better pictures and the projects of my teamies alongside the detailed product lists and the how-tos can be found in the October issue of Craft Stamper Magazine!).


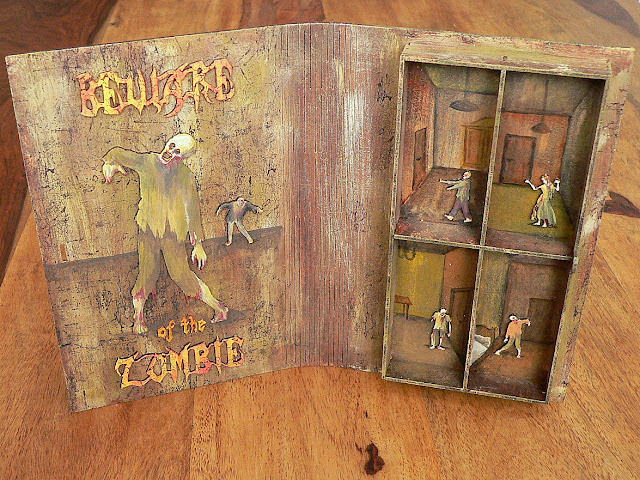
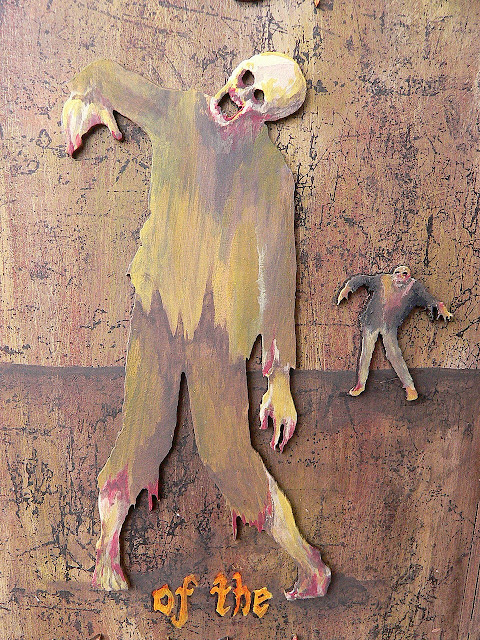
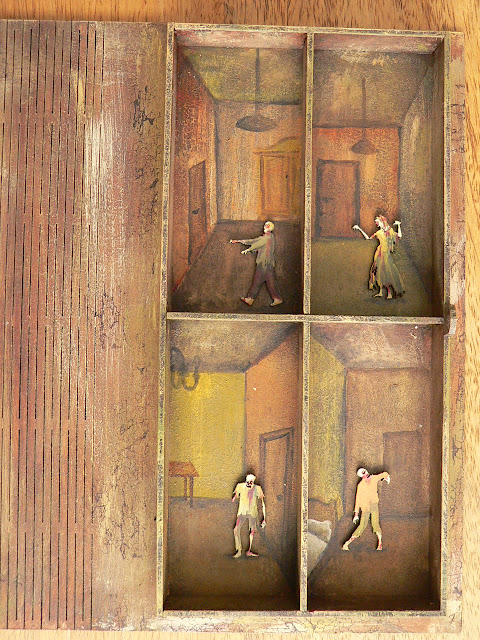
Being a fan of "The Walking Dead" TV series and with the compartments of the book box reminding me of single rooms, I went for a house that is inhabited by zombies...


I especially aimed for that typical colour scheme from the Walking Dead Intro - a pale rotten palette with fleshy warm tones and fading greens. To find the right colour palette for my project I used an online tool (there are several out there) that extracts colour palettes from images you upload on their site - so I snatched a Walking Dead picture I found on the internet - et voilà: all I had to do was pick the matching tones of DecoArt paints from my studio paint storage trolley and paint away!


I painted one large and some mini Zombie wood shapes and also some Halloween words from the Calico Craft Parts range using DecoArt Americana and media fluid acrylics.

Here's an image of the project in progress (without the painted rooms and the hand painted "of the")...


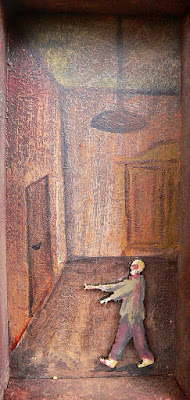
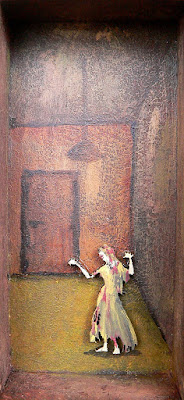
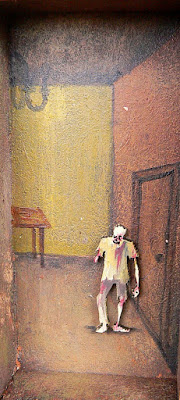
...and these are the rooms I've painted with the zombies glued in place:


I've imagined these zombies all living next door to each other, trying to leave the rooms they're locked in, but not being able to (until some poor human opens the doors, not knowing what is waiting for him on the other side)...and of course doing their nasty groans and grunts and walking around restlessly in there....huahhhh!


And of course there had to be a Zombie close up - reaching its hand out to grab you...ready to take a bite!


I had great fun painting the Zombies - especially the two on the inside of the Book Box Cover!


Amazing what a little paint can do, isn't it? ;) 

Actually the colour range from the DecoArt media fluid acrylics was perfect for the job, and the Americana paints were a great addition as there are so many tones to choose from! 


Such a friendly neighbourhood this is! 


Happy Halloween!
Claudia
xxx


Monday, 29 October 2018

Come Over to my Haunted House...at Calico Craft Parts!

Hi, servus and thanks so much for stopping by!

Today I would like to invite you over to my Haunted House, which gladly isn't the place I live in but my last Halloween project on the Calico Craft Parts blog for this year.

I hope you have all enjoyed the Halloween crafting as much as I have!


There are endless possibilities for cool crafting projects done with Calico Craft Parts as they have an amazingly large collection of Halloween wood shapes - so you already get loads of inspiration just by browsing this section on their online shop site... ;)

There's as always a tutorial waiting for you and of course I wish you all Happy Halloween!
Simply click HERE to get taken to the post. Hope to see you over there!


Hugs and happy crafting!
Claudia
xxx


Monday, 15 October 2018

A Special Family Photo Frame for Calico Craft Parts

Servus and welcome to the usual invitation to meet over at the Calico Craft Parts Blog today, where I am...no, wait...I have asked a special young lady to jump in for me and host today's blog post.


She's the daughter of the young girl in the middle on this picture and I have asked her to share a make she did for her grandmother. She has used DecoArt products for her project (like I usually do)...and maybe a little witchcraft too. So if you click HERE you will be taken to her blog post. (Porticia Crimpbottle, don't embarrass me and behave!!!!)

Have a good start into the week!
Claudia
xxx


Friday, 5 October 2018

Get Your Spook On with StencilGirl® Stencils

Hi, servus and thanks so much for stopping by today! It's time for all kinds of "Treats"  this month over at the StencilGirl® Talk Blog and I treated myself to a really happy and messy time at my craft desk with my latest project for your inspiration. 


The Blair Witch Project is definitely one of the spookiest movies I know and I remember all that creepy stuff hanging from the dead looking trees... like bones, little voodoo-like dolls made from twigs and dried grass, birds wings and other animal parts and bones...well, honestly I always wonder who (and what kind of folks) the people are that create these things for movie sets. They must have lots of fun at work. ;)

I guess they love their good daily dose of spook (and maybe even a bit of splattery grizzly gore here and there) - and to be honest - I don't like the real splatter movies and many horror movies are just dull and boring, but a good horror movie with great storytelling and effects is something I really enjoy.


Of course I had to add at least one black raven to my spooky diorama. 

I love these beautiful and intelligent birds; their cries have something melancholic about them and the fact that ravens are all black makes them the perfect omen that something wicked is coming your way...

...and with that tight thicket everywhere around you there's no way to ever be able to run fast enough to escape it...


But enough of that...be honest: do you still shield your eyes with your hands and peek through your fingers during a horror movie (and have fun at being scared on your safe and cosy sofa)? Well - I do. ;) 

By clicking HERE you will be taken to the StencilGirl® Talk Blog where you can find out about the whole project, stencils used and how I made my spooky Blair Witch diorama. I have also done a seven (!) minutes long video for those who prefer to listen to me explaining chatting away about the stencils and products used and my thoughts behind the project,  instead of reading a long post. For the tutorial though I recommend you read the post. That might even take less long than watching the video this time I guess. lol 

Hope to see you over there!


Hugs and BOO! Happy Crafting!
Claudia
xxx


Thursday, 4 October 2018

Vampires and Poor Dental Hygiene

Suddenly, just as he was about to carve his fangs deep into the screaming victim's neck, a strange thing happened...


The idea for my ATC was sparked during a die cutting session with the Tim Holtz Village Graveyard die set. There were these tiny left overs from the fence piece (visible in the black area on my glass mat)...


...and to me they looked like teeth lying there ( I guess I should mention at this point that I had a root extraction and two implants done last week and am still on recovery from that... ;).

Lost teeth....Halloween....that quote on the fab Monstrous stamp set...and there it was - my idea of what happens to Count Dracula, when he doesn't take good care of his teeth (you know...like brushing them twice a day night,  thorough flossing, using mouth rinse and having them looked at by a dentist at least once a year century). 


Can you imagine anything more horrible than loosing your teeth...I mean: several (or even all) of them at once ...out of the blue...just when your thinking your life is good and things are all going forward and you want to take a bite of that yummy bartender cupcake you've brought home...there simply IS nothing more horrible, right?


I created my toothless vampire by simply removing the stamping ink with a Q-tip from the fangs before I stamped the image onto white cardstock. See? They're gone!

I stamped and painted the image directly on the stamp platform. I used Distress Stains salty ocean and antique linen to mix a pale green for the vampire's skin. To create some shading for a more dimensional look I simply painted over the according areas (under the eyes, on one side of the nose, one cheek and one side of the forehead and neck) two or even three times with the same colour. It's like you're doing a watercolour painting: the more layers - the darker the tone.


Then I mixed fired brick and salty ocean to create a dark red and a pale violet.


The "teeth" were done by cutting the scraps from die cutting the metal fence into slightly different shapes with my fine detail scissors. This way I created two fangs, an incisor and several back teeth. I painted their roots with fired brick and added antique linen for a subtle shading.


Then I got fiddly and blended the edges with black archival ink (using the pointy end of a drop shaped cosmetic sponge). I messed up the molar to the outer right as you can see.


One is already showing first signs of caries. Uh oh!


I used the ATC & Corners Alterations die to cut an ATC blank from heavy grey cardstock and added shabby shutters and dusty concorde Distress ink using the blending tool. Then I stamped it with a background image from the Mini Halloween 5 stamp set.


The corners were blended in fired brick Distress Ink and glued in place. For shocked and toothless Count Dracula I used large sticky foam pads, for the falling teeth I cut tiny black sticky foam pads in halves. I had to use tweezers 'cos the foam pads were so small...


Done!
I must admit I feel sympathy for haughty Count Dracula. Having to feed on blood bottles instead of warm, living prey definitely is in bad style and very undignified, isn't it?


I hope my little fun Halloween ATC has made you smile a bit. ;)

Hugs and happy crafting!
Claudia
xxx

Tuesday, 2 October 2018

Wicked Wood

Servus and thanks for stopping by, dear crafty friend!

I have received my Tim Holtz Glass Media Mat yesterday - so I just HAD TO play on it! And I also had some newly bought Tim dies waiting to be tried out too. So I treated myself to a happy time at my craft desk with all my new (and some older) Tim Holtz goodies!


First of all I have to admit that until today....no, to be more precise: until that day last week when I found the Glass Media Mat at an Austrian online store (yay!!!! reasonable shipping costs!) and decided to order it right away - thus treating myself to some fancy up to date Tim Holtz goodness so I could be part of the hype (which is quite an inferior and vain motive...I know) - I had thought that I didn't really NEED it. I just WANTED it. ;)

But after my first play on it I have to say that buying it was the best decision I've ever made!!!! I have been using a paper palette and large sheets of white paper on top of a craft mat that I have glued onto my craft desk - and that has worked quite well - but this way I always had to switch from paper to craft mat to paper palette and they often got in each others ways and there was always one or the other to be put to the side (which isn't easily done as there's no space left to put anything from my desk to the side actually ;) .
Not to mention the amount of messy, sticky scrap paper that produced. Now I have it all in one place. No more paying attention to not wipe my paper palette off my desk! No more putting the large white sheet to the side to get to my non stick craft mat! And I have discoevered and enjoyed even some more advantages I hadn't even thought of when buying the Glass Media Mat! I am more than pleased with this new fantastic tool! Thank you, Mister Holtz!


The Tim Holtz Addicts facebook group is celebrating its fifth anniversary this week and you can enter a give away by sharing a project on there that is done with Tim Holtz products mainly. So I decided that was a good cause to use loads of Tim Holtz Distress Stains, Inks and Paints on the Glass Media Mat. Tim says it's a game changer - and it is indeed!

I came up with a spooky card, using the following Tim Holtz dies, stamp sets and Distress products:

- Entomology stamp set and dies set
- Falling Leaves stamp set
- Vintage Spirits dies
- Fall Foliage dies set
- Tangled Twigs die
- Distress paints: black soot, weathered wood
- Distress Oxides: broken china, fossilized amber, walnut stain, peeled paint, fired brick
- Distress Stains: tea dye, weathered wood, ground espresso, pumice stone, wild honey


The project was inspired by a photograph I have taken in the beautiful Vienna Woods.


It's a simple "running beetle" - at least that was the name I was told by a biologist when I showed him the picture and asked how this wonderfully amazing beetle is called.

He saw my face when he said "blue running beetle" and quickly added "but for you it is also called "Jewel of the Forest". ;)


So I tried to create the effect of a shiny "jewel" crawling in a forest thicket - shiny and blingy against the matte browns of the twigs and the soil and the fallen leaves.


I also wanted it to be a Halloween themed card - so I made my own Vintage Halloween word using the dies from the Vintage Spirits set and cutting some of the words apart to create the "wood".

But let's start at the beginning of my how-to:

I die cut the Tangled Twigs twice from some thin cardboard packaging.


Then I flipped one to the other side and painted both with Distress paints black soot...


...and weathered wood. The weathered wood was only dabbed on here and there and just lightly.


Using my (also newly bought) Tim Holtz stamp platform (which is the perfect tool for a mediocre stamper like me), I stamped two moths and my running beetle from the Entomology stamp set in black archival ink onto some white cardstock.


Then I picked the according dies from the Entomology dies set and die cut the moths and the beetle from a piece of plain cardstock.


I used the "stencil" that I had made this way to exactly place the dies on top of the stamped images. To do so I simply put the "stencil" in its exact position on top of the stamped image and fixed it with some masking tape. Then I kind of inserted the die into that stencil and ran that through my Big Shot.


That worked just smoothly! (I love that particular dies set so much!)


Time to inaugurate the palette on the Glass Media Mat and paint the die cut insects with Distress Stains!


I used hickory smoke Distress Ink and a bit of water on the glass palette to darken the visible white cutting edges with a detail brush.


My plan was to stack two layers of the die cut tangled twigs on top of a foggy background. I used Distress Oxides on the glass mat and turned another piece of grey packaging cardboard into this:


On some white cardstock I randomly blended fired brick, peeled paint, fossilized amber and walnut stain Distress Oxides and stamped some black leaf pattern on top using a leaf stamp from the Falling Leaves stamp set.


Then I die cut some leaves from that using dies from the Fall Foliage dies set. I used the pointy end of a cosmetic sponge to blend the leaves' edges with dark brown stamping ink.


I added some Liquid Glass (from the DecoArt media line) to the beetle's body and put it under the warm desk lamp bulb to speed up the curing process. I guess you get the same shiny and dimensional effect by using Glossy Accents.


To decide where all the die cut leaves and insects were to go, I played around a bit and used the plain white beetle die cut while the painted beetle was set aside to dry.


Using black sticky foam pads I stacked the two layers of thicket onto the background panel.


I used a paper from a Tim Holtz paper pad and the "wicked" and "boo" dies from the Vintage Spirits die set to create my "wicked wood". I die cut "wicked" twice and used the w and the d plus the "oo" from the "boo".


Using my drop shaped cosmetic sponge again, I blended the word's edges with hickory smoke Distress Ink.

Time to glue all the pieces in place! I used some tacky glue and more black sticky foam pads.


I finished the piece off by blending the edges with jet black archival stamping ink using a piece of blending foam. Done!

I am happy that I have managed to create the impression of an impervious thicket with the last brown leaves still clinging to the bare twigs, some moths fluttering through or maybe being trapped in it and my shiny "Jewel of the Forest" as the star of my make. I hope you like my card too!

Some close ups as usual (simply click on the images for a larger view):


Hugs and happy crafting!
And happy 5th Anniversary, Tim Holtz Addicts!

Claudia
xxx