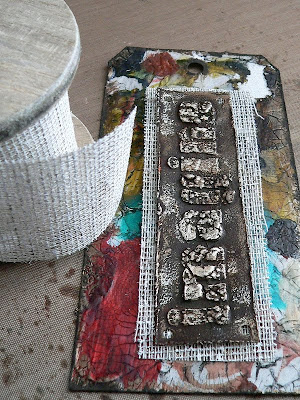
Hi there and welcome back to another tutorial! This time I want to take you through a lot of steps by which I created this tag:
To make this tag I used:
- an old paper palette from your latest acrylic painting session full of yummy colour remains (you can of course use any "messy leftovers" from your creative work)
-
DecoArt Traditions Acrylic Colours "Raw Umber" and "Quinacridone Gold"
-
DecoArt Metallic Lustre
-
DecoArt Americana Decou Page (matte or glossy)
-
DecoArt One Step Crackle
-
DecoArt Texture Crackle (colour of your choice)
-
DecoArt stencil with words
- a bristle brush, a palette or similar, baby whipes, scissors, a carpet knife, four brads, some rough fabric ribbon, a rivet and a rivet setting tool and mat, a hammer, a punching needle, some rough cord
The main idea of this tag is to recycle some of your left overs from colouring or painting sessions. For example I love to use coated paper plates as palettes, when it comes to painting with acrylic colours. And I never throw them away as they look awesome, having a lot of colours and texture on them that I could not produce that way if I wanted to ;) .
I used a Sizzix die to cut the tag, but you can also use a ruler, pencil and scissors to cut your tag from the heavily colour coated "card palette". The image above shows one of my unused paper plates and the cut to size tag to the right.
Once you have prepared the tag you want to work on, you can start turning it into a piece of art on its own :)
1. Cover the tag with a coat of
DecoArt Americana Decou-Page sealer and let dry.
2. Then give it a coat of
DecoArt One Step Crackle. See to it that you do not apply the medium too evenly - the crackles get larger with increasing thickness of your layer. So I tried to vary the thickness of the coat to get various sizes of crackles on my tag.
Let dry and crackle.
3. In the meantime prepare the "imagine" plate (or whatever you choose as your word/s) that will be mounted to the tag's center. Use
DecoArt Texture Crackle (no matter which colour, as we are going to cover the letters with acrylic colour anyway) and apply it generously through the stencil to a piece of cardstock with a palette knife. I used "Light Mocha" btw.
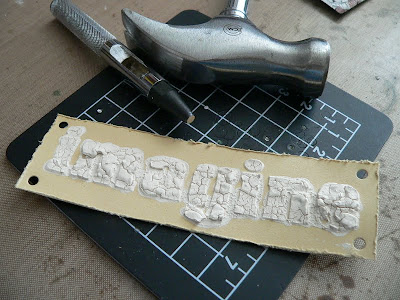
Be careful when removing the stencil to avoid smearing the edges! Your stencilled word should look like this now:
Let dry (or even speed up the process with the heat tool). Your crackled word will look like this afterwards:
4. In the meantime the crackling of your tag should be finished (do not try to speed this up with the heat tool as it will make the crackle medium create bubbles instead of crackles).
Use something (an old brush or a piece of cloth) to rub in some "Carbon black"
DecoArt Traditions acrylic paint. Cover the whole tag with the colour and quickly whipe off the excess using baby whipes, before the colour dries. This will leave some dark colour in the creases and make them more visible.
If you happen to take off the colour from the crackles too, try to whipe using less pressure or change from baby whipes to telephone book pages (which take off the colour as they are slightly absorbant, but do not get into the creases).
See the black and orange "tool" to the upper left? I created a so called "tampon" as is used with printing techniques when it comes to rubbing the colour paste into the fine detailed etchings of copper plates for printing. I used an old T-Shirt and cut out a circle which I filled with some cotton and closed with a rubber band. It allows you to "massage" the colour into the creases and works much better than a brush.
When wiping off the colour excess be generous and change baby whipes quite often, as you will only be whiping the dark colour from one space to another as soon as your whipe has taken too much colour. I needed at least three baby whipes to get the colours of the tag being bright again.
5. Cut the stencilled word plate to size and distress the edges. Therefore use a carpet or crafters knife and scratch it along the edges of the card as shown in the picture:
This will roughen the card's edges, which is perfect for a distressed look.
6. Punch four holes into the plate as it will be fixed to the tag with four brads.
7. Cover the plate with a coat of
DecoArt Traditions "Raw Umber". Try to stipple instead of stroking the paint on with the brush. Don't be afraid - the crackles will still be visible afterwards.
8. After this has dried, add some traces of "Quinacridone Gold"
DecoArt Traditions with some spots of the plate, half painting half dry brushing it to the surface.
9. Afterwards give it a rub with
DecoArt Metallic Lustre of your choice.
I made images of the single steps so you can see the development:
10. The tag needs a darker edge to get the focus centered. Use
DecoArt Traditions "Raw Umber" and a bristle brush and stipple some of the colour around the edges, leaving traces of the brush visible.
The next image shows how the brush's bristles partially apply paint to the upper side of the tag, leaving traces of the single bristles, which creates some nice texture instead of an even outlined border.
11. Cut some rough ribbon to size. It should be at least five to six millimeters larger than the plate. We want the ribbon's fibres to make a kind of "frame" for the plate, to make it stand out from the background of the tag.
Remove some of the outer fibres by pulling them one by one off the ribbon.
This will create a rough edge of the ribbon and also let some of the background show through. The rougher your ribbon, the easier:
12. Position your plate on the tag and poke four holes through it to insert the brads afterwards that will fix the plate and the ribbon to the tag.
13. I then wanted to insert a rivet and discovered that my tag's hole was too large.
I fixed that by cutting a small piece of card to size and punching a hole of the right size into it. I then glued that piece of card behind the tag's hole.
Now I could set the rivet without having it fall through the hole :)
14. Use some strings of rough cord to add it to the tag.
15. I then stamped some artistic words (using self-made stamps from funky foam (tutorial can be found
here)) onto some card, cut them to size and added them to my tag.
Done!
I hope you like it and will try some artist's tags from leftovers of your palettes too! Thank you for staying with me this far and happy crafting!
die amelie xx
Of course some close-ups as usual ;)
More mixed media tutorials from talented fellow crafters and artists can be found
here.


 s
s


