Showing posts with label Artemio. Show all posts

Tuesday, 30 July 2013

"Collage!"...

...is what we want you to do for this fortnight's challenge over at TryItOnTuesday!

This means that - as always - our challenge is an "anything goes" as long as you show us a collage, which must also include some script somewhere ( ...and of course stick to the challenge rules in general ;)


I recently stumbled upon a lovely book about soldered jewelry and so I decided to take up soldering again. This is a technique I had learned over 20 years ago during my arts studies, but honestly never taken any further. But now was the time:
I created a collaged deco hanging with some of my favourite stamps, book pages and images: insects, script/words and plants!

I also wanted to use the awesome bookpages from an old herbarium, which were given to me by lovely ELLIE during a swap! (Thank you for this rare and wonderful treasure, my dear crafting friend!)
And they were just perfect for this project! I sooo love how they are displayed now.


I used 5x5 centimeter Memory glass plates, self adhesive copper foil tape and the soldering iron from dear hubby ;) - and I had a lot of fun!

In the following I will show you all six sides of the hanging ornament:


To create my six small collages, I used pages from the old herbarium, some script and animal stamps which I stamped onto beige card or scraps from the pages' borders and also some scraps from Tim Holtz papers which I stamped some images of insects on. Most of the scraps were cut to size, some of them were torn. All of them were blended with DI "vintage photo" around the edges. Then I glued them to place and put front and back images between two pieces of Memory glass. I covered the edges of the glass sheets with self adhesive copper foil tape and soldered around them afterwards.

Stamps used are from DeStempelwinkel, 7Gypsies and Artemio, stamping inks: archival black jet and sepia. 

Sssshh....my favourite collage is this one ;) :


Working on such small space is something I really like to do. But of course the collages you enter with the challenge can be of any kind and size you want ;)


I invite you now to hop over to Try It On Tuesday to see what my fabulous team mates created for your inspiration! Thank you for stopping by and I look forward to seeing your awesome collages soon entered with our challenge!!!!

I enter FSC's "Script/Books/Pages/Print" challenge with this make.(Thought I already had, but it seems I deleted this paragraph accidentally during editing :(

Hugs,

die amelie xx


Thursday, 27 June 2013

Great teachers...

..are sadly not a matter of course, but our son was so lucky to have two wonderful years with three awesome teachers, who have been putting all their humanity, wisdom, heart and knowledge into their job to make my son a more self confident and happy school kid (after a not too good start with his first two years at a different school and with a different teacher, that had made us face severe problems like school anxiety and great lack of self confidence even though he is a smart boy - which his latest school report gladly shows!).

As a thank-you-gift from the deepest bottom of my heart (being myself a teacher and knowing about school kids' AND teachers' problems), I bought them some gift coupons and made three tags with envelopes on them to put them into.


First I die cut the three envelopes and coloured them with various Distress inks in blues and greens. After I had folded and glued them into shape I stamped some of my lovely hedgerow images onto the tags and envelopes using dark blue archival stamping ink.


The white lace and blue linen ribbon were sewn to the tag and the blossom twigs were fixed to the tag using blue twist. I used the same twist to close the envelopes. Done!


Thank you for stopping by and happy crafting!

Claudia - die amelie x

Friday, 21 June 2013

"Look left!"

As I love noir comics I also love dark stories - and both is brilliantly combined with the graphic novel "From Hell" from Alan Moore and Eddie Campbell.

Inspired by the book I designed and carved a new stamp today and used it to create this scene with:


Stamps used with this tag: one of my own design and some of Darkroom Door and Artemio.


As this is a "new style", according to a new stamp design, I enter this tag (again) with FSC's "Something New/New Style" challenge ;) and as this is definitely a "Men's Tag", I also enter The Artistic Stampers "Makes for Men" challenge with it.
I also enter Stampotique's "Anything but a card" challenge with it as it is a tag.
Aaaand it also works well with Out of a Hat Creations' challenge "Transport".  ;)
City Crafter's Challenge "Clean and Neutral" seems just to be waiting for my tag *lol.
I also recently discovered PunkyouGirl's challenges - as their first challenge is "anything goes" (as long as it is "dark", "gothic" or otherwise punk), I enter my tag with their challenge too.

Hope you like it!

Hugs,
die amelie x

Wednesday, 15 May 2013

Our Creative Corner - "history untold"

Hello out there, my dear friends, followers and those yet to become ;)

I am very proud today to officially show you my very first project as a member of  Our Creative Corner's DT and thus offer you some mid-month motivation and inspiration!

There is still almost a fortnight to go with joining the challenge and I would love to see your awesome creations over there too! This month is "anything goes" time!!!! So I am sure I will see a lot of awesome projects entered... ;)

For my first OCC project as a Design Teamie I chose to do one of my favourite "themes" - a booklet. It turned out rather feminine, which is not what I do mostly, but that is just how this booklet turned out - it developed almost by itself (and maybe I developed alongside with it too ;).

I apologize in advance for a rather word and picture heavy post ;)


"history untold" means the history we - the ordinary people like you and me - "write" just by being in places and living our lives... sometimes at places that have a wider known history on their own...but would they have it without people who have been telling it? I believe it is us, who write history and not the places.


Maybe Dr. Watson would have never become Sherlock Holmes' "room mate" hadn't he heard that violin? How would this have changed the Sherlock Holmes stories?


A galant kiss behind closed doors might have changed some lives of girls, we do not know of... but a great "story" may have started with such an event... and I am sure, this has happened in famous places too... Prague, Rome, Venice... who knows? And where did something like this happen to you? This place has it's very special history now for you, hasn't it?


There lived a lot of highly talented women who painted famous places for their own personal keeping...never showing it to anyone but their dearest friends or family. Think of Sibylla Merian, who was one of the first women who became famous for their painted work... just because we don't know of them, this does not mean that there are a lot of gifted artists/painters out there...even today.


I often wonder how childhood days friendships looked like some fifty, eighty, hundred, two hundred years ago... what was it that children rejoiced in? Are the sounds of their giggles, cushioned by hands held quickly to their mouths, and whispered eternal friendship vows still captured with the bricks of old buildings in famous places? Sometimes I touch these old stones and try to listen with my fingertips...


Which untold stories could a boy have witnessed, waiting for his father to return from the pub, hearing the men's laughter and smelling the warm food?


What about history, written about long lasting female friendship? Shared thoughts well hidden underneath new hats? Afternoon tea filled with gossip, great plans and expectations?

I often wonder how many stories that would be real history (and not only fiction) are out there - yet untold, because they would be the history of people like you and me. And I am sure many of them would be as adventurous and special as history we know today, that has been handed down about famous people...


I used papers from the lovely Prima "Script Pad" as pages, cut them to size and treated the edges using the Sizzix OntheEdge tabs die from Tim Holtz. The backs of the single pages - as they were white - were coloured by using DI "aged mahogany", "pumice stone" and "iced spruce"... applying them to the craft sheet, spritzing with water and dipping the pages through the puddles of ink.


The stamps used for this booklet are from flonzcraft, IndigoBlu, HeroArts and DarkroomDoor. The stains were stamped using Andy Skinner, BoBunny and Tim Holtz texture stamps and heat embossed with dark red "Sternenstaub" embossing powder to add a little bling and contrast.


The images and words were stamped on light beige card (with DI "aged mahogany"), cut out and glued - edges blended with DI "walnut stain" - to the prepared pages.


For the binding I bent two rings of dark wire, which I embellished with a lovely
Artemio button and some coloured lace ribbon.


I left the "history" rather sketchy - to leave enough room for imagination and thoughts on possible untold history - maybe even running with ones own family.

Browsing through old photographs showing my ancestors or reading notes they once made in corners of books or written postcards to their loved ones often makes me wonder how much "history" might be found there  - untold yet (and sadly most of the time remaining untold, as noone is left to tell...).


So I created this booklet as a kind of reminder too - to remind me/us to tell our stories/history to our next of kin. Maybe write a diary... or leaving notes in our calendars and keep them... so we can tell our grand children what once was a "moment of importance" to us as it changed our lives...

I leave you with these thoughts and some more close-ups and hope you have enjoyed this rather word- AND picture-heavy post.... I look forward to seeing your creations  over at OurCreativeCorner! :)


I am entering SSSaS's "little paper" challenge and FSC's "Anything Goes" challenge with this project.

Hugs,

Claudia - die amelie xx

Sunday, 24 February 2013

"embrace imperfection"

...which mostly means "learn to love yourself" as I see it. ;)

Love the quote and the stamp too and at the moment I especially love to get inky - really inky!!!

For this tag I used the colouring technique with felt tip pens on acrylic bloc and water spraying bottle again (the one I used for this tag).
It was great fun - as was stamping the grass image onto the sticky dots and applying them to the tag afterwards.

Some additional doodling and added texture using the Tim Holtz stamp with the rings...done!
Hope you like this one too!

Hugs,

die amelie xx


Monday, 24 September 2012

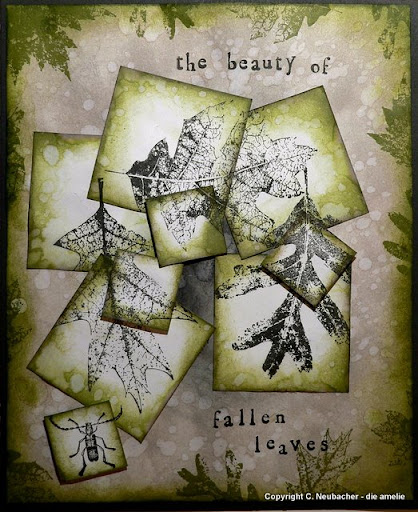
"fallen leaves"

I had fallen in love with the Tim Holtz stamp set "Falling Leaves" at first sight, so when I finally had it in hands, it came as a surprise to me that I absolutely did not know which project to do with it, that would show the whole potential of these gorgeous images...

It took me some days to find an appropiate approach. I stamped, cut out, inked ....and discarded. Then I had the idea, that instead of the leaves, that should look like they had fallen on the ground, the paper they were stamped on should take their place instead and look like a pile of fallen leaves...with pictures of fallen leaves on them. AND I thought it the perfect project to do my very first inchies.

This card is the outcome of a lot of stamping, cutting stencils, searching for exact positions, sparkling and inking:


I combined 1 and 2 inch inchies for the project, which was very helpful to fill the "gaps" that had developed after I had stamped the three big leaves onto the five big inchies (which was quite tricky I have to admit).

After I had all my inchies covered with my puzzle of leaves, I inked the edges with Distress ink "peeled paint" and gave them a spritz with water from my fingers to get some texture, that should contrast the fine details of the stamped leaves images. Then I inked the edges with "pumice stone", which I also used as the background colour for the card. The border once again was treated with "peeled paint" (stamped small leaves AND inking with blending tool) to get a frame-like look. The letters from the Hero Arts stamp set were stamped with "black soot" after I had glued some of the tiles directly onto the card, some with foam sticky pads on top to create some depth.

Hope, the pictures show some of the threedimensional pile-of-leaves-look!


With this project I enter the challenge at City Crafter Challenge Blog, where they ask to use inchies. Well, I did! Inchie-leaves, to be exact. ;)

Friday, 14 September 2012

Birthday Parties and Weddings

I admit it at the very beginning: I do NOT enjoy making cards for official events like Weddings! It seems like a curse: I try to get right angles and exakt measurements, but there is always some lacking when I am done! A last minute stamped fingerprint on the back, which I noticed too late or oblique angles, where there should be right ones...

But things like these have to be done and I am of course too proud (and too lazy) to go and buy cards, so - from time to time - birthday cards & co keep me busy and slightly annoied.

But creating the envelopes for my son's birthday party was fun! He turned 9 this september and had invited his three best friends over for a "mens' evening" (which in truth lasted from 3 pm to 6 pm *lol). But I was gently asked out for this afternoon, as no women were allowed present during this event. (So I selflessly "suffered" with my best friend in her garden at her swimming pool, having drinks and no shouting kids around. Poor me!)

The envelopes contained little goodies for the guests, as there were cool removable tattoo's, monster buttons, skull lollies, marbles and spiderman rubbers.

The wax seals were highly appreciated, I was told!


The card for the wedding offered resistance as usual. I had to cut the inlay twice (just to discover, I had made it right angled the second time but too small again *hmpf) and I halfway tore the stamp with the iron fence image when peeling it off from its' sheet for the first time. *grmpf

But the result can be shown and this is as good as it can get.


What I really love to show you is my new "Handmade"-stamp, which is - I think - originally meant for selfmade marmalades, jams, juices and other home-made nourishment. *g


Love this stamp so much!

Hugs,
die amelie xx

Friday, 7 September 2012

Time to show....

...you one of my very first (and still most important) projects, where I used stamps, inks to distress and other typically scrapbooky materials. As it is leading a kind of shadowy existence, hidden on my "About me"-page here, I thought it was time to let a little light shine on it, so you can see a bit better...


I admit, I bought my very first scrap booking or stamping materials like distress inks, blending tool, stamps a.o. to do this very project, as it shows a moment which is very precious to me.

The fairy, who touches the boars heart like no one else dares or is able (or even allowed) to, stands for my writer-me (as I sometimes write poems too). The boar stands for a writer, I came to know via the internet, and although we are so different in so many ways, we are soul mates in a very special way of thinking and feeling about poetry and writing or expressing feelings in general. And we recognized each other in an instant - deeply and whole-heartedly.

So we found each other in the internet jungle and in writing we created our own deep and rich forest, which is full of laughter, joy, passion, even sometimes anger (which can be a very powerful source for creativity), small creatures beneath the fallen autumn leaves, we can hear crawling below our feet, and beauty - to be found even in the most rotten branch.We became each other's source of inspiration, fellow writer and critic companion.

This deeply felt friendship and relation and the ability to touch the other's heart deep inside, is, what I tried to express in this three-dimensional collage. The boar and the fairy are self-drawn images, the stamps are from the lovely Pictorial Webster's Stamp Set, inks used are "vintage photo", "broken china" and "rusty hinge". Grass stamps in the background are from Artemio and the script stamp I created the bark of the birches with, I admit, I cannot recall... the letter stamp set is from Hero Arts. 

To get the depth I desired, I attached the birch trees with sticky-foam-pads in two different levels and glued boar and fairy between these layers. The bark texture of the birches, which I cut quite randomly from a white cardstock, inked with distress inks from Ranger, was stamped with a small script stamp afterwards, which I inked only partially, to let the text fade in and out. 

Well - now I have shown a very special and personal "me" to you. The picture shows how I feel about and how I see life and nature surrounding us, wherever we go. How I treasure important people around me and heart-touching encounters.
This picture is a piece of me in a way. So I really hope, you like it.

Hugs,

die amelie (which btw. has been my writing pseudo for over six years now)
xxx

Friday, 31 August 2012

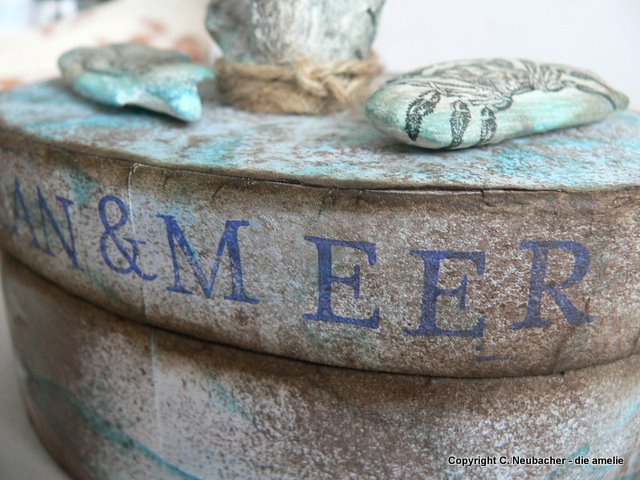
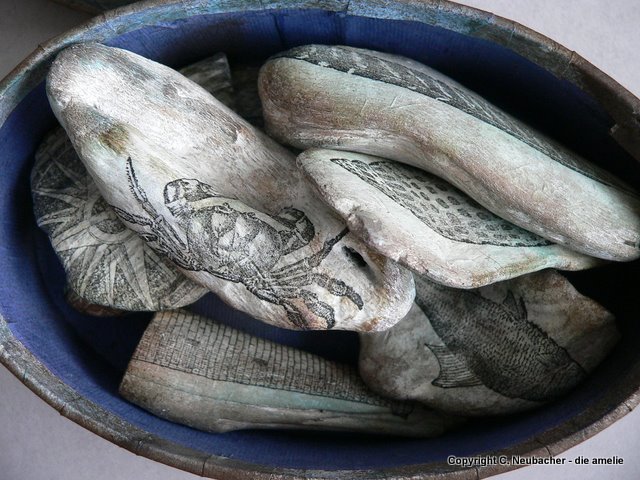
"Meeresschätze" / "Treasures from the Sea"

I have been storing some driftwood for quite a long time now and after the oceanic stamp set from Artemio had arrived a few days ago an idea for a project to finally use them started to take shape in my mind.

This is the result, which I am going to enter to the challenges from Catered Crop "No Stress to Distress"-Challenge, the StampotiqueDesigners Color challenge and  Simon Says Stamp and Show 's Challenge "Inspired by Summer Distress" as the new Distress ink "Salty Ocean" turns out to be my new favourite...


It's a box, were I can store the driftwood which I covered with stamped tissue paper. And because one of the wood pieces looked like a handle, I made it a handle by screwing it onto the lid of the box. But first I gave this screw an aged look by dyeing it with AAI "rust". 
 Here is a picture of the most important materials used in this project: 

For a start I distressed the white washed driftwood pieces with Distress inks "salty ocean", "walnut stain" and "antique linen". 

 Letting these dry, I stamped the oceanic images from the really coooool Artemio stamp set with black archival ink onto a single layer of tissue paper and let these dry too.                                                                                                            
I crumpled up two sheets of ordinary white copy paper, inked the crumpled edges with "salty ocean" Distress ink and sprayed the sheets with water from the Mini Mister afterwards to let the colour bleed out a little. I also added some dashes of Glimmer Mist "Moonlight" and Maya Mist "Espresso brown", to create a beach-sandy impression. 

While letting this paper dry, I tore the stamped images from the tissue paper sheet and glued them onto the wood pieces using Art Podge. After finishing that, I had a lovely collection of "treasures" for my box:

In the meantime my self-coloured paper had dried and I cut the stripes with which to cover the outside of the oval box and lid, giving it one additional centimetre width to glue around the edges to the inside. For the upside of the lid I glued the lid directly onto the selfmade paper, cutting around the edges afterwards. Then I inked all of the edges using Distress ink "walnut stain". On the outside of the lid I stamped a "word border" saying "Ocean" in various languages with a darker blue colour.


On the outside of the bottom section I stamped a fish (using "salty ocean" again), "swimming" around the box and it's treasures inside. At last I made a tiny tag, saying "Treasures from the Sea" and fixed it with rough cord onto the handle of the lid and glued two more wood pieces to the right and the left of the center wood piece. 

As the inside of the box was already pale lilac, I sprayed some Glimmer Mist and Espresso brown to the inside, to give it some texture. Done!

Here are some close-ups which I hope you will enjoy: