Showing posts with label flonzcraft. Show all posts

Friday, 12 July 2013

Altered Cigar Box Nr.3 (a tutorial)

I have a very dear friend who is a tobacconist and saves the empty cigar boxes for me :) So I always have some in store, waiting to be turned into something else...

Altering boxes is great fun but quite time-consuming. The box I want to show you today - along with a veeeery long and detailed how to - took two days in its making due to a lot of drying time inbetween the single steps. (I often work on another project simultaneously with which I can proceed while my other project dries).


I combined Steampunk with a slight touch of "lady-like" and some script stamping, as this box is meant to keep letters. Here comes the How-To and the materials list:

Materials I used were:
- a box to alter
- black, white and beige manila cardstock
- two pins or short nails
- DecoArt Traditions Acrylic paints "Raw Umber", "Transparent Red Iron Oxide", "Transparent Yellow Iron Oxide", "Burnt Siena"
- DecoArt Texture Medium
- DecoArt "Weathered Wood" Crackle Medium
- DecoArt Metallic Lustre "Black Shimmer", "Gold Rush" and "Copper Kettle"
- Sizzix dies for the book plate and the flourish (you can of course also die cut your     gears yourself using the TimHoltz Sizzix dies for example)
- Chipboard gears
- Stamps from flonzcraft and Marianne Design
- self adhesive half pearls
- a bristle brush, a palette, scissors, ruler, pencil, a stencil (I used one with cogs and gears), an embossing folder and a Sizzix or similar, glue, some ribbon, archival stamping ink "sepia", crackle medium (Distress clear rock candy crackle paint)


And here we go:

1. Glue some gears and the half pearls to the box.


2. Give the box two layers of DecoArt Traditions "Raw Umber" acrylic paint. Try to stipple the colour onto the surface instead of brushing to avoid strokes that will be visible after the dry brushing that is to follow a bit later. Let dry.


Your box should look like this now:


3. Using a stencil, a bristle brush and DecoArt Texture Medium, apply some gears and cogs to a corner of your box. Let dry.


Cover this area with Raw Umber acrylic paint after the medium has dried. (You could of course have done this step before giving the whole box the two coats with paint, but I changed my mind a bit late, so I did it this way round ;).

4. Apply DecoArt "Weathered Wood" Crackle Medium to some other areas of your box and let dry. (these are the shiny areas on the lid of the box):


5. Apply an acrylic colour of your liking onto these areas and let it crackle (which happens by itself while the colour dries). I used DecoArt Traditions "Quinacridone Gold" mixed with some "Transparent Yellow Iron Oxide"). Water the colour down around the edges of the painted areas to get a soft transition to the base colour of your box. You can also take off too much paint with a soft cloth if necessary.
Dry brush some other areas with DecoArt Traditions "Red Iron Oxide" and "Burnt Siena" until you have the desired look. I recommend trying one of Andy Skinner's Timeworn techniques for an aged and rusty look.


The dry brushing highlights the raised areas of the glued on and stenciled cogs and gears and makes them more visible. 

6. Stamp your central image onto a piece of manila card and let dry. In the meantime die cut the book plate from heavy black card. Then glue the book plate onto the manila card, having your stamped image in the centre and rub some DecoArt "Metallic Lustre" onto the frame.


Give the image a coat of Distress clear rock candy crackle paint and let dry. Rub in some watered down acrylic paint or Distress ink and wipe off the excess.


7. Stamp some images of your choice onto some beige manila cardstock, cut out, distress and blend the edges of your ephemera with Distress inks of your choice. I used "rusty hinge" and "vintage photo". Die cut some flourishes or other embellishments for your lid's design from heavy black card and rub on some DecoArt "Metallic Lustre".

Collage all of your desired parts to the lid of your box. Fix the book plate with two large pins (I used pins which are normally used for upholstering. If your pins are too long, cut off the ends from underneath using cutting pliers).

My letter box looked like this after I had a long time playing around with all my elements I wanted to use:


To add some more depth I partially stamped a script stamp onto the lid, heat embossing some of it using Ranger "copper" and "walnut stain" embossing powder. The light script was stamped using beige chalk ink.

8. For the sides of your box cut for strips of black card. Measure the length and height about three to four millimetres smaller than the sides of your box are.

 9. Run them through your Sizzix, Cuttlebug or whatever you have using an embossing folder that gives yummy texture.


10. Dry brush the strips in three steps, from darkest to lightest colour. I used some warm Earth tone DecoArt Traditions colour tones for this as I wanted to achieve a rusty look.


11. Glue them to the four sides of your box after they have dried. Then finish your box with a rub of DecoArt "Metallic Lustre" "Copper Kettle" around all the edges of your box. This will build a kind of "frame" around your embossed and dry brushed strips of card and look more interesting than leaving all the edges just "dark".


You're done! Well, almost...*lol.

12. The inside of your box may need some treatment too. I covered the lid's inside with a piece of paper from a Tim Holtz paper stash and painted the inside of the box using DecoArt Traditions "Transparent Red Iron Oxide", but you can design your insides any way you like of course. :)


But NOW you are really done! ;)
I hope you have enjoyed this how to and will make your own altered box soon! Have fun and thank you so much for reading this far!


I enter SimonSaysStamp's "Pin it" challenge with this box, as I have used two upholstering pins for fixing the book plate.
I also enter SimonSaysStampandShow's "A little Stamping" challenge with it, as I only did a little stamping but a lot more of painting on this project.
Then I enter "Anything But A Card's "Steampunk" Challenge (of course ;), Fashionable Stamping Challenges "Mail Time" challenge and The Artistic Stamper's "Ladies Day" challenge with it, as I have used some lovely ladies' images on my box.

I hope you like it, leave you with some close-ups and wish you all a happy time crafting! (Please, click on images to enlarge).


Hugs,
die amelie x


More Mixed Media and Altered Art Tutorials from some very talented fellow crafters and artists can be found over here.  

Wednesday, 15 May 2013

Our Creative Corner - "history untold"

Hello out there, my dear friends, followers and those yet to become ;)

I am very proud today to officially show you my very first project as a member of  Our Creative Corner's DT and thus offer you some mid-month motivation and inspiration!

There is still almost a fortnight to go with joining the challenge and I would love to see your awesome creations over there too! This month is "anything goes" time!!!! So I am sure I will see a lot of awesome projects entered... ;)

For my first OCC project as a Design Teamie I chose to do one of my favourite "themes" - a booklet. It turned out rather feminine, which is not what I do mostly, but that is just how this booklet turned out - it developed almost by itself (and maybe I developed alongside with it too ;).

I apologize in advance for a rather word and picture heavy post ;)


"history untold" means the history we - the ordinary people like you and me - "write" just by being in places and living our lives... sometimes at places that have a wider known history on their own...but would they have it without people who have been telling it? I believe it is us, who write history and not the places.


Maybe Dr. Watson would have never become Sherlock Holmes' "room mate" hadn't he heard that violin? How would this have changed the Sherlock Holmes stories?


A galant kiss behind closed doors might have changed some lives of girls, we do not know of... but a great "story" may have started with such an event... and I am sure, this has happened in famous places too... Prague, Rome, Venice... who knows? And where did something like this happen to you? This place has it's very special history now for you, hasn't it?


There lived a lot of highly talented women who painted famous places for their own personal keeping...never showing it to anyone but their dearest friends or family. Think of Sibylla Merian, who was one of the first women who became famous for their painted work... just because we don't know of them, this does not mean that there are a lot of gifted artists/painters out there...even today.


I often wonder how childhood days friendships looked like some fifty, eighty, hundred, two hundred years ago... what was it that children rejoiced in? Are the sounds of their giggles, cushioned by hands held quickly to their mouths, and whispered eternal friendship vows still captured with the bricks of old buildings in famous places? Sometimes I touch these old stones and try to listen with my fingertips...


Which untold stories could a boy have witnessed, waiting for his father to return from the pub, hearing the men's laughter and smelling the warm food?


What about history, written about long lasting female friendship? Shared thoughts well hidden underneath new hats? Afternoon tea filled with gossip, great plans and expectations?

I often wonder how many stories that would be real history (and not only fiction) are out there - yet untold, because they would be the history of people like you and me. And I am sure many of them would be as adventurous and special as history we know today, that has been handed down about famous people...


I used papers from the lovely Prima "Script Pad" as pages, cut them to size and treated the edges using the Sizzix OntheEdge tabs die from Tim Holtz. The backs of the single pages - as they were white - were coloured by using DI "aged mahogany", "pumice stone" and "iced spruce"... applying them to the craft sheet, spritzing with water and dipping the pages through the puddles of ink.


The stamps used for this booklet are from flonzcraft, IndigoBlu, HeroArts and DarkroomDoor. The stains were stamped using Andy Skinner, BoBunny and Tim Holtz texture stamps and heat embossed with dark red "Sternenstaub" embossing powder to add a little bling and contrast.


The images and words were stamped on light beige card (with DI "aged mahogany"), cut out and glued - edges blended with DI "walnut stain" - to the prepared pages.


For the binding I bent two rings of dark wire, which I embellished with a lovely
Artemio button and some coloured lace ribbon.


I left the "history" rather sketchy - to leave enough room for imagination and thoughts on possible untold history - maybe even running with ones own family.

Browsing through old photographs showing my ancestors or reading notes they once made in corners of books or written postcards to their loved ones often makes me wonder how much "history" might be found there  - untold yet (and sadly most of the time remaining untold, as noone is left to tell...).


So I created this booklet as a kind of reminder too - to remind me/us to tell our stories/history to our next of kin. Maybe write a diary... or leaving notes in our calendars and keep them... so we can tell our grand children what once was a "moment of importance" to us as it changed our lives...

I leave you with these thoughts and some more close-ups and hope you have enjoyed this rather word- AND picture-heavy post.... I look forward to seeing your creations  over at OurCreativeCorner! :)


I am entering SSSaS's "little paper" challenge and FSC's "Anything Goes" challenge with this project.

Hugs,

Claudia - die amelie xx

Saturday, 26 January 2013

"Want people talking about you?"

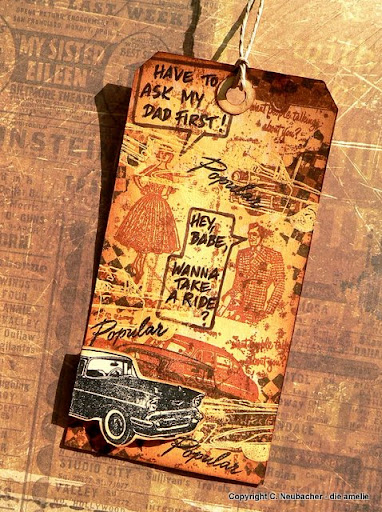
Vintage Stamping Challenges and Allsorts Challenge blogs ask for "Vintage" and "Masculine" projects.

So this was the perfect time to try out my awesome new vintage stamp set I won over at Vintage Stamping Challenges! (Whoop! Whoop!)

I also used my newly bought Sizzix Tag Die (as I never manage to trim the upper corners exactly when I cut out the tags by hand, that was some useful acquisition!). Cool thing is: it cuts two hole fasteners too! (using beige cardstock I found this really looks very vintage!)


To create the background I did some stamping and partially embossing with clear embossing powder, blending over with Distress inks "vintage photo" and "rusty hinge". The stamps are all from the flonzcraft stamp set "Sweet Fifties". Only the pepita texture was stamped with a Tim Holtz stamp from the "Classics #7" plate.


I drew the speech bubbles by hand (love that special comic font!). Hope you like the tag!


Have a sunny afternoon!

die amelie x

Tuesday, 15 January 2013

Let's celebrate!!!


Believe it or not: FunwithATCs celebrates its 3rd Birthday on January 19th! So the challenge theme for this fortnight is - of course - "Birthday/Celebration".

And there's even more to come! On this special occasion FunwithATCs is having an awesome blog hop in store for you with great prizes to be won. Prize sponsors are Tando Creative, Visible Image and 100 proof press!!! Cool, huh?!

To participate in the prize draw you have to take part in the blog hop - which means you have to visit all of the blogs and leave a comment with each of them. If you came to me from the FwATCs challenge blog and then Irit's blog "Irit Shalom's Designs" you are on the right track and will have to hop over to Mark's "Spesh Ink" blog from here (Mark will tell you where to hop next). If you just popped in here accidentally and want to take part in the blog hop, go directly to FwATCs challenge blog, where you find a list of all the "stations" of this blog hop in their correct order. The winner/s will be drawn randomly and of course the Top 3 will be selected too as usual.


My ATC for the challenge is quite different from the things I commonly do, but I just love these stamps from flonzcraft, which come with a gorgeous "Birthday" stamp set with many more gorgeous images. :)

I coloured the stamped quotes and images and the background using felt tip pens and crayons, then I drew some garlands with the embossing pen and heat embossed them with some of my sparkling embossing powders. I also heat embossed some of the stamped stars with clear embossing powder to add a little more bling and depth. Hope you like it and have fun and of course I wish you good luck with the blog hop!


Yours,

die amelie xx

Monday, 29 October 2012

Countdown till Halloween....tic toc

I want to show you a tag I made some weeks ago for a dear scrap friend of mine (fabulous Sandra - yes, the goodies-fairy ;).


The background was cut out from an autumnal paper stash from Bringmann, distressed and blended with white chalk ink and Distress ink "black soot", using a rough kitchen sponge. Spider webs were stamped with white chalk ink too. For the skeletton from flonzcraft I used jet black archival ink from Ranger.

Heat embossing was done with black "Sternenstaub" embossing powder. I also added a self-adhesive black velvet ribbon and a wonderful flower from Prima. The eyes (watching YOU!) are from a postcard I found at a museum's fleamarket. I copied it and cut out three of the eyes, did some doodling with a black felt tip pen and glued them onto the tag.


To match the colour of the flower seeds, I stamped the tiny spider on top, using white stamping ink first and then stamping over this layer one more time using a light green.


For a finish I did some heat embossing with aged copper embossing enamel and chose a ribbon that should repeat the greens from the flower and the spider.

With this tag I enter Fashionable Stamping Challenges once more this fortnight.


Thanks for your visit!
Hugs,
die amelie xx