Well, finally I made it and dived into art journalling! It took me quite a while to find the appropriate approach for me without feeling that this is not "me" but "art journalling as it is done". I admire so many art journal artists, who do a lot of colourful painting and drawing and doodleing... but "my style" is different and it took some time to unravel it from all my impressions found in blogland.
But now that I feel confident with what I do, I dared buy an art journal to work in!!! And today I created the cover to turn this wonderful empty piece of card art into my piece of art. (And by doing so I understood my pupils' fear of plain, white paper for the first time *lol).
Yes, you are right - it's the awesome art journal from finnabair's collection! And it is such a well thought-out design - with all its pockets, the manila and card pages, the envelopes and bags! Just brilliant!
I went for a rather reduced colour scheme and covered the cover with a thick layer of white Gesso for a start. I also coated some metal embellishments with white Gesso for later use.
I used a scrap from a journal page that I had overdone and therefore cut to scraps for use with a different project. Sometimes these cut out pieces look so much better than the whole page you cut it from!
I glued it to the cover after some heavy spritzing and playing with some Mr. Huey's and Chalk mists and also some diluted acrylic colours.
The wire stamp is from BoBunny (love it!). It is from the "Distressed Textures" clear stamps set and also available at SimonSaysStamp over here.
Why do I tell you this? Because by doing so I can enter their actual Simon Says Stamp Wednesday challenge where "Stamp-tember" is celebrated with a group blog-hop!
The "inspire" quote was applied through one of my new awesome Red Lead stencils!
I just love their stencils as they are perfect for art journalling!
I also rubbed some DecoArt Metallic Lustre "Gold rush" onto some areas of the gessoed cover, creating kind of stripes with my finger.
The washi tape is from a sale at a home decorations store.
I also applied some white and gold decorating paste through a stencil for more texture.
To add some more texture I stamped a border onto the cover's edge, using the lovely leaf stamp from 3rd Eye!
I also enter this cover to Artful Times' challenge "Scrap Art" as the center piece of my creation is a scrap from a journal page that I messed up and cut to pieces.
Did I mention that I love to use scraps from messed up paintings or pages? ;)
Thank you for staying with me this far and I hope you enjoyed your visit!
Hugs and happy crafting/journalling/... !
die amelie x
Showing posts with label 3rd Eye. Show all posts
Wednesday, 18 September 2013
Sunday, 15 September 2013
All about changes
No, you haven't clicked the wrong button, dear readers, friends and followers! This is still me..."die amelie" and her (still quite messy) projects.
Only I felt that it was time to do some "cleaning up" and give my blog a more reduced appearance - so the focus is turned to the projects more easily. (Well, maybe we are speaking of "growing up" here too... ).
My latest projects after the holiday break were not too numerous (most of the recent projects that came up on my blog recently, were prepared in advance - even my DT make for Our Creative Corner's "Forgotten Things" challenge - , because I knew that it would become quite hectic after our return, with school starting again, a lot of laundry and flat cleaning to do and getting back to normal.) and I missed that "flow" - which was definitely interrupted by our holiday.
Believe me - I was frustrated by repeatedly sitting down at my workdesk and waiting for that special "initial spark" - which just didn't happen!
Witch Myrtle's Travel Case was a happy day crafting, but it is something different than creating - I hope you know what I mean... crafting and creating are slightly different things to me at least. Even though I love both. But the first needs more logical thinking and fiddling and the latter is something that almost "creates itself" - through me. There's an inner voice then, leading the way and my hands just do what the soul tells them to.
Those who have been following me for a while now, know that I don't do any art journaling. I tried once or twice, but was never content with the outcome, because what I had created then never felt like a piece of "me" - even more like trying to be too hard what I simply wasn't.
And so I let go... I continued enjoying to create tags and also some canvases and altered objects....but art journaling was something I admired with other gifted people out there....
...until yesterday, when I sat down at my crafting desk after I had discovered a very old note book I bought about twenty years ago on my trip to New York (how time flies!). It has a binding that enables you to remove and add pages...which I discovered is perfect for art journalling as you can remove (and re-add) pages and can do them without having to pay attention not to spoil the rest of the journal. And that was the start of....well, I am not too sure of what exactly... ;)
But I know it is something I dare show you.... so see for yourself:
For this page I used white Gesso, ribbons, Glimmer Mists, a lot of my 3rdEye stamps, which are great for creating backgrounds, some Red Lead and Crafty Individuals stamps too (which I also love for their versatility) and texture paste with some stencils.
I had a really joyful play and the page almost built up on its own. Maybe you know that feeling too: seeing something that you have just finished and feeling about it as being foreign AND familiar with you at the same time.
My guess is, that when it feels like that, you have arrived at a new level on your creative journey and just freed something in you that has always been there - but you had just not been ready for it before.
My main fear - of overdoing the page as usual - just didn't come up at all. I redid some
of the areas where I had applied too much colour - and thus the page became even more "alive".
Well, maybe some of you think "I could have told you that much earlier!" right now, but even if you had (and I have some books about art journalling that tell about it too ;) - I guess I just had to discover that for myself.
Some things cannot be "done as dictated" - they have to be encountered and "lived" to become a truth for you.
But I guess I am boring you with all my "artist's babble"...I simply leave you to some more images and hope you have enjoyed your visit anyway.
I enter The Artistic Stamper's "Autumn" Challenge with this journal page and once more Frilly and Funkie's "Anything Goes" challenge. I also enter A Mixed Media Color Challenge #7 with it.
I would also like to apply for the DT Call over at Stampotique Designers Challenges that way - as this page shows a lot of me actually : my love for texture, for the use of black stamping with almost any of my creations, my love for nature, for a slight gothic (or quirky) touch and old photographs and my more or less "messy" approach to art and creating. (and Mr. Mojo seems to be back too ;). I really would love to get the chance to play with Stampotique's awesome stamps! (Well, who wouldn't... ;). I definitely love my Stampotique (one out of two I own at the moment *lol) stamp which I used with this tag. ;)
If you browse Stampotique's stamps you will find a great variety of stamps - many of them very versatile and just perfect for art journaling or creating awesome texture. So I do not only love the Daniel Torrente stamps but their whole range actually.
Hugs and happy crafting,
Claudia - die amelie x
Only I felt that it was time to do some "cleaning up" and give my blog a more reduced appearance - so the focus is turned to the projects more easily. (Well, maybe we are speaking of "growing up" here too... ).
My latest projects after the holiday break were not too numerous (most of the recent projects that came up on my blog recently, were prepared in advance - even my DT make for Our Creative Corner's "Forgotten Things" challenge - , because I knew that it would become quite hectic after our return, with school starting again, a lot of laundry and flat cleaning to do and getting back to normal.) and I missed that "flow" - which was definitely interrupted by our holiday.
Believe me - I was frustrated by repeatedly sitting down at my workdesk and waiting for that special "initial spark" - which just didn't happen!
Witch Myrtle's Travel Case was a happy day crafting, but it is something different than creating - I hope you know what I mean... crafting and creating are slightly different things to me at least. Even though I love both. But the first needs more logical thinking and fiddling and the latter is something that almost "creates itself" - through me. There's an inner voice then, leading the way and my hands just do what the soul tells them to.
Those who have been following me for a while now, know that I don't do any art journaling. I tried once or twice, but was never content with the outcome, because what I had created then never felt like a piece of "me" - even more like trying to be too hard what I simply wasn't.
And so I let go... I continued enjoying to create tags and also some canvases and altered objects....but art journaling was something I admired with other gifted people out there....
...until yesterday, when I sat down at my crafting desk after I had discovered a very old note book I bought about twenty years ago on my trip to New York (how time flies!). It has a binding that enables you to remove and add pages...which I discovered is perfect for art journalling as you can remove (and re-add) pages and can do them without having to pay attention not to spoil the rest of the journal. And that was the start of....well, I am not too sure of what exactly... ;)
But I know it is something I dare show you.... so see for yourself:
For this page I used white Gesso, ribbons, Glimmer Mists, a lot of my 3rdEye stamps, which are great for creating backgrounds, some Red Lead and Crafty Individuals stamps too (which I also love for their versatility) and texture paste with some stencils.
I had a really joyful play and the page almost built up on its own. Maybe you know that feeling too: seeing something that you have just finished and feeling about it as being foreign AND familiar with you at the same time.
My guess is, that when it feels like that, you have arrived at a new level on your creative journey and just freed something in you that has always been there - but you had just not been ready for it before.
of the areas where I had applied too much colour - and thus the page became even more "alive".
Well, maybe some of you think "I could have told you that much earlier!" right now, but even if you had (and I have some books about art journalling that tell about it too ;) - I guess I just had to discover that for myself.
Some things cannot be "done as dictated" - they have to be encountered and "lived" to become a truth for you.
But I guess I am boring you with all my "artist's babble"...I simply leave you to some more images and hope you have enjoyed your visit anyway.
I enter The Artistic Stamper's "Autumn" Challenge with this journal page and once more Frilly and Funkie's "Anything Goes" challenge. I also enter A Mixed Media Color Challenge #7 with it.
I would also like to apply for the DT Call over at Stampotique Designers Challenges that way - as this page shows a lot of me actually : my love for texture, for the use of black stamping with almost any of my creations, my love for nature, for a slight gothic (or quirky) touch and old photographs and my more or less "messy" approach to art and creating. (and Mr. Mojo seems to be back too ;). I really would love to get the chance to play with Stampotique's awesome stamps! (Well, who wouldn't... ;). I definitely love my Stampotique (one out of two I own at the moment *lol) stamp which I used with this tag. ;)
If you browse Stampotique's stamps you will find a great variety of stamps - many of them very versatile and just perfect for art journaling or creating awesome texture. So I do not only love the Daniel Torrente stamps but their whole range actually.
Hugs and happy crafting,
Claudia - die amelie x
Labels:
3rd Eye,
art journaling,
Color wash,
fabric,
GlimmerMist,
Hero Arts,
mixed media,
RedLead
Wednesday, 17 July 2013
Be Unique!
I recently bought another stamp set from Tim Holtz, the "way with words" and I LOVE it! Along with it I also bought two new Sizzix embossing folders from the Tim Holtz Alterations range.
Yesterday I finally found the time to have a play with it and this is what I came up with:
I had a lot of fun play creating the background of the tag, using DI "black soot", masking tape and Ranger clear embossing powder with the Tim Holtz stamp.
I added some structure to the white ribbon by crumpling it with my fingers and dabbing it to the DI "barn door"ink pad from various sides.
The lovely moth image is a stamp from wonderfully talented stamp designer (and shop owner) Drycha from 3rdEye!
I dry embossed some white card using the Tim Holtz Alterations Texture Fades "Stencil" embossing folder, cut out the single letters and blended the raised areas and edges with DI "barn door" before glueing them to the tag.
I also created two tiny tabs using the Sizzix "Tiny Tabs and Tags" Alterations die. They were fixed to the tag for more interest. I hope you like the tag!
Thank you for visiting!
Hugs,
die amelie x
Yesterday I finally found the time to have a play with it and this is what I came up with:
I had a lot of fun play creating the background of the tag, using DI "black soot", masking tape and Ranger clear embossing powder with the Tim Holtz stamp.
I added some structure to the white ribbon by crumpling it with my fingers and dabbing it to the DI "barn door"ink pad from various sides.
The lovely moth image is a stamp from wonderfully talented stamp designer (and shop owner) Drycha from 3rdEye!
I dry embossed some white card using the Tim Holtz Alterations Texture Fades "Stencil" embossing folder, cut out the single letters and blended the raised areas and edges with DI "barn door" before glueing them to the tag.
I also created two tiny tabs using the Sizzix "Tiny Tabs and Tags" Alterations die. They were fixed to the tag for more interest. I hope you like the tag!
Thank you for visiting!
Hugs,
die amelie x
Saturday, 1 June 2013
Steampunk Challenge - June: Underwater!
This image shows "salmo platycephalus rota
dentata" (the common gear sea trout) in its natural surroundings. It has
already been discovered within depths over 200 metres but usually inherits
the brighter reef zones. ;)
Also very
old and fairly rusted specimen have been discovered with the stomachs of grown
up squid too - so its age can be estimated to reach more than two years
really, which is exceptionally old for trouts in general. Maybe "salmo rota dentata's" elongated life span has something to do with their metal skin, which makes them rather non-digestible bait for trouts' usual enemies.
;)
Hi there and welcome
to June's challenge over at
This month's theme is
Underwater!
We want to see your 2D and/or 3D creations. As always with our challenge it is "anything goes" - as long as your projects stick to the theme in some way.
This month I have the pleasure to present my project along with SanDee1899's and Drycha's awesome underwater creations (and Drycha, owner of 3rdEye stamp shop, has also prepared a new stamp design on this occasion to be released! Cool, huh?)
I promised her - as this month she is also our prize sponsor - to use 3rd Eye stamps only - which really was not hard to keep as she offers some great Steampunk stamps with her collections too. ;)
To start with, I first have to show you one of my crafting hobbies I share rather seldomly: crafting with paper cut out sheets.
I had this lovely trout I once made and wanted to use it for my inspirational project for this challenge.
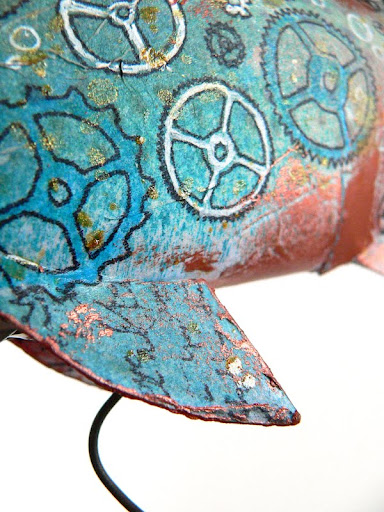
So first I covered the trout with some GlimmerMists and other metal colour sprays to achieve a metallic and pale blue surface for further treatment. Then I stamped the lovely gears and cogs stamps onto some tissue paper and let that dry.
You can see the 3rd Eye stamps to the right (already mounted to some cling foam) and partially cut out prints waiting for the next step: glueing the images onto the trout using Mod Podge.
After that had dried I coloured some of the gears using a white gel and a blue brush felt tip pen and added some copper "Inka Gold" along with some tiny blotches of Mr. Huey's "gold" here and there.
Voila!
I hope the images show a little of the sheen of the copper rub on and gold spreckles - this one was quite difficult to photograph to be honest. So here come some images and close ups for your inspiration:
This close up shows the use of the 3rd Eye script stamp which I really love as it is so versatile for creating texture!
You can also see the coloured gears and the partially used script image with the fins. I also drew some blubbles onto the surface to create the impression of "underwater action". ;)
The tail fin needed some special care: I stamped the two great bulb light stamps using archival black ink onto some tissue and glued the cut out pieces to the fin using Mod Podge. After that had dried I added some white highlights with a gel pen too. The edge of the tail fin was decorated with mica fragments as I felt my trout needed some "recognition mark" - so it cannot be mistaken for "salmo trutta rota dentata", that has a quite unremarkable tail fin.
Salmo platycephalus rota dentata's quite vulnerabel stomach to the left. You can well see the copper markings that make this specimen so very special.
Thank you for stopping by! I hope you had some fun and leave quite inspired and ready to go for your own projects to enter with our June challenge over at SanDee&amelie's Steampunk challenges!
See you!
Hugs,
die amelie x
Labels:
3rd Eye,
die,
drawing,
GlimmerMist,
metal,
mixed media,
Mr. Huey's,
SanDeeANDamelie's Steampunk challenges,
Sizzix,
steampunk,
Xcut
Sunday, 19 May 2013
Yellow, Lightbulbs and Some Wire
is the theme over at DragonsDream TagItOn and I LOVE it. Yellow is such a vibrant (but also quite tricky) colour to work with! And I LOVE lightbulbs - this time I used my beloved 3rd Eye lightbulbs (the big and small ones) - AND I love wire too. The perfect challenge for me then - so I had to join in. :)
For the background I die cut a white #8 size tag and gave it a layer of "mustard seed" DI using my favourite TCW "Mini gears" stencil and the blending tool.
Then I cut some gears using the Tim Holtz Movers and Shapers dies and used the left overs from the white card as a stencil too to add another layer of "mustard seed". The cut out gears were blended with the same colour and put aside.
Using archival black jet ink I stamped a "lightbulbs border" using the two small lightbulb stamps from 3rd Eye and stamped the big light bulb onto some white card and cut it out.
I did the same with the Tim Holtz pointing hand image and adhered them to the tag using sticky foam pads I cut to size. In between the sticky pads and the card I put a piece of white coated wire (a left over from my beading hobby) I first wrapped around the bulb socket.
I also bent a filament from that same wire and glued it together with the extra stamped "i" onto the tag. Thus the "i" "shines too. ;)
The word "shine" was stamped using my brand new Tim Holtz "worn text" letter stamps! (Love them!)
The gears were fixed to the tag with some big worn copper brads and cut to shape once in place.
The edges of the tag were distressed and blended with "black soot" distress ink. For a finish I attached the gorgeous measuring tape ribbon. Wallah! ;)
Hope you like it! Thanks for stopping by and have a wonderful Whitsunday!
Hugs,
die amelie x
For the background I die cut a white #8 size tag and gave it a layer of "mustard seed" DI using my favourite TCW "Mini gears" stencil and the blending tool.
Using archival black jet ink I stamped a "lightbulbs border" using the two small lightbulb stamps from 3rd Eye and stamped the big light bulb onto some white card and cut it out.
I did the same with the Tim Holtz pointing hand image and adhered them to the tag using sticky foam pads I cut to size. In between the sticky pads and the card I put a piece of white coated wire (a left over from my beading hobby) I first wrapped around the bulb socket.
I also bent a filament from that same wire and glued it together with the extra stamped "i" onto the tag. Thus the "i" "shines too. ;)
The word "shine" was stamped using my brand new Tim Holtz "worn text" letter stamps! (Love them!)
The gears were fixed to the tag with some big worn copper brads and cut to shape once in place.
The edges of the tag were distressed and blended with "black soot" distress ink. For a finish I attached the gorgeous measuring tape ribbon. Wallah! ;)
Hope you like it! Thanks for stopping by and have a wonderful Whitsunday!
Hugs,
die amelie x
Friday, 26 April 2013
Help Heather shine!
I am on a mission... the first moment I saw Heather, I knew she needed someone to make her a bit more happy again.
"Who is Heather?" I hear you ask. Well, "Heather" is one of the newly released 3rd Eye stamps which I really love as they are very unique in design. This month's challenge over at 3rd Eye wants to see something "sunny" - so it should not surprise that they call it the "Sunny Challenge" ;)
But let me introduce you to Heather first:
As she looks veeery melancholic (maybe she writes poetry or does some art journaling using dark colours...??) I wondered what could be done to help Heather shine again (not too much and too often, but at least from time to time...as I think a little melancholic streak is necessary to create poetry or other art that has some depth... ;)
For the tag background I used Distress inks and Distress paints with water and after drying I stamped the "branch" stamp on top using DI "chipped sapphire".
The white paper I stamped the leaf stamp on several times (to use as sun beams) was coloured using the "DIs with water spritz, dap and flick" technique (one of my all time favs). After that had dried I cut out the single leaves and glued them to a punched card circle and Heather's cut out face on top. Voila - Heather had turned "sunny" - but somehow she still did not shine right... maybe you can help?
Heather's face was also coloured using white, blue and red gel pens. For a finishing touch I used the leaf stamp again to create a border with the whole tag.
I also enter Simon Says Stamp's "anything goes" challenge with this tag.
Hope you like it!!!
Thanks for visiting!
die amelie xoxo
"Who is Heather?" I hear you ask. Well, "Heather" is one of the newly released 3rd Eye stamps which I really love as they are very unique in design. This month's challenge over at 3rd Eye wants to see something "sunny" - so it should not surprise that they call it the "Sunny Challenge" ;)
But let me introduce you to Heather first:
As she looks veeery melancholic (maybe she writes poetry or does some art journaling using dark colours...??) I wondered what could be done to help Heather shine again (not too much and too often, but at least from time to time...as I think a little melancholic streak is necessary to create poetry or other art that has some depth... ;)
For the tag background I used Distress inks and Distress paints with water and after drying I stamped the "branch" stamp on top using DI "chipped sapphire".
The white paper I stamped the leaf stamp on several times (to use as sun beams) was coloured using the "DIs with water spritz, dap and flick" technique (one of my all time favs). After that had dried I cut out the single leaves and glued them to a punched card circle and Heather's cut out face on top. Voila - Heather had turned "sunny" - but somehow she still did not shine right... maybe you can help?
Heather's face was also coloured using white, blue and red gel pens. For a finishing touch I used the leaf stamp again to create a border with the whole tag.
I also enter Simon Says Stamp's "anything goes" challenge with this tag.
Hope you like it!!!
Thanks for visiting!
die amelie xoxo
Monday, 11 March 2013
"finally spring" - 3rd Eye's VIVID Challenge
Over at 3rd Eye they have a really talented bunch of ladies doing awesome LOs, art journal pages and other stuff! And they have a challenge too!
I stumbled upon their great stamps by accident - and the challenge requires to use some of them alongside with vivid colours.
So here comes my take on a vivid colours tag:
As I own only a few 3rd Eye stamps I had to improvise a little as I mainly ordered stamps I wanted to use on grungy or Steampunk projects ;)
(only the bird images are stamps from Crafty Individuals and my beloved alphabet stamps are from Hero Arts).
The lovely tree branches are my favourite image from the 3rd Eye range (well, besides their awesome light bulbs)! The brick wall stamp is fab too and now to the tricky part: "Marcel".
"Marcel" is part of the tag too...but let me introduce you to Marcel first ;)
Voila! Marcel is the guy to the left (well, obviously). But where the hell does he appear on the tag I can hear you ask. To be honest: I needed some grass to grow in front of the brick wall...and Marcel's hair was perfect for the job (and I wanted to use as many of my (six) 3rd Eye stamps as possible)! See?
The background of the tag was made using Distress inks in various tones. Hope you like the result :)
I also enter Vintage Stamping Challenges "Spring Is In The Air" challenge and The Artistic Stamper's "tag" challenge with this tag.
I stumbled upon their great stamps by accident - and the challenge requires to use some of them alongside with vivid colours.
So here comes my take on a vivid colours tag:
As I own only a few 3rd Eye stamps I had to improvise a little as I mainly ordered stamps I wanted to use on grungy or Steampunk projects ;)
(only the bird images are stamps from Crafty Individuals and my beloved alphabet stamps are from Hero Arts).
The lovely tree branches are my favourite image from the 3rd Eye range (well, besides their awesome light bulbs)! The brick wall stamp is fab too and now to the tricky part: "Marcel".
"Marcel" is part of the tag too...but let me introduce you to Marcel first ;)
Voila! Marcel is the guy to the left (well, obviously). But where the hell does he appear on the tag I can hear you ask. To be honest: I needed some grass to grow in front of the brick wall...and Marcel's hair was perfect for the job (and I wanted to use as many of my (six) 3rd Eye stamps as possible)! See?
The background of the tag was made using Distress inks in various tones. Hope you like the result :)
I also enter Vintage Stamping Challenges "Spring Is In The Air" challenge and The Artistic Stamper's "tag" challenge with this tag.
Thanks for your visit!!!
Hugs,
die amelie xx
Labels:
3rd Eye,
Crafty Individuals,
distress,
Ranger,
tag
Subscribe to:
Posts (Atom)