Showing posts with label The Mirror Crack'd. Show all posts

Sunday, 5 July 2015

"Canvas" - the New Challenge at The Mirror Crack'd

Servus and welcome to the start of the new challenge over at The Mirror Crack'd mixed media challenge blog!

The theme for this month's challenge is "Canvas" and this time I created a little series of three mini canvasses for your inspiration.


 I started with creating a masterboard on some heavy card using old book pages, washi tape, stencils, DecoArt white modeling paste, white scraped on Gesso and Shimmer Misters and some rubber stamping.


The canvasses have about ATC size and I used matte DecoArt Decou-page to glue the cut to size pieces on. Then I smudged some DecoArt Traditions Carbon black acrylic paint around the edges using an old bristle brush to create the scratchy patterns and create a kind of "frame".


Next I glued all my chit chat stickers in place and shaded them in using my black soot distress marker on the still slightly wet Decou-page, smudging it with my finger.


For a finishing touch I sprinkled on some drops of gold spray paint.


The stencil I used is from Red Lead, the flowers stamp is an Indigo Blu design. The chevron pattern was stamped using a Carabelle Studio stamp. The small dots stencil is from memory box.


This month - instead of a physical prize - TMC offer the winner a guest designer spot for a future challenge. And I really would love to see your canvasses (as I am a curious girl and always love seeing art created by others)! So I hope to see you and your gorgeous projects over at The Mirror Crack'd soon!

Hugs and happy crafting,
Claudia xxx 


Friday, 5 June 2015

Treasures from Enchanted Places

Hello and servus!

It is time for a new challenge over at The Mirror Crack'd and lovely Shilpa is going to be your host this month. The theme chosen for June's challenge is

Shadowboxes


which I guess won't need any further explanation. ;)

But first let me share some exciting news with you and tell you that I am a winner at Tim's 12 tags of 2015 with my May tag! Yay! I really, really loved the burlap he used for his tag and playing with distress and idea-ology goodness - so being one of his top 12 definitely means a lot to me! Thanks to Tim and his team for picking my tag! x


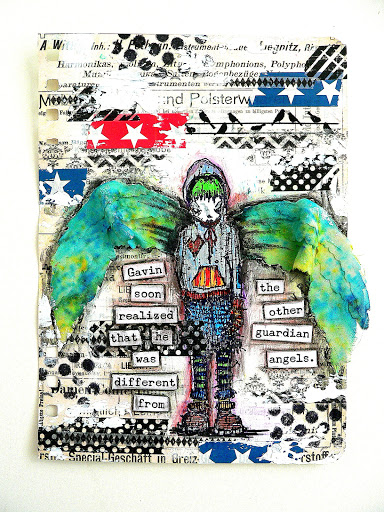
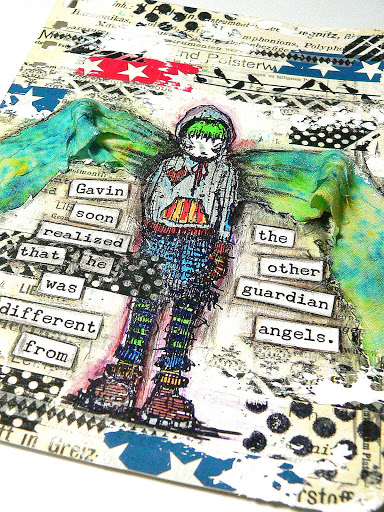
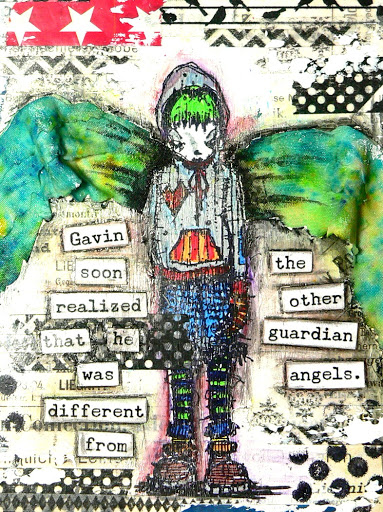
Next let me tell you that I have prepared a new mixed media project and tutorial for you on the DecoArt Mixed Media blog! Here's a little sneak peek that hopefully helps lure you over to take a closer look! ;)


But back to the main reason for this blog post: the new challenge over at The Mirror Crack'd - "Shadow Boxes"!

We all love shadow boxes, don't we? Well, I definitely do!!! They always make us (or at least me) feel a bit like we took a peek into places that are special and enchanted....like tiny realms we cannot enter but at least get a glimpse of their magic.

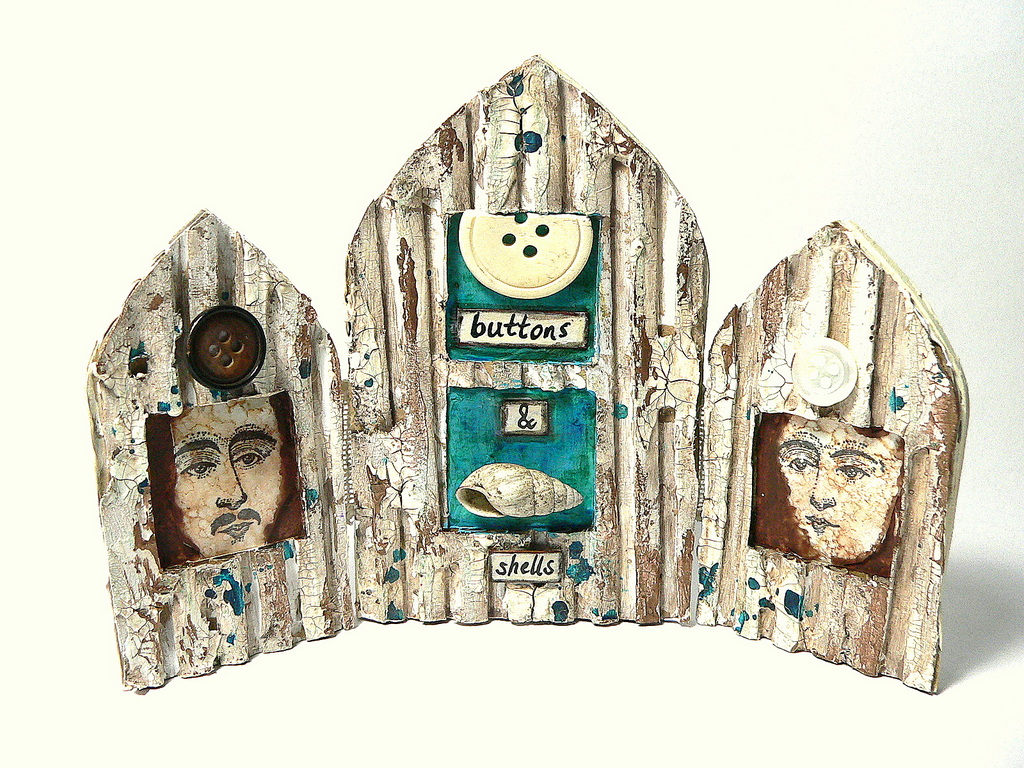
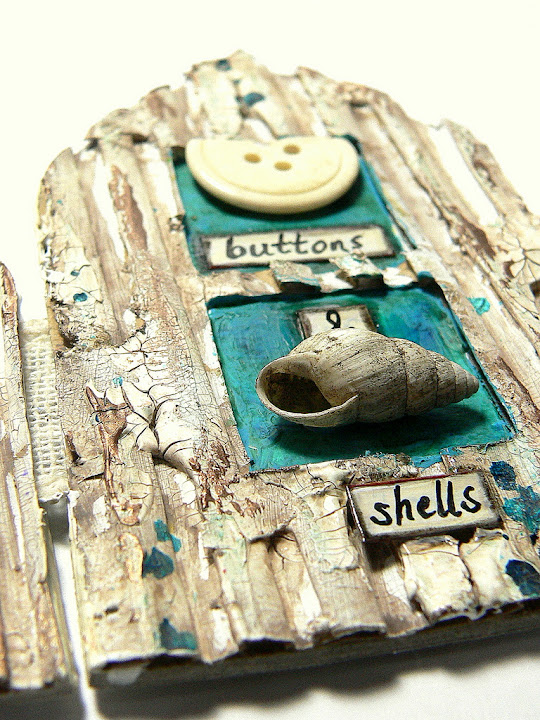
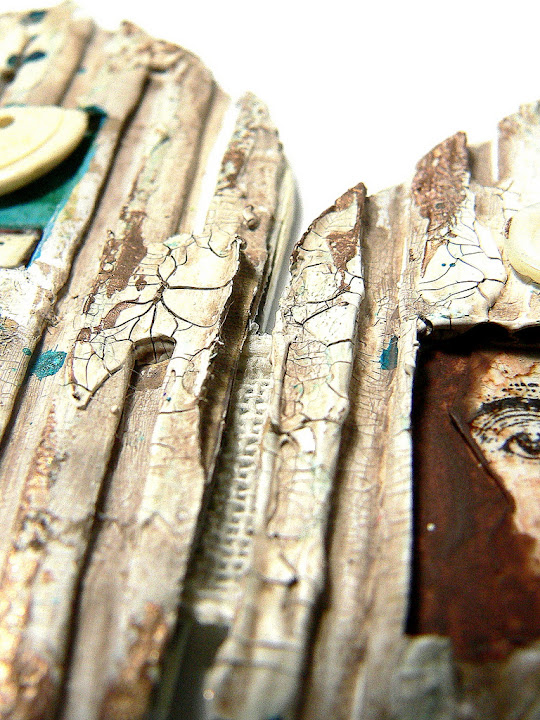
So with this shadow box I decided to create a kind of keepsake shrine-ish project that would show some of my gathered nature treasures from some of my most beloved (and enchanted) holiday places (like Castle Bernstein for example).

The snails houses, lichen and green serpentine I put into my shadow box were finds from the castle's surroundings.


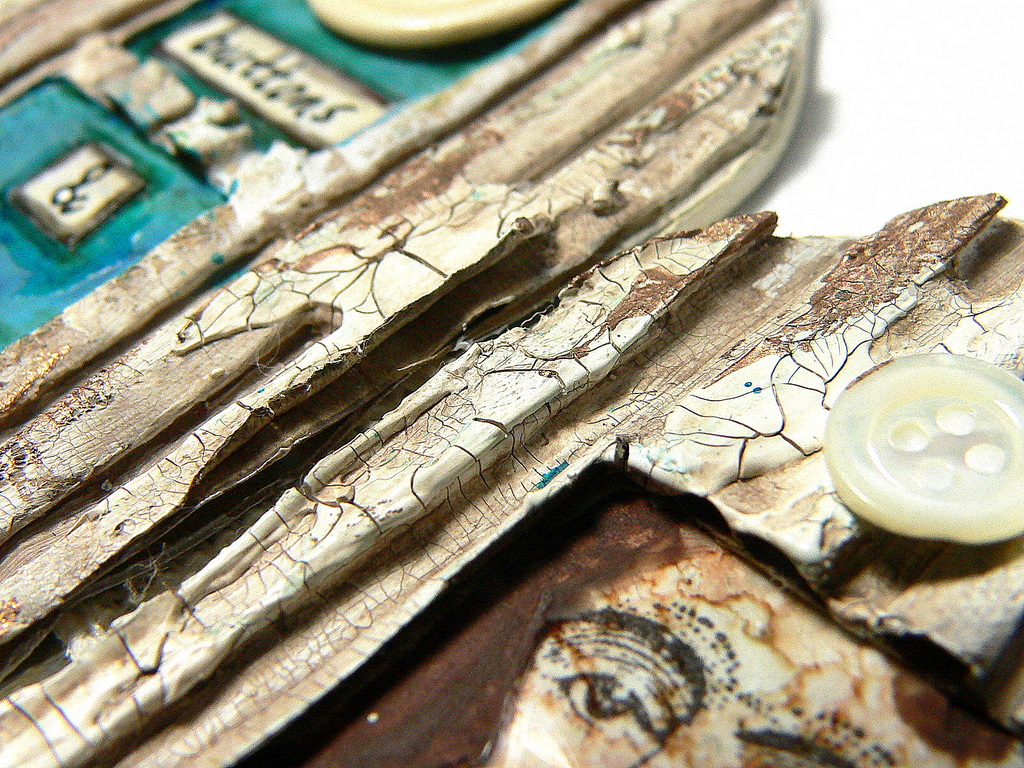
The background was made from pages from an old French botanical school book with which I covered the mini canvas (using matte Decou-page as usual).Then I dabbed on some Raw Umber acrylic paint to emphasize the frame and draw the focus towards the center.


Some white DecoArt media crackle paint was added here and there. Once it had dried I rubbed in some DecoArt media Raw Umber Antiquing Cream to make the cracks more visible.


The label was cut from left over scraps from the dictionary pages.

A piece of driftwood was added to the top of the box to form a kind of pediment alongside with another small piece of lichen.


All the elements were glued in place with the matte Decou-page. I really love that it dries invisible and holds even bulkier items (like the serpentine) in place.


For a finishing touch I added some strokes of DecoArt media Interference Green and Gold paints here and there around the frame. The interference paints add a bit of bling that only gets visible when you look at the project from a certain angle...so that's a kind of a hidden "treasure" as well.


I love the idea of expressing (and visually repeating) the fact that all these small and rather "unspectacular" objects are real treasures to me by adding that sort of "bling" that isn't visible at first sight either. You really have to examine and look closer to discover all there is to be discovered (which is the same way in nature, right?)


I hope you like my tiny shadow box with my rather personal treasures I put inside!

The challenge over at The Mirror Crack'd will be open until the 4th of July  and one lucky winner will win a prize of £12.00 sponsored by

http://www.woodware.co.uk/

 to spend at your favourite Woodware Stockist, either in store or on line.

So I highly recommend you now hop over to our challenge blog and get yourself your bundle of inspiration from the rest of the fab DT I am working on and then head off to your crafting desk to create your own shadow boxes! Good luck and happy crafting!

Claudia xxx


Tuesday, 5 May 2015

"Because he loved her he let her crack open his shell and push his most sensitive buttons."

Servus and welcome to today's start of the new challenge over at The Mirror Crack'd!

This month the theme is 

Tryptichs


so show us your mixed media threesomes!


A triptych is a work of art that is divided into three sections. Nowadays it is seen done on canvasses too but most of the time it is a piece of art closer to a shrine with three (often carved on the outsides and painted on the insides) panels that are hinged together and can be folded shut or displayed open. It originates from Christian art and is mostly known with church altars that fold open on Sundays and holidays to display the most beautiful and precious paintings and show the outer (also painted or otherwise decorated) sides (when closed) on work days.

By now they have also found their way into mixed media and art in general - and to many artists they still mean more than just a certain format to work on: they are keepsakes in a way and still imply that their shown contents are highly treasured and/or meaningful ones. But of course one can also simply play with the possibilities and visual benefits the tryptich format offers.


My tryptich is made from corrugated card which I treated with white Gesso, crackle media, metallic paints (DecoArt misters) and guilding wax. 

"Because he loved her he let her crack open his shell and push his most sensitive buttons" was the line that came to my mind when I looked at the spread out tiny treasures that I had collected for a possible use on my tryptich. 

Love is pretty much about trust and opening up and it is also about letting the partner not only see your more vulnerable sides but also bring out the best in you or even bring some hidden potential to the surface. But it needs a lot of trust and caring, right? 

The broken button was part of a fleamarket find and I thought it shows perfectly how "sensitive" buttons might react to being pushed too hard. The tiny shell is one that can be found with our lakes in the Austrian Salzkammergut and I have been collecting them since I was a child. Now my son is the one who snorkels and collects those tiny treasures. ;)

(click images for larger view)


The three panels are hinged together by a piece of rough ribbon that was glued between the front and back panels of each section. I love to use fabric (especially linen) as hinges as they are flexible and soft at the same time. 


I first gave my die cut corrugated card panels (with the openings already cut into them) a heavy coat of white Gesso. Once that had dried I added some white DecoArt Crackle Paste with a palette knife and a brush and let that dry naturally (and thoroughly). Then I covered the whole surface with DecoArt Raw Umber Antiquing Cream and let that dry before I wiped off the excess with a baby wipe. I love how weathered the result looks! 


The faces were stamped onto acetate that was first treated with alcohol inks. I cut the acetate slightly larger than the window openings so I could simply glue them in place without visible traces of the glue. 

The background colours were painted in using a fine tip brush and DecoArt media fluid acrylics. For fixing my found objects to my tryptich I used matte DecoArt Decou-Page (my all time favourite when it comes to adding bulkier items to my projects). 


The winner of this month's challenge will be offered a guest designer spot for a future challenge - so why not join in and take your chance? I would love to see your interpretations of a tryptich! I also recommend you check out the makes of my fab teamies over at The Mirror Crack'd! I promise you will find some wonderful inspiration on how to approach this theme! ;)


Hugs and happy crafting,
Claudia
xxx


Sunday, 5 April 2015

"Masterboard" Challenge at The Mirror Crack'd

Servus, happy Easter and welcome back to another mixed media challenge over at The Mirror Crack'd!

We want you to "make and use a masterboard" this time. A masterboard is a large, self made background piece designed to cut up and used in smaller projects. It can be created any mixed media way you can think of. With paints, inks, spray paints, stencils, stamps,....just to name a few.

Here's what I came up with:


I had some left overs from my last Gelli plate session lying around (you know: that kind of prints you are not really content with but cannot throw away either).
When I found that some of them matched the colour of a (previously emptied) chocolate box, an idea started to form in my head.

I got out my black archival ink, my new Red Lead crows stamp and some DecoArt Misters and created this masterboard:


See how well the chocolate box and the colours of the print go together? Hah - lucky me! ;)


I cut my masterboard to size and glued one of the strips to the inside of the box.


The other two strips were glued to the top and bottom of the box lid. For a finish I added some black and white washi tape here and there - done!


My team mates have created the most amazing masterboards (and projects from them) too - so make sure you hop over to the The Mirror Crack'd challenge blog and see for yourself!

Good luck with the challenge (I can't wait to see your masterboards and creations) and hugs and happy crafting,

Claudia xxx


Thursday, 5 March 2015

"Wings" - The Mirror Crack'd Mixed Media Challenge #7

Servus and welcome to my first post as a DT member of the "The Mirror Crack'd" mixed media challenge blog run by the lovely Lin from Twisted Witch! I love the team's relaxed but profound approach to mixed media so when I read about their DT Call I decided to give it a try...and voila: here I am, bringing to you my first project I made for them!


The theme this month is 

Wings

and we want to see anything (apart from cards) you can create with WINGS. 


If you haven't played one of our challenges by now I recommend you read the page about the TMC definition of mixed media so you make sure you enter a proper make (and thus get eligible for the prize draw). It is of course just one possible approach to mixed media (and one I really like).

I created another art journal page (in my finnabair art journal) and started with cutting a pair of wings from fabric using the Sizzix "Layered Wings" die. I then glued them to the journal page using the Decou-Page "Fabric" glue, which keeps the fabric flexible. While the glue was still wet I sprinkled some Brusho colours onto them - which created the stained effect you can see. 


The page itself was first given some streaks of white Gesso (to stamp the image on) and then I added some additional texture with washi tape and stamped dots.


The image was coloured using Faber Castell Artist Pens. To shade in the silhouette I used a black and red Stabilo Marks it All pencil and a fine detail brush. The quote was printed on the computer and then glued to the page and blended in with Distress Markers. Some more white Gesso added with a palette knife here and there - that's it. I hope you like it! 

I would love to see you enter our "Wings" challenge at The Mirror Crack'd soon! And don't miss on checking out the makes of my fab teamies - you will find loads of inspiration! 

Hugs and happy cafting,
Claudia
xxx


I enter this art journal page to:

Art Journal Journey's "Things with Wings" collection

http://art-journal-journey.blogspot.co.at/2015/03/032015-things-with-wings-dinge-mit.html


City Crafter Challenge Blog, Week 251 - Washi Tape


Rhedd's Creative Spirit - March challenge

and

Simon Says Stamp Monday Challenges - "Just a hint of clover"
http://www.simonsaysstampblog.com/mondaychallenge/wp-content/uploads/sites/5/2013/07/mondayblog-logo.png