Thursday, 17 April 2014

Happy Easter Inspiration at That Craft Place plus a DecoArt Tutorial

Time for the some new inspiration over at That Craft Place Challenges and a new DecoArt Tutorial as well!

Over at That Craft Place Challenges there will be additional inspirational projects every Tuesday and Thursday tfrom now on. As Lisa also sells a lot of awesome DecoArt products I did this workshop for both - the DecoArt International Design Team and Lisa's store.


The awesome goodies Lisa (the owner of That Craft Place bricks and mortar and online shop) sent me to work with, inspired me to create this little Easter Shadow box:


The box is made from scraps of thick corrugated card and I used a real egg on it, but everything else used I used to create it can be bought with Lisa's awesome shop or with her shop facebook group.


- DecoArt Americana "Primary Yellow", "Sea Glass", "Rockwood Red"
- bark
- feathers
- embossed cardboard wings
- wood frame and crown
- tiny bunny embellishment
- masking tape
- Ditzie Designs clearly background "Wood Grain" stamp
- rough textural burlap
- DecoArt Weathered Wood Crackle Medium
- DecoArt matte Decou Page
- Distress Inks "aged mahogany", "mustard seed"
- clear embossing powder


I first stamped the lovely "Wood Grain" Ditzie Designs stamp with DI "aged mahogany" and clear embossed it. The size of that panel gave me the size for my whole shadow box - so I cut four sides and a backplate from thick corrugated card and glued the box together using masking tape on the outside (to hold everything in place) and Decou Page to make all the parts stick together. While this was set aside to dry I painted the lovely cardboard wings Lisa gave me.


I first gave them a coat of "Rockwood Red" acrylic paint and let dry. Then it was given a thin coat of DecoArt Weathered Wood and after that had touch dried I painted all over with a layer of DecoArt Americana "Sea Glass" (as this matched the colour of my little Easter egg perfectly).


The bark I cut to size and used for decorating the frame was also given some drybrushing with DecoArt Americana "Sea Glass" to make the elements bond into one design (which you can see above). The next images shows the assembly of my bark frame and the glued in place stamped panel that I had inked with DI "Mustard Seed" after the heat embossing.The insides of the frame were painted with DecoArt Americana "Rockwood Red" too.


The outside was painted with DecoArt Americana "Primary Yellow" - which came closest to the "mustard seed" Distress ink look.


After the paint had dried I glued the bark frame onto my shadow box using DecoArt Decou Page glue.


I needed something to glue my cut in half wings parts to, so I dissembled a wooden cloths pin and glued the pieces to the sides with DecoArt matte Decou Page.


You can see a tiny bit of the painted cloths pin peek out at the bottom and top of the left wing...but as I painted them the same colour as the wings they do not disturb the look of the project.


The assemblage in the center of my shadow box contains the lovely Ditzie Designs wood frame to which I fixed the tiny rabbit embellishment (using some thin rough cord), a beautiful feather and some rough burlap in the background. I fixed it all to the stamped, heat embossed and "mustard seed" DI blended background panel with matte DecoArt Decou Page - even the tiny egg and the crown on top. It also worked perfectly with glueing the bark to the corrugated card frame - you just have to make sure to use it rather heavily. As the Decou Page dries clear, nothing of it will be visible later.

To make my shadow box stand, I die cut an easel from a piece of heavy card and glued it to the back. But you can of course also hang it somewhere by glueing a hook or loop to the back of your shadow box.


The sentiment was printed from my computer, blended at the edges with DI "aged mahogany" and glued in place. Done!

I hope you like it! Happy Easter to you! And as always hugs and happy crafting,

Claudia - die amelie x


Friday, 11 April 2014

Dream, Trust, Create, Inspire!


Servus, dear followers old and especially those anew! So glad that you stop by my little creative spot!


The April tag over at Tim Holtz' "12 tags of 2014" really is my absolute favourite so far. I really LOVE that trellis die! And - as some of you might already know and have noticed - I am not very much into flowers (too lovely, too fiddly, too bulky, too whatsoever)...but the flowers Tim creates using the pinecone die are just THE perfect paper flowers for me! Finally I found "my" paper flowers...who would have thought ;)


The play with the trellis die and using it with various surfaces for the tiles and the frames finally led to a series of 4 tags that are connected to each other as all the elements/materials/techniques used on them appear in a variation on the other tags.


I admit my first attempts on making the roses failed as I tore the die cut while trying to wrap it around the tooth pick (there are three spots where the single "leaves" are connected by a rather narrow  piece and obviously I treated them like rated break points ;)...but after some tries I had learned where to pay attention and be careful,  I finally succeeded and even managed to create three more. Phew! ;)


I used Kraft Glasseine for one tag, which I stapled over a stamped tag and treated with alcohol inks afterwards. For  one tag I used brown kraft cardboard, for another a sheet from a Tim Holtz paper stash and for the fourth tag I used Kraft Core, which I sanded down a bit after I had die cut the tag (using the Sizzix "Tag and Book Plates" die).


I even used some scrap from cutting the trellis frames for borders and additional embellishing. I cut the trellis tiles and frames from card which I glued some sticky foil onto and ran some of the tiles throught my Sizzix using an embossing folder. Then I rubbed in some black acrylic paint and wiped off the excess using some soft cloth. The made the embossed texture pop even more! I also dry embossed some of the card tiles for more texture.


Some of the tiles that had the sticky foil on them were given a treatment with alcohol inks - as was the frame (which you can see in the image above)!


I did a lot of stapling, distressing, tearing and puzzling with the various tiles and frames and enjoyed this a lot!  I also varied the ribbons I used with the tops of my tags and tried to find the perfect matches for each tag.


I hope you have enjoyed seeing all my variations and tries with all the various surfaces, textures and colours! My personal favourite is the tag with the Kraft Glasseine background...but I love looking at all four lying side by side... seeing the elements that connect them but create totally different effects on each tag - depending on what they are combined with.


Thank you for stopping by! Hugs and happy crafting!
Claudia x


Sunday, 6 April 2014

Fractured Dolls Panels - a DecoArt Tutorial


Servus to all my true and new readers out there!
I finally managed to finish two panels that had been lying on my table for almost two months as I simply got stuck in the middle of the process...not knowing with what I would like to finish them.

But I have learned to be patient with things like these and today - when searching for something in my embellishments box the right things just lay there....waiting for me to put them on the prepared paint board panels! :)

And this is how they look like:


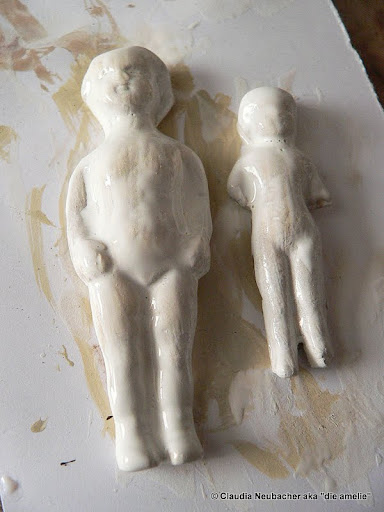
The two casts of fractured dolls were given to me by lovely Brigitte from "La maison de coutureuse" (as were the two bottlecaps with the wonderful French text on them). Thank you so much, Brigitte! Bisous!

Of course you can finish your fleur de lis boards with any objects you have in your stash, but I included the treatment with which I finshed the dolls off too.

To create the panels you will need:

- DecoArt Americana "Fleur de Lis" stencils
- DecoArt Americana acrylic colours "True Red" and "Bahama Blue"
- DecoArt "Dimensional Effects" paintable texture paste
- two paint boards
- Vaseline and a piece of cloth
- a soft brush


For giving the dolls and metal parts their colour and crackle finish you will need:

- DecoArt Traditions acrylic colours "Medium White", "Opaque White", "Burnt Umber", "Transparent Yellow Iron Oxide" and "Quinacridone Gold"
- DecoArt Traditions Glazing Medium
- DecoArt Decou Page matte
- DecoArt One Step Crackle
- water, brushes, a soft towel or piece of cloth
- two hinge clips and some metal corners
- casts of fractured dolls and bottle caps


The panels:

Step 1 

Using a palette knife apply DecoArt Dimensional Effects through two of the Americana "Fleur de lis" stencils and try to create a lot of texture by lifting off the palette knife several times when applying the paste. Let dry.


Step 2

Paint them with DecoArt Americana "True Red" and let dry. 

Step 3

Apply Vaseline in various places using your fingertip. This will act as a resist for the next coat of colour we will put on.


Step 4

Quickly paint over it with DecoArt Americana "Bahama Blue". Try to apply the colour generously and lightly, not going over a spot more than one time. 


Step 5

Once the colour is dry take a soft cloth and gently wipe off the colour with the areas you had covered with Vaseline. This will reveal the red underneath and give the panels the timeworn look of peeled paint.


(Sorry for the change of colour with the images...seems the light changed during the process). 


Your panels are finished. Next I will show you how I altered the fractured dolls casts. 

***


Step 1 

Seal the surface of the casts with a coat of DecoArt Traditions "Medium White". Let dry.


Step 2

Give them a wash of heavily diluted DecoArt Traditions "Burnt Umber".


Step 3

While you set the dolls aside to dry stipple some DecoArt Traditions "Burnt Umber" onto your metal embellishments and the clips using a bristle brush. 


Step 4

While these have to dry too seal your paper collaged bottle caps with a coat of DecoArt Decou Page.


Step 5

Make a mix of DecoArt Glazing Medium and Traditions "Opaque White" and water it down to achieve a medium wash. Apply it to your dolls after you have tried it on some piece of paper first to see if it is as translucent as you want it to be. 


Step 6 

Stipple some "Transparent Yellow Iron Oxide" and "Quinacridone Gold" onto your dry metal embellishments to create a rusty look. 


Step 7

Apply a thin coat of DecoArt One Step Crackle to your dry dolls and the bottle caps. Let dry. 


Step 8

Once these are dry rub in some DecoArt Traditions "Burnt Umber" and wipe back the excess with a damp cloth. 


Step 9

Arrange all the pieces on your boards until you are content and then glue themto your panels using DecoArt Decou Page matte. 


Yay! You're done!

***

Hope you liked the tutorial and the panels! Hugs and happy crafting, 

Claudia xx


As usual I have some close-ups for you:


***

http://decoart.com/andyskinner/