The 15th of the month it is - and this means I am sharing my latest steampunk creation for our March challenge over at SanDee&amelie's Steampunk Challenges with you today!
We are back to our usual "Anything Goes - Steampunk/Industrial" mode by now - so there is plenty of room for your creative ideas!!! Mine originated from rearranging stuff in my craft room and when I sorted my Sizzix dies I stumbled across the fab "Mosaic" die (by Tim Holtz)...and an idea started to form in my head. (which lead to a sudden stop in the process of cleaning up of course because I just HAD to try it out).
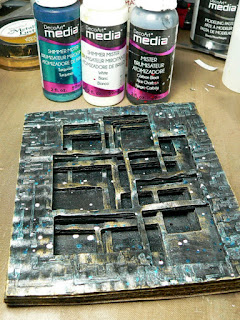
I simply layered three die cut mosaic frames the way that they created overlaps...like some metal framework or pipes (at least that was the image I had in my head when arranging and layering the corrugated card frames).
To create the metal and worn look I used DecoArt media fluid acrylics, media black Gesso and Modeling Paste, black, white and turquoise Misters and Shimmer Misters, the fab "Short Circuit" stencil and Metallic Lustres.
So I started with die cutting my mosaic frame three times from thick corrugated card.
Then I layered and flipped the panels until I liked the layered look and cut them all to size.
The top layer was given a coat of black Gesso and once that was dry I applied the Short Circuit pattern through the stencil using black Modeling Paste and a palette knife.
While that was set aside to dry I glued the other two layers together and added a back panel that I had cut from heavy cardboard (from an old packaging).
The front panel was glued in place too and the whole mosaic layer piece was sprayed with dark acrylic paint from the media Mister.
The spots that the Mister had missed (sorry for the pun ;) were fixed with black Gesso.
I dry brushed on some Sparkling Turquoise Metallic Lustre.
Next I went in with some Gold Rush Metallic Lustre and added it randomly to some spots using my fingertips.
I added sprinkles of white, black and turquoise Shimmer/Mister.
To tone it all down and make it look a bit warmer and more worn I added a thin wash of Transparent Red Iron Oxide.
The (alpha parts) letters were glued in place and dabbed on some Gold Rush and Iced Espresso Metallic Lustre.
The chit chat sticker was stuck in place.....done!
Some close ups as usual:
I hope you like my steampunk mosaic panel!
I would love to invite you over to our SASPC challenge blog to check out my teamies' makes as well! I promise you will find loads of fab inspiration over there!
Hugs and happy crafting!
Claudia
xxx


I can't believe the super cool results you achieved with this mosaic piece! I LOVE it!!
ReplyDeleteBeautiful, original and inspiring work!
ReplyDeleteOMGOSH I love this Claudia! I thought that was the Mosaic die. I soooooo need to make one.
ReplyDeleteI was cutting with my mosaic yesterday (I love this die) and I was looking at the negative thinking I need to make something with that cut. LOL... how the creative brain works. Always looking at everything and how we can create with it. Just AWESOME!!!
Superklasse gemacht! Ich bewundere immer deine Art des Patinierens. Du kannst Pappe in Metall verwandeln.😀
ReplyDeleteLiebe Grüße
Sabine
einfach grandios !!! die idee mit der Pappe iss mega.
ReplyDeleteTrau mich sowas gar nicht durch meine Big Shot zu kurbel ...
Greets and hugs
Alexa
You are AMAZING Claudia. What INCREDIBLE CREATIVITY once again! So unique and rich... WOW. Xj.
ReplyDeleteGeniale Idee, die versetzten Pappen geben dem Ganzen ein wunderbares Raumgefühl! AWESOME!!! LG Kerstin xx
ReplyDeleteThis is an awsome idea! Stunning result!
ReplyDeleteA brilliant idea Claudia, it looks fabulous - you are so creative!! Anne x
ReplyDeleteI love the layering technique and the Red Iron Oxide touch was perfect.
ReplyDeleteFab project
ReplyDeleteWow, Claudia, das sieht einfach nur genial aus! Die versetzten Kartongitter erzeugen eine tolle Tiefe, grandiose Idee!
ReplyDeleteSchönen Sonntag noch! xx Evelyn