Showing posts with label sewing. Show all posts

Wednesday, 31 December 2014

Happy New Year and a New Tutorial

Servus and a happy new year to all my (crafty) friends and followers out there!

By now I hope you have had a wonderful Christmas and relaxed holidays! I wish you all the best for 2015 and can't wait to see where your crafty journeys will take you this year!

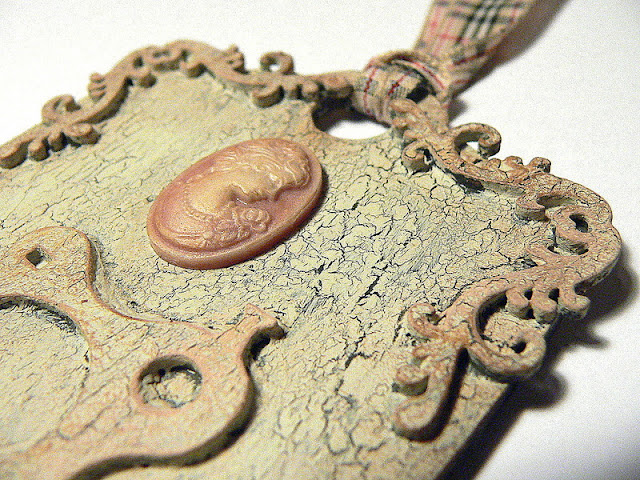
It's "VonPappe Wednesday" time over at That Craft Place and I want to invite you over to check out my latest tutorial, which will show you how to create this little, vintage and shabby chic door hanger:


You'll learn how to combine some of Lisa's fab MDF and grey board elements with the lush DecoArt Chalky Finish paints, how to create some yummy crackle texture and what there is to dry brushing.


Curious now? Great. Then just follow the link to get to the post and to That Craft Place.

Hope to see you there! 
Hugs and happy crafting,
Claudia 
xxx

Wednesday, 5 February 2014

Selfmade Notebook/Art Journal

Hello, dear readers, followers and crafting friends,

another (prepared) post to finally share one of my recent makes as it has been given to its recipient by now. I made this as a birthday present for my mother in law, who loves everything nature and is the most wonderful grandmother for my son you could wish for! So it had to be something really special I wanted to give to her!


Many of you will still remember this make, on which I used the same wonderful background technique taught by lovely Grace Howes on the Soul Food class (and the same range of DecoArt acrylic colours)!
Now I finally made a smaller version of her art journal so my MIL can use it as a notebook and carry it with her.


It's a really useful item, as it has foldable flips on the front and back cover, which can be used to mark special pages in the notebook. It also has a pocket for tickets and such on the front and back cover insides.


The sewn binding is easy to make but also very effective. It does not only hold my two signatures in place but also works as added texture on the spine.


I used my lovely (and rather new) Red Lead feather and fragment word stamps to add more interest to the signatures covers. I really LOVE those stamps and cannot believe I did not use them earlier although I had already bought them some weeks before X-mas! But sometimes my new acquisitions just have to wait until the "perfect" project for using them comes around the corner ;)


 The numbers were stamped using part of a Kaisercraft stamp. The scraps of text are from an old book I bought for 2 Euro.


I also left the perforated edges from the paper pads as they came off the paper pad and used a mix of kraft and white sketch and watercolour papers for the signatures. I love it when you can see what a project is made of and I love when you can touch and feel various textures.


I also love how the acrylic colours blend together when being scraped on- and into the paper. They do it all by themselves - so no hard thinking on any colour tones I might need to use and mix ;)


And I like that the sewn binding is visible on the outside too - so you can see HOW the project is made.


I hope you have enjoyed your visit! Thank you for stopping by my little creative corner ;)


Hugs and happy crafting,
Claudia x

Monday, 25 November 2013

Last minute selfmade presents: colourful notebooks with DecoArt acrylics

Still in search for some artsy last minute selfmade gifts for X-mas? Well, how about making some really easily and quickly made colourful notebooks?


If you are as addicted to collecting unique booklets to write or doodle in as I am and/or you know other people who are too then this is the right project to make ;)


All you will need for making notebooks like these are:

- DecoArt Americana acrylic paints ( I used Bleached Sand, Yellow Light, Bahama Blue, Coral Blush, Olive Green, Green Mist, Dark Chocolate, Pumpkin, Golden Straw and Navy Blue)
- a spray bottle filled with water
- a brayer
- some sticky tape and some glue
- baby wipes
- kitchen roll
- a pack of white dividers (available at any bureau shop) - which will spare you a lot of cutting to size
- a transparent sheet (from your bureau stuff) and a white sheet of paper to stuff in
- thread, scissors, a punching needle, a sewing needle, a punching mat
- a label stamp
- a brush

I recently bought a Gelli Plate (after half a year of rolling all the pros and cons in my mind), but before I owned that really fun and easy to handle tool for monoprinting I used a lot of different surfaces for the monoprints I did with my pupils.
One of them was simply a transparent sheet fixed to the table with some sticky tape (and filled with a sheet of white paper so the colours can bee seen more clearly).


 1. Well,  let's get started: get your transparent sheet and fix it to your table too. (as I know me being a very messy crafter I fixed it to my craft sheet first).


2. Get a stack of dividers ready and the DecoArt Americana acrylics. Apply dots of various colours randomly onto your transparent sheet.


3. Now comes the most important part: the trick with the brayer!

Don't roll it over the whole sheet in different directions but keep moving it with hardly any pressure(!) from left to right only (or right to left only if you are left-handed) and do only very short distances at once - then lift the brayer and put it down some centimetres further to roll on...and so on.
That way the colours will not mix too much and a lot of space will remain uncovered (which will let the white of the paper you print on show through). Don't clean your brayer after this - put it aside. You will need it in a sec. Your transparent sheet should look like this now:


4. Place two dividers onto the transparent sheet and use the colour covered brayer to press them down. Roll the brayer firmly over the whole sheets, then lift them off the ground (if you brayer too long some of the paper might stick to the transparent sheet as the acrylic colour then works like a glue once it has dried too long).


The sides you covered with your brayer will become the insides of your booklets' covers. They will look like this:


The outsides should kind of look like this: bright and colourful. Let dry (or speed up with a heat tool). Clean your brayer and surface with some spritzes of water and some kitchen towel.


5. Take a pile of dividers (depending on how many pages you want your notebook to have), put one of the prepared covers on top and cut off the side pieces where the two holes are.


Use one of the dividers to create a stencil for the holes you will have to punch for the sewer binding. Fold it in half and mark four spots.


Punch holes through all the layers using a punching needle and a punching mat.

6. Choose a thread of a matching colour for your colour design of the cover and take a large sewing needle. Use doubled thread and the length of about your arm. This should do for sewing the binding twice.


Start with the second hole from the left and from the inside, then slide the needle through the hole left to it from the outside to the inside again. Then through the hole you started with to the outside again and through the third hole to the inside and through the fourth hole to the outside again. From there through the third hole to the inside again... then repeat the whole procedure.


This way you should have done a kind of weaving  and the thread should be doubled everywhere. Tie the ends together on the inside of your booklet with several knots. Then cut off the excess thread.


Now you can carefully fold your booklets. The only thing left to do is create a label.


7. Get a label stamp (mine is from Red Lead), the DecoArt Americana Navy Blue, a soft brush and the transparent sheet again and spread some of the colour on it. Dip the stamp into the thin layer of paint and stamp onto some white card.


8. Cut out your labels, do some handwriting on them (or leave them plain for the person who will receive this lovely gift) and glue them to the covers. Done!


Hope you have a lot of fun making your own and will be giving away a lot of these colourful booklets! They are so easily and quickly made!


Hugs and happy crafting!

Claudia

http://decoart.com/andyskinner/

Tuesday, 24 September 2013

Going Dotty (Dots or Circles) at Try It On Tuesday

Can you believe it? Another fortnight has passed again and it's time for a new challenge at Try It On Tuesday!

It is called
Going Dotty (Dots or Circles)

We want you to "go dotty", so use dots or circles with your projects. The design team over at Try It On Tuesday have prepared a whole bundle of inspiration for you - so hop over to our blog and join in the fun!

I used some self-adhesive dots (which are usually meant for bureau use) which I stamped and coloured and glued to a tag afterwards. I had used this technique on an earlier tag and was asked about the how to by the girls from TIOT. You will find more details about the technique over here.


I also applied some decorating paste through a dots stencil and stamped some additional dots onto my tag afterwards using on of the Tim Holtz grungy textures stamps. The ribbon has dots on it too ;)


I did some sewing and hand writing for further embellishment. The "art" word is heat embossed using white embossing powder.


The white embossed word "art" was stamped using the Tim Holtz "Worn Text" stamps, which can be bought at SimonSaysStamp over here.

By telling you so, I enter this tag to Simon Says Stamp's Wednesday Challenge, where they celebrate Stamptember by using products available with their on line store.


Thank you for stopping by!
Hugs and happy crafting,

Claudia x

Wednesday, 10 July 2013

12 tags of 2013 - july

The July tag from Tim Holtz' "12 tags of 2013" brings a lot of yummy texture as I've seen, so I was glad I found some time to give it a try today :)

As we do not celebrate the 4th of July in Austria, I chose something that was related in colours: "London" and the awesome "Paris to London" stamps from Tim Holtz - one of my latest favourites. And as I am a great London-fan, this stamp sheet was a must have to me ;)


The idea of creating a background using droplets of Distress stains and the brayer is absolutely great! I LOVE the smears of intense colour you get this way!


After I had prepared the background of my tag, I stamped the British flag, covering the blue areas with masking tape when stamping the red ones and vice versa.


I cut out the flag and gave it a thick coat with Distress clear rock candy crackle paint. After the magic of crackling had happened I rubbed in some "black soot" Distress ink and whiped off the excess on the surface to make the crackles more visible.


As Tim used some metallic colours with his tag, I used Distress stains "brushed pewter" with the edges of my flag, creating "puddles" to achieve a bit of a soldered edge look.

I stamped the "luhn-duhn" phonetic spelling using the Tim Holtz "worn text" letter 
stamps and the image of the guard onto the tag. To add some more texture I added some of the smaller images from the "Paris to London" stamp sheet.

Then I added some torn scraps of Tim Holtz tissue tape for more interest.

The idea-ology enameled tag was covered with an idea-ology remnant rub on, the piece of fabric at the bottom was stamped and heat embossed  using white embossing powder.


A piece of white ribbon was stamped with the image of Big Ben and sewn to the tag together with the flag. Afterwards I added the wire pin and the label tag from the Tim Holtz idea-ology range.

The edges of the tag were distressed, blended with Distress ink "black soot" and I also applied Distress stain "brushed pewter" with some spots.


I had a lot of fun creating this tag and I hope you like it too. Thank you all for stopping by my place and having a look around and thank you for your comments you leave with me - I really appreciate them all!

Hugs,

die amelie x