Friday, 14 February 2014

A Last Minute Valentine for the Take It, Make It Challenge at Craft Stamper

I guess I just had to do "my version" of a project with a heart....in answer to the floods of red hearts around and before Valentine's Day.


As we don't celebrate it, it does not mean a lot to me honestly. My HB brings me flowers every now and then anyway and tells me that he loves me quite often - and whenever he feels he needs to. So we don't need a special date for this...and as he is a mathematician (and therefore quite stubborn), he would never ever do it on Valentine's Day - even if it were important to me - , because everybody else does AND because he was TOLD TO by some collective habit and special date. (Do I have to mention that we don't celebrate mother's day at home either?)

As I recently joined the Craft Stamper Design Team I also am free to conbribute to the wonderful Take It, Make It - Challenge which is hosted monthly by the lovely Trish Latimer!

http://craftstamper.blogspot.co.at/

This time "repeat stamping with a small stamp" is the theme and it is a lovely way to create gorgeous patterns which can be used on a large variety of projects.

I used one of the 15 "Ornament & Floral Designs" stamps from Rico Design I once bought and almost forgot about. I stamped with DI "barn door" and "embossing ink" and heat embossed my three rows of hearts using Ranger Ultra Fine clear embossing powder. Then I blended the whole tag with DI "black soot" and wiped back the colour from the clear embossed hearts.


After that I die cut the thread spool and the tailors puppet (using the Sizzix Tim Holtz Movers and Shapers dies I recently bought at the large Sizzix Sale for about four Euro!) from light brown manila card and blended the edges with "gathered twigs" DI.


To create the heart I first drew and then cut a shape from heavy card and gave it a coat of white Distress crackle paint which I coloured red (using some Distress paint) after it was dry. Then I rubbed in some "black soot" DI to make the cracks more visible and gave the shape an outline with a black china ink pen.


I die cut two labels and stamped red frames on them. Then I stamped my saying onto the labels after I had cut them to size.


For a finish I added some self adhesive black lace ribbon at the bottom and a moustache on top of my tag. Done!


I hope you like the tag and will join in this month's Take It, Make It challenge over at the Craft Stamper blog soon!

I also enter this tag to Tim Holtz' "12 tags of 2014". 


Hugs and happy crafting,
Claudia x

Tuesday, 11 February 2014

Portrait done with Oil Pastels

I am still busy with catching up on my Soul Food classes after the holidays and today I finally dared take the leap into portraiing in colour!

I still remember how I hated it during my arts studies (and I was so afraid of it that I just HAD to s*** at it ;). Teachers did not show us how to do it, but expected us to find out for ourselves - and I obviously followed the wrong how-tos, because today I was able to put aside all those fears of failure and just dive in!

And I really love the outcome of my first try following Jeanette House's fabulous tutorial although my nearly eleven year old son looks as if he was in his twenties already *lol! But I managed to capture his special smile and his big bright eyes aaaand...yes...that freakin' skin-tone that I always found so hard to paint.


This time I started with the eyes when I drew the sketch with a pencil. Sometimes I start with the nose and the mouth... actually I am not sure on what it depends.


Although I am a really bad painter I managed to work my way towards something that looks like real skin with the oil pastels rather easily. They are very forgiving when it comes to re-doing a layer of colour that turned out too dark or simply the wrong colour for this place.


And although at this very moment I find - while writing this post - that I have to correct that one spot on the nose (to the right) where you can see what looks like I had drawn a second (smaller) side of the nose, I am quite relaxed because I know I can just cover that up as often as I need to ;)
I hope you don't mind if I don't take any new pictures to show the (slightly) enhanced portrait. It is my very first try in colour and now that I finally know how to approach this I will surely do some more some time (to keep up practicing).


You can see how I worked my way around the cheeks and the eye, the nose and the mouth...and I like that my "traces" I made with the oil pastels are visible. It avoids letting the surface look too smooth (and therefore un-real, but at the same time too close to real, which most of the time looks a bit awkward).


Sadly I had to take images in artificial light because it is grey in grey (as usual) outside. But I hope you get an idea of the colours.

Thank you for stopping by and taking a look at my efforts ;)

Hugs and happy crafting,
Claudia x

Sunday, 9 February 2014

A Toilet Roll Steampunk Tag Album - and a DecoArt Tutorial

Hello, servus and welcome back for another tutorial for the DecoArt International Design Team Blog (featuring Andy Skinner) which I am proudly part of!


http://decoart.com/andyskinner/


Browsing the net I recently found some wonderful mini tag albums made from toilet rolls and I felt the urge to finally do one of these myself!

And as some of you might already know Meresanth from "Meresanth Krafts" has recently opened her brand new online store "Retro Kraft Shop" where she offers the most wonderful vintage steampunk crafting goodies.

http://www.retrokraftshop.pl/en/

She generously sent some more of her treasures along with my order so I could have a play with them and create a project for her shop blog - and this is the result:


It was a lot of fun to play with all the watch parts and lovely embellishments, lace ribbon and designer papers! But now on to the promised tutorial:


To make your own mini tag album you will need:
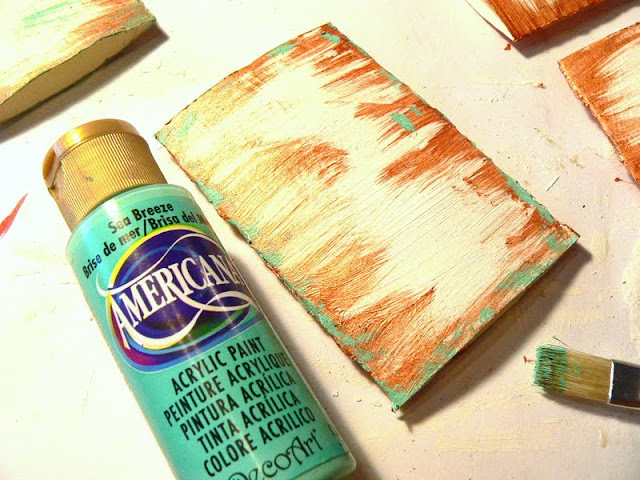


- DecoArt white Acrylic Gesso
- DecoArt Americana Acrylic colours "Red Iron Oxide" and "Sea Breeze"
- DecoArt Dazzling Metallics "Bronze"
- DecoArt Decou-page matte


- some bristle brushes
- 5 toilet rolls (and your Sizzix or Cuttlebug to get them real flat)
- a tool for making eyelets
- wire and some pliers
- designer papers of your choice
- scissors, glue, eventually some sticky foam pads
- some small tags (or the Sizzix "Tag and  Tie" die, which I used for my tags)
- some stamps and stamping ink for further embellishment
- Distress ink "rusty hinge"
- various kinds of washi tape


Items used for embellishing this project that are also available on Meresanth's Retro Kraft Shop:
- Prima "Printerie" stamp set
- Vintage Neutral - K&Company Paper Pack
- Bronze Metal Branch
- Bronze Metal Key 4
- Watch Dials and other Watch Parts
- White Lace 
  

Step 1

Flatten your toilet rolls using a bone folder or (even better) your Sizzix or Cuttlebug.


Step 2


Give the rolls a thick coat of white DecoArt Gesso.


Step3


Take the DecoArt Dazzling Metallic "Bronze" and paint your rolls once the Gesso has dried.

To do so load your brush with some colour and stipple the colour onto the edge of your roll:


Then use the same brush (or your fingertips) to direct some of the applied colour towards the roll's center with gentle and fast strokes:


See to it that you don't work too evenly. Let Mr. Random be your guide ;)


Step 4 

Next apply some DecoArt Americana "Sea Breeze" - but this time the colour has to be stippled on and around the edges - that way it looks like spots of verdigris patina.


Step 5

Load a brush with some heavily diluted DecoArt Americana "Red Iron Oxide" and sprinkle a lot of stains on your rolls and do this from both sides. This will add a little more depth to the bronze look. 


Step 6

Punch some holes for the eyelets. You can set the eyelets right now but can also add them later.


Step 7

Cut five tags from designer papers using the Sizzix "Tag and Tie" die and your cutting machine. 


Step 8

Choose some designer papers for all sides of your painted rolls and cut them to rectangles that don't cover the eyelets and leave an edge about at least half a finger's width - so your beautifully painted edges remain visible. Leave one of your painted rolls untreated - we will later use it to create the cover.


I also distressed and then blended the edges of my cut to size paper panels with DI "rusty hinge"before I glued them in place.


Step 9

Add some pieces of washi tape here and there. Create layers and overlaps.


Step 10

To make the cover wrap some lace around the "front roll" and glue it in place. Then embellish to your liking. 


I used some watch parts, metal embellishments and some stamping on the cover. But you can do whatever you are up to.

Step 11

Cut two pieces of wire to size (depending on how many pages your album shall have). (leave a bit more on both ends to form two tiny rings at each end - but for now leave the ends straight so you can insert them through the eyelets). 
Bend your two wire pieces into circles by "wrapping" them around one of the DecoArt colour bottles' caps. They have the perfect diameter for book rings ;). Assemble the album before you finish the wire ends!


Step 12

Assemble your mini album once you have embellished all the pages. 
Insert your cut out tags. 
Curl up the wire ends at least once (see picture above) to close the rings. Then use pliers to form small rings at all ends, so no one gets hurt by any sharp and pointy wire ends. 

Done!


On the inside of my album I used some of my newly "found relatives" from my last visit at the flea market at the famous Vienna Naschmarkt. I made colour copies and blended the edges with DI "rusty hinge".


I hope you can see at least a bit of the shine of the DecoArt Dazzling Metallic "Bronze" - as it looks so very cool!


I love the colour contrast of the "verdigris" and the shiny bronze! It is what keeps the album's design together.


I had to fix the spring to the cover with a brad. All the other embellishments were glued on using DecoArt Decou-page matte and/or sticky foam pads.


The tiny metal branch was fixed to the clock face using a small piece of thin wire.


And don't these calendar rings look just great? The bell jar image is a stamp from the Prima "Printerie" stamp set (as are the stamped words and the "Welcome" at the back cover).


I hope you will be making your own toilet roll steampunk albums soon! Thank you ever so much for stopping by and the encouraging comments! (Ssssst...he's my personal favourite: ;)


Hugs and happy crafting,
Claudia x

Saturday, 8 February 2014

Some apres ski sketches

Hello and servus, dear readers and followers (old and new)!

I have just returned from our skiing holidays (which were fab - a lot of sunshine, enough snow (although there could have been more of it), good food (although there could have been less of it ;), lots of good sleep and wonderful forest walks with the dog) and as I promised to myself to take up drawing again this year I took my small sketch book, some pencils, a rubber and a small booklet from the "Game of Thrones" TV series with me...

...and I came up with at least four pages filled with various sketches which I am (more or less) content with - so I dare share them with you.


I prefer to draw with a drop action pencil (because it doesn't need sharpening ;) when I work on a small format like my small sketch book.


Most difficult for me to draw are mouths honestly (and hair too - because I am too lazy to finish hair drawings... ;).

My HB and I really like "Game of Thrones" - as it is fantasy but NOT that kind of kitsch fantasy (if you know what I mean). You barely find any of the typical shallow fantasy cliches...but in fact a dense and good story with a lot of depth and beautiful images - with all you expect good fantasy to be and to offer ...and also some surprising new elements.


Hm....I admit that SHE (and her warrior prince below) look rather close to the fantasy cliche at first sight...but she does not behave like you would expect her to do...so this character works well too. And fantasy is based on this kind of archetypes - so I guess you just have to like it or leave it be ;)


My HB has always been very much into fantasy... and some of the fantasy novels from his large collection would not meet my expectations of a good story (or good storytelling) at all. But "Game of Thrones" is an exception to that rule - I really love this series very much and also started to read the novel (which is rather complicated but beautifully told). And of course there are others like for example Ursula K. LeGuin, whom I love to read too.

I have always loved to draw fantasy characters - especially during the time when we used to play a lot of pen and paper roleplaying games like "Dungeons and Dragons", "Everway" or "The Black Eye". So drawing some of the characters from Game of Thrones brought back some of the "good vibes" and a lot of nostalgia ;)


I hope my short side trip to the realms of fantasy did not bore you to pieces ;)
(You should have seen me in my heavy leather armored Borg* costume I wore at the one (and only) live role playing game I took part in...LOL...which was actually ages ago (oh my, have we really grown that old already ? ;) and I mainly did it to impress my HB (who wasn't my HB at that time and our love was rather young at that point...well, don't tell me about the things we do for love *giggle).

Next time I will be back with some mixed media and/or stamping... well, we'll see... promise! ;)

Claudia x


*) Borg = the hostile collective from Star Trek - The Next Generation (just in case someone might NOT know who the Borg are *erhemm)


edit: I've shared these simple sketches with the community of "Share Your Face" - hosted by the lovely Kim Dellow. For more information check HERE.


Wednesday, 5 February 2014

Selfmade Notebook/Art Journal

Hello, dear readers, followers and crafting friends,

another (prepared) post to finally share one of my recent makes as it has been given to its recipient by now. I made this as a birthday present for my mother in law, who loves everything nature and is the most wonderful grandmother for my son you could wish for! So it had to be something really special I wanted to give to her!


Many of you will still remember this make, on which I used the same wonderful background technique taught by lovely Grace Howes on the Soul Food class (and the same range of DecoArt acrylic colours)!
Now I finally made a smaller version of her art journal so my MIL can use it as a notebook and carry it with her.


It's a really useful item, as it has foldable flips on the front and back cover, which can be used to mark special pages in the notebook. It also has a pocket for tickets and such on the front and back cover insides.


The sewn binding is easy to make but also very effective. It does not only hold my two signatures in place but also works as added texture on the spine.


I used my lovely (and rather new) Red Lead feather and fragment word stamps to add more interest to the signatures covers. I really LOVE those stamps and cannot believe I did not use them earlier although I had already bought them some weeks before X-mas! But sometimes my new acquisitions just have to wait until the "perfect" project for using them comes around the corner ;)


 The numbers were stamped using part of a Kaisercraft stamp. The scraps of text are from an old book I bought for 2 Euro.


I also left the perforated edges from the paper pads as they came off the paper pad and used a mix of kraft and white sketch and watercolour papers for the signatures. I love it when you can see what a project is made of and I love when you can touch and feel various textures.


I also love how the acrylic colours blend together when being scraped on- and into the paper. They do it all by themselves - so no hard thinking on any colour tones I might need to use and mix ;)


And I like that the sewn binding is visible on the outside too - so you can see HOW the project is made.


I hope you have enjoyed your visit! Thank you for stopping by my little creative corner ;)


Hugs and happy crafting,
Claudia x