Showing posts with label toy theater. Show all posts

Friday, 21 September 2018

Boo! - an (almost) all Tim Holtz Shadow Box

Yessss! It is that time of year again - time to get out all my Halloween dies and stamp sets, which are mainly Tim Holtz design ones....yes, I simply can't help buying his stuff. Almost everything he designs is a must-have for me...lol
But I know I am in good company with being a Tim stash hoarder. And I know a lot worse ways of how to spend my pocket money ;)


Some of Tim's stamp sets simply call for being used for fun dioramas and shadow box projects - like the cute Haunted House set. Perfect to create a little Halloween scene shadow box!


I haven't done any steps images as I was being carried away during the process (I will add the links to the mentioned dies and stamp sets instead).
A process that started out while browsing my Halloween stash and deciding to use as many of my treasures in a single project as possible....lol. The project was also inspired by the lovely Holiday Shadow Box die set by Katelyn Lizardi. You can definitely do so much more with that one than a winter or Christmas themed shadow box (but everything you need to create one of these comes with the amazing dies set).

 I just used the main parts for the shadow box (the front and back and hills with the glue taps) and simply snipped off the leaves from the trees to get a spookier look.


I combined some of my other favourite Tim Holtz dies - the On the Edge - Graveyard die, the Drip Edge and Twisted Edge Thinlits dies and the Vintage Spirits die set - with stamped images from the Haunted Mansion and Mini Halloween #5 sets.

They all came together just beautifully! I prepared the background for all the die cut pieces by using an artists sponge and dabbing on mixes of grey, white and black for all the construction parts and mixes of reds for the Drip Edge and mixes of greens for the "boo" and the Twisted Edge. I used the same acrylic paints to colour part of the stamped images to visually fuse all the elements. 


Once all the stamped, painted and fussy cut parts had been darkened with black archival ink and an ink blending tool they were glued to the die cut "hills" with the glue tabs. The witch was fixed to the back of the front trees with sticky foam pads. 


The Graveyard was also stuck to the back of the front using sticky foam pads. This way there was more room inside the shadow box to create sufficient depth. 


I especially love the top of my shadow box front - it reminds me a bit of a toy theatre. 


To repeat the white from the top piece with the red eyed owl, I added the small quote to the bottom. 
If you have any questions, please, use the comments function or email me. But I think everything is quite clear. There's a short instruction included with the shadow box die set as well. If you want to add more than three layers, simply trim the glue tabs to a smaller width, so there's more room for more glue tabs on the bottom. 


The background was done before assembly of course. I used Tim's background stamps from the Haunted House set and also added acrylic paint splatters using a splatter brush. 


Some detail shots:


Creating this shadow box was such great fun! Halloween - here we go! I am all ready! 


Hugs and happy crafting!
Claudia
xxx

Monday, 4 April 2016

What is Your Personal Style as a Crafter and Artist?

Now isn't that the most difficult question to answer if you - like me - feel that you are someone who loves variety and constantly trying out new techniques and....well, styles?

But the question is being asked (right at this moment by Calico Craft Parts who are having a call out for one new DT member) and I guess this is a good time to face it (especially as I have been struggling with it for quite a long time now). So this is going to be a post where I talk a lot about art, about how we end up struggling with some of what is part of being an artist or creative person and also a bit more about myself than usual (even though not that much, because still I prefer to have my projects speak for themselves) - so if you want to just take a look at what I think represents my style, scroll down to the images and feel free to skip my blurb instead.

To all those who decide to read on and learn a bit more about the artist within us all and also about me: I would love it if you shared your thoughts and your own projects on this matter because this is - after all - what we all ask ourselves at some point: is my work recognisable by others? Does it inspire others and does it make a difference? Am I (still) on the right path?

So I invite you to join in and share some of your thoughts on this or maybe even a past or actual project that you think represents you best (by either leaving a comment or using the link up at the bottom of this post). Please, consider my long post being an invitation and icebreaker (and maybe you can even relate to some of what I write about):


A lot of people tell me that I do have a style that can be recognised easily but if you asked me I would say that I have no "trademark" style that can be immediately assigned to me and my artwork. Which is something that often worries me as I feel I am lacking originality and an "own language" as an artist.

I guess this feeling originates not only from the fact that I still love to take on new techniques (and there are really a lot out there ;) but also that I have always been good (and felt safe!) at imitating styles and already started doing so when I was a kid. Back then I drew almost every day and tried to copy the illustrators from my favourite childhood books (like from "Brambly Hedge" from Jill Arklem or the "Bullerbü" books from Astrid Lindgren) and later the paintings from H.R. Giger for example.
All of that was good exercise but sadly I had noone who encouraged me to explore my own creative voice as an artist. Especially not at art university (which honestly rather helped with making me even more confused and feeling lost and insecure when it comes to developing your own style as an illustrator or painter).

So when I finally became an arts teacher my main goal was always to encourage my pupils and students to trust in their own artistic "vocabulary" and "writing skills" in the first place and rather adapt the techniques and knowledge I gave them than follow it too closely. I loved it (and my students loved it too) when I could "read them" in their paintings and that still is something that is so much more important to me than any painting skills when it comes to real art that is authentic and speaks to me and shows the artist as well as her or his view on the world we live in.

As young kids we do not doubt or even question our own skills and ways of picturing  what is important to us: mommy, daddy, siblings, auntie Mim, our pets, our home, those marvellous and wonderful trees, birds, skies, clouds and flowers out there... our drawing sheets are our universes and we reinvent the world on them without having to do any sketches first or think about where to put the first line. Our hands are directed by our hearts (instead of knowledge) and we draw and paint what we are touched by most - the wonders of the world at our doorsteps! And we manage to capture that magic in our drawings and paintings effortlessly...we do not even notice or know about our "divinity" at that age. (Picasso often said he wished he could paint like a child again - boldly and without any fear of failure. Because he knew what we lose while growing up).

Later - at the age of thirteen or fourteen - we realise that what we draw doesn't look "natural" (because at that age our awareness for threedimensionality develops - only to give us a hard time as we can now see where we are "failing" trying to capture it on two-dimensional substrates) . There are these things art teachers and experts tell us about such as perspective, shading, proportions and other obstacles that take away this magical process of creating freely - without any fear of messing up. Things that have to be understood and learned - and which most of the time only lead to disappointment (especially for those who don't have any teachers or mentors who guide them through these times with understanding and care). It feels as if with the wink of an eye everything we loved about being creative has been turned into something worthless and - which is even worse - false. That is the time when the majority give up on drawing and painting and live their lives thinking of themselves that they simply suck at art and lack that obviously needed "talent" (which simply isn't true).

My "talent" - as already mentioned before - is that I can quite easily and quickly copy or adapt to styles and take on new techniques...but that isn't helpful with developping my own visual language at all. So much for the praised talent then. ;)

Therefore having to choose three projects that might serve at representing "me" or "my style" wasn't easy and at first I thought that it was even impossible, but it made me browse the projects I have been doing so far and at least search for some linking qualities - and that was an eye opener to me because for all that time I had been thinking I hadn't focussed on developping "my own artistic language" (because I was attracted to and distracted by all the loads of cool techniques and styles out there that I needed to try and learn) when in fact I had done so. Only differently than I had thought I would. ;)

Here are the three projects I chose (or "found") that I feel really represent ME and what I love to do most:


This "Forest Love" stacked ATB shrine is a project (done for Calico Craft Parts as their Guest Designer a few weeks ago. Thanks again for having me, ladies!) that brought back to me some of the skills and techniques I thought I had lost or that I couldn't relate to anymore: my love for really tiny, fiddly, detailed painting - and I could also combine it with my love for the forest (or nature in general - especially insects), found objects and shadow boxes and shrines.

When I discovered Calico Craft Parts' MDF Mini Insect Wood Shapes these "spoke" to me immediately - and the project built up almost on its own. And I found myself creating with that security and joy of a kid (well, at least very close to that).


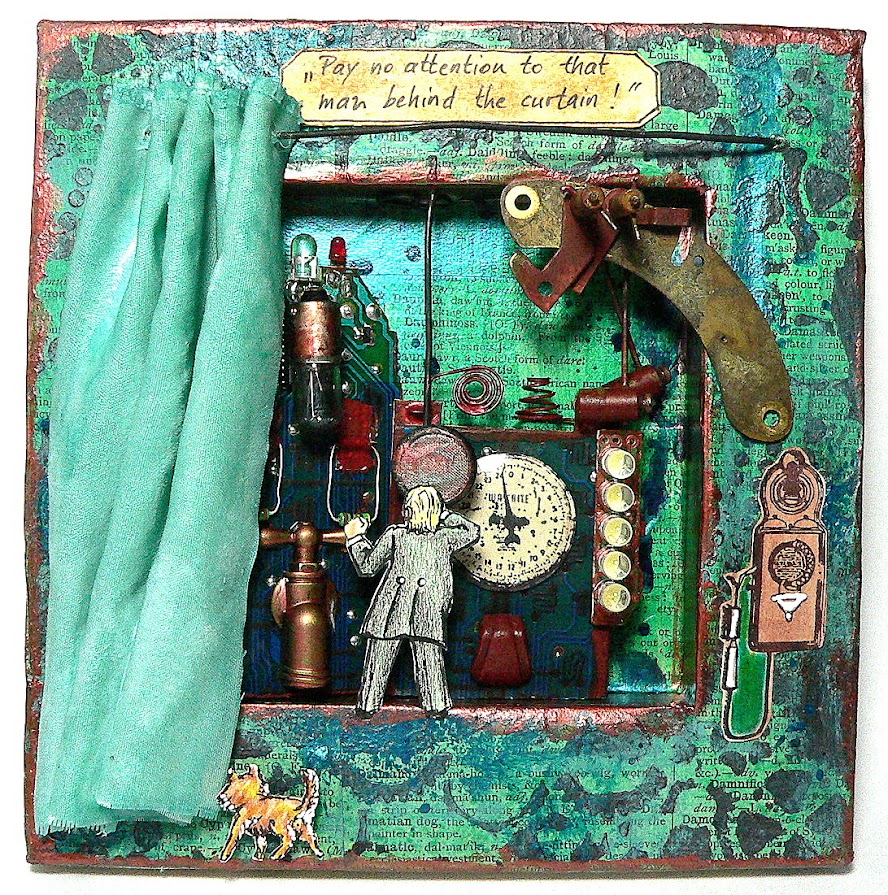
My "Wizard of Oz" shadow box also shows my love for using found objects, for creating scenes like in a toy theatre (I have a small collection of these btw), for thinking out of the box (and using a broken remote control to make the wizard's machine). Story telling is something I very much love seeing with others' projects - and it is what I love to do too when creating.The Wizard of Oz and Toto are hand drawn - and again really tiny. I also remember that I had a real good "me-time" (totally forgetting about the world around me for hours) while creating this one.


"A Dog's Dream" shows my dog Bluna dreaming of the things she loves most: chasing crows (although it is pretty obvious that the crows trick her every time), running up and down steep hills at high speed and getting her favourite  dog biscuits (that - thanks to the manufacturer - have the shape of bones of course). And - yes - it is a shadow box again. The hills, crows, Bluna and all the other things in it are hand drawn and painted and the shadow box was done following a wonderful online class held by lovely Sarah Hand at Soul Food 2014.

I found that really often I end up with doing shadow boxes and shrines. And these boxes all tell very personal stories....about the things I deeply love and that bring me true joy. And even though you can say that these shadow boxes look all very different in style and making, they all have in common that they had to be shadow boxes and that they had to tell a story and display something that touches me deeply and is dear to my heart. They are like a mirror - and the image of me I can see in them is one I can relate to and that I can also love.

And I guess that is what we all aim for when we create - to find ourselves in our work. And to love what our work reflects of us.

Thank you to all who read this far! Those who know me know that I usually don't do this kind of mammoth posts - and these will definitely remain the exception. But the issue about ones personal style has been bothering me for ages it feels. And from what I know and read I assume I am not alone. ;)

Here's the link up - for those who want to join in and share their personal hunt for their "own artistic style". I will keep this collection open for the next two months. Let's find out who is out there ;)


Thank you for stopping by and taking the time!
Hugs and happy crafting!
Claudia 
xxx


Friday, 21 November 2014

Woodland Magic

I recently stumbled over the lovely X-cut Build-a-Scene dies from docrafts and the "Woodland" set instantly won my heart. They have various lovely scenes to build, but as I am a dedicated lover of the forest AND of toy theatres (and shadowboxes in general), I just had to have this one.


The fox is already one of the five dies of this set, but I wanted to have an owl too - so I made one myself. Oh, I can imagine various animals in this enchanted woodland! But for a start I decided to stick to the fox and just add the owl and put the main focus on drawing on the die cut shapes to create an illustration kind of look.


The owl was fussy cut freehand and then painted with acrylics, a white sharpie and a black Faber Castell PITT artist pen (as was the whole forest).


My fox was done the same way and then glued to the layer I wanted him on.


This morning (after I had taken pictures of this project in dizzy light) the sun came out for some minutes and I shot an image of my woodland scenery in full sunlight...which makes the layers and shades pop!


What I love with shadow boxes or little stages of toy theatres is that they reveal more detail when being looked at from various angles:


This creates a special depth that draws you right into this enchanted realm on its own, doesn't it?


I had a wonderful time drawing the bark and the leaves and layering my finished stages to create this tiny piece of woodland. I haven't drawn for ages and this reminded me to start drawing again. Well, we'll see.... :)


I hope you like this piece. This dies set is such a lovely design! Especially this scene stole my heart right away!  Can't wait to do a variation of it! ;)

Hugs and happy crafting,
Claudia xxx


I enter this project to the following challenge/s:

The Artistic Stamper - Christmas is Coming
(the "Joy" and "Happy Holidays" quotes are stamped)

Craft Room Challenge - Anything 3D 
(which is the perfect challenge theme for a shadow box lover like I am. Thank you! ;)

Dies R Us Challenge Blog - Anything Goes - Christmas

Moo Mania & More - Trees
(their challenges are open to other formats than Moos as well....yay! Thanks for the information, Susie ;)

Monday, 3 June 2013

My Morpheus Box

Well, today I am really proud to be able to share with you my very first assemblage piece of art!

The awesome Micheal deMeng online class was a gift from my husband and I LOVED it!!! To me this workshop was enlightenment on new ways of painting, encouragement to leave traditional ways of creating art behind (of which I had learned a lot at university but never felt very much at home with) and - what is most important : be daring and have a lot of fun!

So I Dremel-ed, I went to Vienna's famous Naschmarkt flea market on the hunt for beautifully rotten objects to add to my box, I sculpted, I used my drilling machine and saws again... well, actually I felt like in heaven this approach to creating art being so very natural to me.

The finished project looked even surprising to myself *lol.

So beware of a picture heavy enthusiasmic post today ;)


As the fun thing with the Morpheus Box is that it has a spinning block with four sides, each displaying a different painted image, I start with showing you my favourite painting: "Grandma".

All the paintings were made by painting over copies of old photographs from my personal stash (I hope my ancestors will know that I meant no offense by turning them into ghoulish beings ;).


This picture shows the spinning mechanism on top of the box. You turn the block inside the box by switching the tiny gear on top to your desired position. Cool, huh?

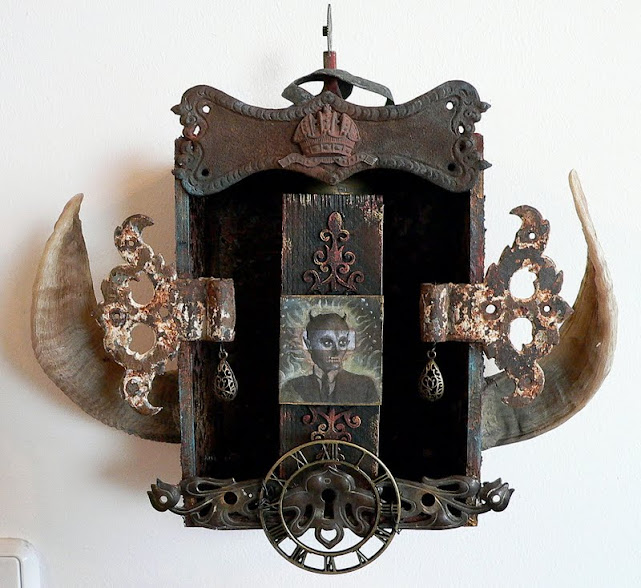
The idea of attaching horns to the box crossed my mind when browsing through e-Bay on the hunt of metal findings or other old rusted stuff... I stumbled upon a shop that sells animals skeletons and horns - perfect!!!


Attaching them to the box was the greatest challenge for me as it meant I had to cut the horns to size (wearing mask and goggles and using my Dremel on the balcony making a lot of noise I guess my neighbours had some rather weird sight that day *lol).

The last step - fixing the spin mechanism with the screw that holds the wood block in place inside the box - was quite tricky, but after a while of fiddling I managed to saw and file a wooden dowel that fit with the screw's head...


I coated the two pieces with Apoxy Sculpt, gave it some texture with a fine tool, let it harden and painted it afterwards as I painted the outside of the box using fine sand texture paste first and acrylic colours on it after it had dried.


The inside of the box was coloured using a mix of GlimmerMists, Perfect Pearls Mists and mica flakes, as I wanted to have something dark but at the same time shiny to show as a background and surrounding for the images.

This image shows the box in a very early state - there I just had the two rusted hinges which I wanted to use as "wings".... no idea that I would attach some spooky horns too at that time.


I played around a lot during my working on the box and thus came across two metal hanging ornaments I had been storing for quite some time then.

I attached them to the hinges using some raw wire.

I love how they dangle a little.... thus adding more movement to the box.


The clock face is from Prima's finnabair collection and I fixed it to the Jugendstil fitting using thin wire, trying not to work too neat and proper.


I tried to give the outside of the box a timeworn and rusted look, using the techniques I have learned with the wonderful Andy Skinner "Timeworn" workshop.


I love the look of rust and decay and colourful patina! Painting verdigris is a lot of fun actually and it always is surprising how it alters a normal everyday item into something that looks as if it has seen a long time span passing by...


Painting the areas of the horns emersion points was the trickiest thing to do, but I finally managed to find the right colour mix for "goat horn" ;)

I did not paint the horns though as I love their natural colour and texture and did not want them to look artificial.

I love how they "frame" the box and drive the focus from the base to the top of the box, thus integrating the boxes surrounding.


As you have already met the "boys" and "grandma", I only have to introduce you to "dad" and "mom"... ;)

Some of you may recall "mom", as I used her with one of my earliest tags


Thank you so much, dear crafting friends, readers and followers new and old, for staying with me this far! I hope you like my Morpheus Box!

Hugs and happy crafting!

die amelie x

Tuesday, 9 April 2013

"Spring has sprung!" - Challenge

is this fortnight's theme with us at Try It On Tuesday!

We would like to see something that moves on your cards or projects. 

I chose to try another 3D pop up card similar to this one.
Only this time I did a smaller version.
The card folds flat to fit with an envelope and opens up by pulling the tab below until the "stage" unfolds to its full depth. The mechanism is quite tricky and uses a hidden ribbon attached to the pull tab and the bottom of the stage.


Stamps used are from  Pictorial Webster's stamp set, RedLead and Art Journey.


All images were stamped with Ranger jet black ink onto white card. The rabbit and the snail were cut out and glued onto a piece of acetate so the rabbit would look as if it was just making a big leap.


As usual there is a prize to win this month! This time our sponsos are


who are giving away a $25  Gift certificate! 

If you need some inspiration hop over to the challenge blog to see the awesome projects my design team mates made!

I look forward to seeing your spring-sprung projects soon! :)

Hugs,

die amelie x

Wednesday, 13 June 2012

Kurzer Ausflug zum Papiertheater / A short visit at the toy theater

Um einmal meine andere Papierleidenschaft zu zeigen, hier kurz ein Blick auf das Papiertheater, das ich glücklicherweise günstig ergattern konnte. Darin der Entwurf für eine Räuberhöhle für Ali Babas 40 Räuber. (Ob das Stück jemals fertig wird und zur Aufführung gelangt, weiß ich noch nicht... ;)

Es handelt sich hier um ein Papiertheater der Fa. Schreiber aus München. Keine Antiquität, sondern einen limitierten Nachdruck aus den 90er Jahren. Die Bühne besteht komplett aus Karton und ist zusammenfaltbar. Kann also in einer relativ flachen Schachtel transportiert werden.

Figuren und Bühnenbilder werden ebenfalls aus Karton geschnitten und per Holzblöckchen montiert und mittels Stäben auf der Bühne bewegt. Als Beleuchtung habe ich eine LED-Leiste (für Schrankbeleuchtung). Früher, als Papiertheater neu und modern war, gab es als Lichtquellen kleine Kerzen. Der eine oder andere Theaterbrand war dadurch vorprogrammiert.

*****

To show my other paper-love, here 's a short glimpse on my toy-theater I had the luck to get. It shows my first try of a cave-scenery for a stage setting for "Ali Baba and the 40 Thieves". (If this production will ever reach performance is unsure at the moment ;)


It is a toy theater printed by the Schreiber Company, Munich. Not an antique original, but one of the limited reprints from the 90's. The stage consists of heavy cardstock only and can be folded to fit into a rather flat cardbord box.


Actors and stage designs are also made of cardstock, cut out and mounted on small wooden blocks and moved on the stage by using wire or wooden sticks. For lighting the stage I use a LED-bar. In former times they user small candles, which not seldomly led to theater-fires ;)