Showing posts with label shadow box. Show all posts

Tuesday, 10 May 2022

Luminescent Specimen Cabinet - a PaperArtsy Project

 Servus, hi and how's everyone doing these days?! I hope you are all fine and enjoying Spring and (finally!) warmer temperatures! 

Over at the PaperArtsy Blog they have just started a new topic - "Specimen Jar". You can tell I loved that one right away! I immediately thought about all the specimen neatly aligned in the beautiful vintage glass cabinets in Vienna's Natural History Museum. I could look at these for hours and just feel happy and soothed (I guess not only because I love studying fossils, insects and other small specimen but also looking at something so intriguing to me being displayed in such a neat order and large numbers). 

My aim with this project was to capture the feel of a cabinet from the Victorian era and also re-create an effect from a display box from Salzburg's "House of Nature" where they show some fish of the deep sea that make their own light down there. You press a button and their lights turn on - how cool is that?! So, yes, you're guessing right - I also used some mini-lights with my cabinet (and that was great fun). 

Just a few pictures to lure you over to PaperArtsy's blog


Find out more about the how-to and products used and meet me there

Hugs and happy crafting!
Claudia
xxx


Monday, 27 April 2020

Dreaming Myself Away Creatively in Times of Corona

Hi, servus and how is everyone doing these days?

Austria is taking first steps at getting back to a "normal" everyday life; "normal" meaning as normal as possible with the Corona virus still out there. Face masks, keeping one to two metres distance to everyone who is not living with you in the same household and special time tables for school kids will be staying part of that "normal" life (with schools and kindergardens and shops reopening again) for quite some time I guess. No one knows how summer holidays will look like and if these can be spent the way we usually do....

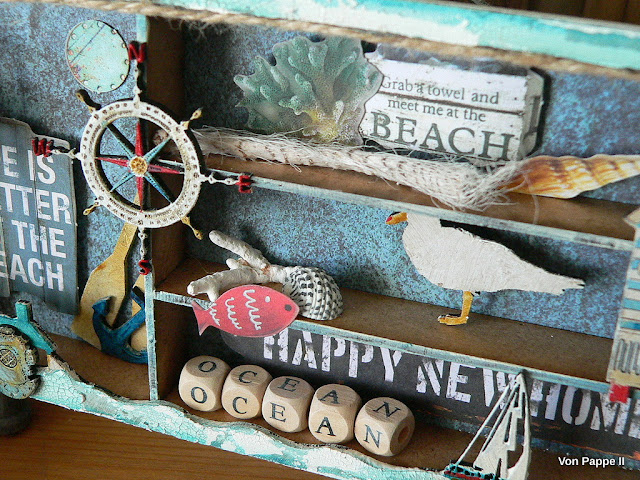
...so I decided to at least do some fantasy holiday travelling creatively on my desk and go to the beach!


Using one of Calico Craft Parts' printer's tray kits and other craft parts from their amazingly wide range of maritime and seaside themed wood shapes and combining these with stickers and designer papers and some DecoArt media goodness was great fun and creating my shadow box was a lovely relaxing time spent in my studio.

To see which Calico Craft Parts I have used and how I made my Beach-Holiday-Tray simply click HERE to get to the according blog post.

Stay safe and keep creating!
Claudia 
xxx


Thursday, 27 February 2020

Mixed Media Entomology - a DecoArt Mixed Media Project and Tutorial

Hi, servus and thanks so much for stopping by!

Today's post is an invitation to check out my latest project and tutorial for the DecoArt Mixed Media Blog.

My love for insects should be a well known fact by now - and this project is once more inspired by "bug beauty" ;)


I've found a cool and easy way to create my own beetle by using specific supplies that are usually meant to enhance human beauty...if you want to find out what it was that I've used, simply click HERE to get taken to the blog post with the tutorial and a list of all the paints, products and cheap little "specialities" it needed to get my gorgeous bug done.


Of course there had to be some yummy texture and crackle too! The tuto also covers how these were done of course.


I hope you like my project and the tutorial! Get inspired to create your own glamorous and fascinating specimen! It is really easy and quickly done - and great fun too! See you over at the DecoArt Mixed Media Blog!

Hugs and happy crafting!
Claudia
xxx


Monday, 30 September 2019

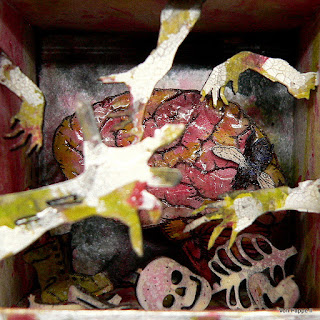
Chamber of Horrors - a Calico Craft Parts Artist Trading Block for Halloween

Hi, servus and I hope you've had a lovely weekend!

Mine was just wonderful - my husband and I spontaneously decided to go on a weekend trip and stay at my favourite castle hotel - Castle Bernstein in Burgenland. We had some delicious wine and food there, being surrounded by historic furniture and traces of the castle's five hundred years of history, and we did a three hours hike in the beautiful woods surrounding the castle. We walked in the pouring rain but that didn't bother us at all as we saw five fire salamanders, a beautiful large toad and really huge mushrooms - actually loads of mushrooms, some were so large they reached my knee! It was like a hike through a magical forest no one had ever been in before us.

But back to business! It's my turn over at Calico Craft Parts to inspire you with a project and as there are a lot of genius new Halloween Craft Shapes in the store, I had to have a go at some of these!

A list of the Calico Craft Parts and DecoArt paints and mixed media products I have used is of course part of my post over at the Calico Craft Parts Blog. As are a lot of images and a tutorial. ;)


I hope to see you over there! Simply click on one of the images or the badge at the end of this post to get there. And watch out for Zombies - they are in search of some fresh brain!


Hugs and happy crafting!
Claudia
xxx


Thursday, 16 May 2019

More Forest Magic in a Shrine - a DecoArt Mixed Media Blog Project

Oh, well....this post was originally just meant as a short invitation over to the DecoArt Mixed Media Blog, where I am sharing my latest project today, but I got stuck somehow right at the beginning and that has then become a longer blurb about some thoughts and feelings that came up while trying to do this write up and coming up with a fun and inviting message to lure you over (obviously "fun and inviting" wasn't really my thing today...lol).

 You do not need to read that at all and I am definitely not offended (as I won't know anyway) if you decide to just click HERE to get taken to the DecoArt Mixed Media Blog post and tutorial. ;)
I just wanted to share what crossed my mind today and what it is that sometimes makes writing up invitational posts or even designing as a design team member a bit tricky for me. And maybe I am not the only one who feels like this at times...It's the the part written in italic letters at the bottom of this post. ;)

So some detail shots will do the job maybe even better than a witty write up...?


You know me...the forest is one of my most favourite themes and source of inspiration and in this project I tried to capture what I love most about the forest: kind of woven visual layers of interesting shapes, amazing textures like bark, lichen on trees, thicket, soil and rotten leaves, ferns, mushrooms and all the other little wonders you can find if you just look closely...

To make this shrine project yours (instead of just a copy) you should of course use your favourite theme, cutting dies and embossing folders. But there's another reason why you should do that: because I am sure that if you combine a theme you love with the designs and colours you love, this will already create magic almost all by itself. Magic right from your heart. ;)

I hope you will like my finished project and tutorial and I would also love to see your "love shrines"!

Hugs and happy crafting!
Claudia
xxx


PS: still not sure what it was that made me fumble with this write up for over two hours...maybe some aftermath from my stay at the hospital and the stressful last weeks. ;)


It's funny...when starting the write up for this post I felt I needed to apologise for sharing once more a forest themed project, but then I also felt this wasn't something I should need to apologise for, right? 

Not just because even though it is a repetitive theme it still is a new and also different project, but also because one should not need to apologise for having a favourite theme that can be interpreted and re-created in countless variations and ways. But still I obviously feel that little fear of maybe boring you with all my "forest love"...

I guess it is my fear of someone just reading the blog post title and thinking "oh, dear...she did it again...just more of the same...how boring!!!" And maybe this fear relates to our quite competitive ('cos most of the time business related) crafting community's need for always sharing something new that surprises or even sets a new trend all (or most) of us want to follow...

And obviously I am infected with this way of thinking too...which is quite strange, because I - as an arts teacher - know pretty well that there are a lot of well known artists in art history that focused on a single theme and/or technique - and therefore became real masters in doing it...and none of their work is boring at all or feels like boring repetition...on the contrary: it is their mastery we enjoy and appreciate. 

Not that I see myself any close to a master, lol. 
But I find I keep returning to a few themes over and over again - because these are themes I love or feel especially well with when being creative. And when I look at my pinterest boards I find I am also looking out for mostly the same "loves" of mine - be it techniques, media used, themes, styles or colour schemes. You know what I mean? We have our specific favourites or "loves" - they make us not only feel good, but they also are what motivates us and feel especially fulfilling when we get creative and kind of "celebrate" them by expressing them in as many ways we can. 

What do you think?


Friday, 21 September 2018

Boo! - an (almost) all Tim Holtz Shadow Box

Yessss! It is that time of year again - time to get out all my Halloween dies and stamp sets, which are mainly Tim Holtz design ones....yes, I simply can't help buying his stuff. Almost everything he designs is a must-have for me...lol
But I know I am in good company with being a Tim stash hoarder. And I know a lot worse ways of how to spend my pocket money ;)


Some of Tim's stamp sets simply call for being used for fun dioramas and shadow box projects - like the cute Haunted House set. Perfect to create a little Halloween scene shadow box!


I haven't done any steps images as I was being carried away during the process (I will add the links to the mentioned dies and stamp sets instead).
A process that started out while browsing my Halloween stash and deciding to use as many of my treasures in a single project as possible....lol. The project was also inspired by the lovely Holiday Shadow Box die set by Katelyn Lizardi. You can definitely do so much more with that one than a winter or Christmas themed shadow box (but everything you need to create one of these comes with the amazing dies set).

 I just used the main parts for the shadow box (the front and back and hills with the glue taps) and simply snipped off the leaves from the trees to get a spookier look.


I combined some of my other favourite Tim Holtz dies - the On the Edge - Graveyard die, the Drip Edge and Twisted Edge Thinlits dies and the Vintage Spirits die set - with stamped images from the Haunted Mansion and Mini Halloween #5 sets.

They all came together just beautifully! I prepared the background for all the die cut pieces by using an artists sponge and dabbing on mixes of grey, white and black for all the construction parts and mixes of reds for the Drip Edge and mixes of greens for the "boo" and the Twisted Edge. I used the same acrylic paints to colour part of the stamped images to visually fuse all the elements. 


Once all the stamped, painted and fussy cut parts had been darkened with black archival ink and an ink blending tool they were glued to the die cut "hills" with the glue tabs. The witch was fixed to the back of the front trees with sticky foam pads. 


The Graveyard was also stuck to the back of the front using sticky foam pads. This way there was more room inside the shadow box to create sufficient depth. 


I especially love the top of my shadow box front - it reminds me a bit of a toy theatre. 


To repeat the white from the top piece with the red eyed owl, I added the small quote to the bottom. 
If you have any questions, please, use the comments function or email me. But I think everything is quite clear. There's a short instruction included with the shadow box die set as well. If you want to add more than three layers, simply trim the glue tabs to a smaller width, so there's more room for more glue tabs on the bottom. 


The background was done before assembly of course. I used Tim's background stamps from the Haunted House set and also added acrylic paint splatters using a splatter brush. 


Some detail shots:


Creating this shadow box was such great fun! Halloween - here we go! I am all ready! 


Hugs and happy crafting!
Claudia
xxx