Wednesday 20 December 2017

Anything Goes at Emerald Creek Dares


"Merry Christmas", "Joyeux Noel" and  "frohes Fest", dear crafty friends! This month's challenge is all about winter and holidays of course - and as always you can win a $50 voucher to spend at the Emerald Creek online shop or - as a follower up - a 20% coupon code, which is worth playing along too.


Since the start of November Emerald Creek and Altered Pages have been teaming up to share projects created by their design teams using products from both shops. Today is my turn to share an all Emerald Creek - Altered Pages make.


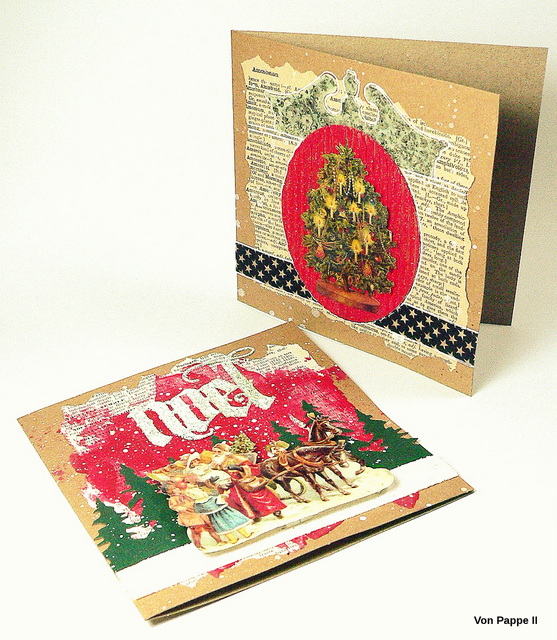
I made two Christmas cards using some of Altered Pages' lovely digital images and other products from their store alongside some of my favourite Emerald Creek embossing powders!

Here's the list of the products I used:

Emerald Creek products used:


Altered Pages products used:
Tacky Glue


I don't use digis a lot, but what I like about digital images is that you can make them every size you need them on your projects or even mirror the image (as long as there's no text...lol) if you want to. I did that with the gorgeous Santa's sleigh image as I wanted the horses to look to the right instead of left...ready to continue their ride through the winter forest to your doorstep to deliver your Christmas presents.  


For my cards I used two squares torn from dictionary pages as backgrounds and glued them to two kraft card blanks. I also die cut an oval from adhesive corrugated kraft paper and tore a rectangle shape (that I had planned on using as a back panel for the sleigh image, but I changed my mind later during the process). 


I painted the die cut oval (and rectangle) with DecoArt Americana "rouge" Chalky Finish paint.


Once the paint had dried, I used an embossing ink dabber to generously apply embossing ink to the raised areas of the corrugated card. This way the Emerald Creek Chinese New Year embossing powder created a lovely stripe pattern with a bit of festive bling. 


One of the dictionary page backgrounds on my cards got a layer of scraped on DecoArt Americana  "rouge" Chalky Finish paint. Once that was dry, I sprinkled on diluted "timeless" Chalky Finish paint with a splatter brush. 


I  heat embossed a die cut Christmas word with Emerald Creek Ultra Puff White embossing powder. 


I did the same with a cut to size strip of manila cardstock.


Another die cut element for my card was given a coat of "timeless" Chalky Finish paint...


...before I added a layer of Emerald Creek "Fractured Ice" embossing crystals to it. 


The printed out and fussy cut images were given two coats of Emerald Creek "Clear Chunky Gloss" embossing enamel to turn them into shiny Christmas image plaques as the focal pieces.


All my prepared and die cut elements were glued to the cards using tacky glue and/or sticky foam pads. 


I stamped holiday wishes to the insides of the cards using Memento "Love Letter" Dew Drop stamping ink. 


Et voilá!


There are plenty of other gorgeous Christmas digis to find at the Altered Pages store! I am sure you will find your personal favourites there too! And combined with Emerald Creek's awesome embossing powders these will make for the most amazing Christmas cards! I can't wait to see yours! 


Merry Christmas!
Claudia
xxx


Saturday 16 December 2017

Robin on a Branch - a DecoArt Mixed Media Project

Hi and servus! Just a short hello from me today to invite you over to the DecoArt Mixed Media Blog, where I am sharing my December project.


I fell in love with this gorgeous Sizzix "Little Robin" Thinlits die set at first sight and had to use it to create a little Christmas home decoration piece. And with the use of some of DecoArt's fab seasonal textural and glittery products this was easy to do and also great fun! Simply click HERE to get to the Mixed Media Blog and the tutorial. 


Hugs and happy crafting!
Claudia
xxx


Thursday 14 December 2017

Emerald Creek & Stencil Girl Blog Hop


Hi, servus and welcome to my little creative spot! I am very excited and honoured to be part of the fab three-days-long Emerald Creek & Stencil Girl Blog Hop on Day 2 today!

Yesterday wonderful Seth Apter himself together with Mary Beth Shaw, Kim Evans (my lovely boss from Emerald Creek) and Vicky Evans kicked off this great event.
Today it's my turn to share my inspirational project with you alongside Gwen Lafleur, Mary C. Nasser and Chulia Chupik.
And on the final day, tomorrow, Janet Joehlin, Tina Walker, Diana Hetherington and Karen Bearse will finish the blog hop off with their projects. (if you read on you will find the links to their projects and blogs all listed and ready to take you through the hop).

And what would a blog hop be without a cool...


GIVEAWAY
One lucky winner will receive a $25 Gift Certificate to StencilGirl Products
AND a $25 Gift Certificate to Emerald Creek!
Enter to win by leaving a comment below.
Then be sure to visit the other blogs in the hop and comment to win.
The more blogs you comment on, the more chances you have to WIN!
One winner will be chosen at random from all blog comments!
(One comment per blog please.)
You have until Tuesday, December 19th at 11:59PM Central Time to leave your comments.
Winner will be announced on
StencilGirl's Facebook page on Wednesday, December 20th.

And there's another fab give away waiting for one lucky winner!
Seth Apter himself is giving away this
amazing piece of art he created for this blog hop!

Seth-Apter

Cool, huh?


Blog Hop Order:
December 13


December 14
Claudia Neubacher (you are here now)

December 15


So have fun hopping and getting loads of wonderful inspiration from Seth and the Emerald Creek and Stencil Girl ladies!


Being mainly into industrial and steampunk style art, to me Seth Apter's stencil (and dies) designs being combined with the amazing Emerald Creek embossing enamels are a match made in crafty heaven! But of course there are plenty of other fab stencil designs for everyone's taste and liking to be found with the Stencil girl range and by visiting the others' blogs you'll find that the possibilities to create from their stencils and Kim's wonderful embossing powders are endless.


List of products used on my project (honestly I threw on almost everything "Seth" I have...lol):

Stencil Girl stencils - designed by Seth Apter:
Urban Insiders Bar
Urban Insiders Square
Past Present Future
Techno Insiders Circle

Emerald Creek embossing powders:
Charred Gold
Burnt Copper Leaves
Hammered Metal
Steel Sapphire
Aztec Gold
Clear Chunk Gloss

Additional Seth Apter stamp sets used:
Spinners
Triptych
Turnarounds Set 4
What will happen...

Additional Seth Apter dies sets used:
Robo Ring
Robo Bar
Pocket Watch


I had this thin journal at home that had a plain kraft cover - just perfect for altering it and turning it into a keepsake for precious thoughts and memories!


To keep the journal's pages safe from being accidentally painted or stained, I inserted a sheet of scrap paper between the cover and the first page. Then I used Seth's "monoprinting with paper" - technique (as I call it) to create a quick background for my cover. (sorry for the poor pictures, but it was very dark outside all day long and this was the best I could get from my lighting and picture editing without loosing too much detail). 


Working on several sheets of  manila cardstock at the same time, I brushed on various acrylic paints with a wide flat brush and pressed and rubbed the wet paints from one sheet onto the others until I was content with the look. 


I created more sheets than I actually needed for this project - but I love having plenty of beautiful papers to choose from. I added sprinkles of dark blue paint to the dried cover using a heavily loaded brush and diluted acrylic paint. 


Using Seth's dies I die cut a pile of various shapes from different backgrounds so I had a stash to play with.


I also die cut the same shapes from heavy black card and made sure I had at least two pieces of each design...


...so I could use some for layering and others for heat embossing them with some of Kim's great embossing enamels.


 When heat embossing the pocket watch frame with Steel Sapphire embossing powder I also sprinkled on traces of Hammered Metal embossing enamel - I love to mix embossing powders like that.


I embellished some of the die cut panels with word stickers and added two coats of Emerald Creek Clear Chunk Gloss to create labels and frames. 


Some of the die cut pieces were given additional texture by randomly stamping them with Seth's designs.


I also heat embossed some of these with the Clear Chunk Gloss embossing enamel.


I stamped some of Seth's designs onto the cover using StazOn "Ganache" ink. Then I grabbed the beautiful Stencil Girl stencils I was kindly given for this blog hop event and created a second layer on my cover using beige chalky finish paint and opaque orange acrylic paint. I used the Techno Insiders Circle stencil on top of the stamped on circle near the centre to create my focal element. They are a  perfect match, aren't they?


Then it was time to play with all my die cut, stamped and heat embossed pieces! I used tacky glue to fix them to the cover. Some were outlined with a white gel pen and/or a black fine tip china ink marker.


Some detail shots that show the layering and "weaving" of the die cut pieces, the stencilled on patterns and stamping.


And once more the finished journal:


Now it's time to visit the others' blogs and check out their amazing makes! Loads of yummy inspiration are waiting for you - I promise! 

Thank you so much, Stencil Girl, for this wonderful opportunity to play with your fab stencils! Thank you, Kim, for the incredible embossing powders you create - they brought me into loving to work with heat embossing! And thank you, Seth Apter, for your awesome designs! They really never fail to inspire me!  


Hugs and happy crafting!
Claudia
xxx


Monday 11 December 2017

Time to wish you all a very...


..., my dear creative friends from all over the world!

 Christmas is fast approaching and over at the Calico Craft Parts Blog the whole design team are already in full Christmas crafting swing. So am I and the image teaser above - as always - just shows a detail of my latest project...so what could it be waiting for you over there today? ....yes, my latest tutorial and project of course...lol. Simply click HERE to get taken to the post and the Calico Craft Parts Blog. I hope you will like my little Christmas project!

Hugs and happy Christmas crafting!
Claudia
xxx