Tuesday 29 December 2015

This Year's Nativity Scene

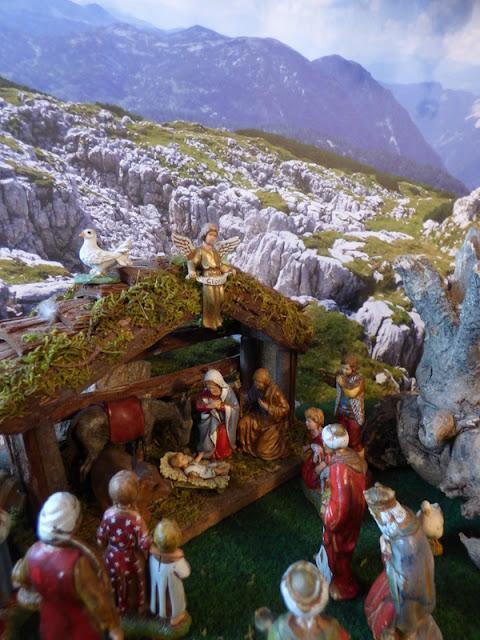
A short post today to share the nativity scene I built this year.

 
As usual I did not paint the planned Alp landscape background (which is called "Hald" (from "heap") in Ebensee, from where this specific nativity scene tradition originates) this autumn and knowing that I very likely would not paint it for next Christmas (or the one after that) either (as landscape painting isn't up my alley at all) I had a sudden lightbulb moment born out of utter despair: I could use one of my photographs I have taken this summer when hiking the Krippenstein to take a look at the marvellous Dachstein glacier from there!!


The more I thought about doing this the better I liked this idea. It would kind of transfer a very old and loved tradition from centuries ago into the 21st century - a contemporary "interpretation" so to say! Yessss!


This is one of the images that made it into the finals...but in the end I decided to go for a background that looked more "close" to the scene with all the children, shepherds, animals and other characters ...


Of course I was too late with getting my printed photo-canvas in time so I could already have it for Christmas eve, but it arrived today and I am more than just pleased with how it turned out! Yay!


I will have to get a bigger base of course for the scene to match the size of the canvas...but that is a lot less "scary" than imagining myself painting a mountain landscape. But then it will always be a work-in-progress project as there will new characters and animals be added and maybe new pieces of bark, new rocks,... just as it is meant to be.

Wishes!
Claudia
xxx

Thursday 17 December 2015

Have a Merry, Grungy Steampunk Christmas!

Servus and welcome to my very first post as a proud member of the fantastic Emerald Creek Dares DT!

http://blog.emeraldcreek.ca/


With this challenge lovely Kim Evans (my new boss) and all the ladies from the DT want to wish you a safe and happy holiday - and so do I!
The aim of this challenge is also to celebrate the holidays around the world and learn a bit of the traditions and other things we all love about this favourite season of the year.

My family and I celebrate Christmas on the evening of the 24th December...by lighting candles on the decorated tree, singing Christmas carols, unwrapping presents (which is accompanied by a lot of "ooohs", "aaahs" and "yays") and having lovely food like roast duck or Wiener Schnitzel with our traditional "French Salad" afterwards.

Many people in Austria also have fondue on Christmas eve and quite a lot of Austrians have simple bratwurst with sauerkraut (which is mainly a habit in the countryside). I am more the roast duck type, but enjoying a tasty bratwurst on an advent market (alongside some hot and sweet punch) is something I love too.

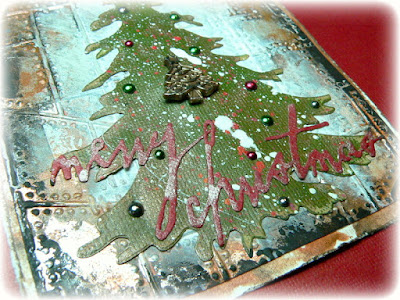
So here's my card with which I want to wish you all a safe and happy Christmas:


I was mainly inspired by the gorgeous Christmas Tree and Victorian- and Mini Victorian Snowflake charms from Emerald Creek. I knew immediately that I had to make one of the beautiful snowflake charms the topping star on my grunge Christmas tree!


The tree shape was cut from a sheet of Nostalgic Kraft Core by using Tim Holtz'  Sizzix Evergreen die. My sentiment was cut from Kraft-Core too, using the gorgeous Tim Holtz Thinlits "Handwritten Holidays" die set.


The background was made by sticking pieces of Ranger Metal Foil Tape Sheets onto some cardboard and running it through my Sizzix using the Tim Holtz Riveted Metal embossing folder.


To cover the white spots with a metal tone too I dabbed on some brushed pewter Distress Stain and wiped back the excess on the foil tape with a soft damp cloth. I knew that even if it both looked silver-y the foil tape areas would react differently to paints and stains than the areas with just the brushed pewter on them. Adding a bit of "randomness" this way always helps with adding more depth and detail to grunge projects! It is as if you trick yourself and thus prevent yourself from working too neatly (which always looks kind of "strange" with grunge projects).


 After that had dried I dabbed on some Antiqued Bronze Distress Paint and sprayed it with water to create drip lines.


As I always try to make most of my paints I decided to swipe my cut out tree through the run down paint on my desk. That also helped blend in my tree with the metal looking background.


While my tree was drying, I dabbed on more Antiqued Bronze and Black Soot Distress paint to my background, wiped some of it off with my cloth or went back in to add more with other spots until I was content with the look.


I also used the Antiqued Bronze Distress Paint to make my silver snowflake charm match the bronze look of my background.


As I found the loops on my charms weren't needed for use on my card I simply cut them off using large cutting pliers.


The die cut sentiment was swiped through some Brushed Pewter Distress Stain on my Ranger Craft Sheet to blend it in as well.


Next I sprinkled some diluted Barn Door and Picket Fence Distress Paint onto my tree using a soft fine tip brush.


To make my tree shape stand out from the background I dabbed some more Picket Fence Distress Paint on and spread it with my fingers. While it was still wet I wiped back most of it, moving my cloth from the outside towards the center of my card thus creating a kind of shading.


For a finish I glued the tree, my sentiment and the charms in place and dabbed some Black Soot Distress Paint around the outer edges of my card to create a visible "frame" that draws the focus towards the center.


To tone down the clean white edges of the card I wanted my finished piece to mount onto, I loosely dabbed on some Antiqued Bronze Distress Paint here and there.


The last finishing touch was to add some half pearls for a little more bling.


Voilá! 


 If you hop over to

http://blog.emeraldcreek.ca/


you will find more inspirational projects made by my teamies! By playing along you also get the chance to win a fantastic $25 voucher for the Emerald Creek online store! (they ship world-wide by the way ;)

http://www.emeraldcreek.ca/default.asp


 I hope you have enjoyed your visit with my little creative spot!


I wish you all the most wonderful Christmas eve and holidays!!! 

Hugs and happy crafting,
Claudia 
xxx


Friday 11 December 2015

Altered Domino Christmas Ornament Tutorial

Servus and welcome to my little (and rather quiet) creative spot!

This is just a short post today that is meant to invite you over to DecoArt's Mixed Media blog where I am sharing a tutorial on how to create this Christmas ornament by altering dominoes.

http://decoart.com/mixedmediablog/project/373/altered_domino_christmas_ornament


I hope you like it and are having a joyful advent season!

Hugs and happy crafting,
Claudia xxx

http://decoart.com/mixedmediablog/project/373/altered_domino_christmas_ornament


Tuesday 1 December 2015

SanDee&amelie's Steampunk Winter Special Challenge - Part Two

Servus and welcome to my little creative spot!

By now I am sure you are all in full advent season swing and enjoying ginger bread, eggnog, hot toddy, punch, glogg or some of the other tasty seasonal delectabilities...

...so maybe steampunk crafts might not be on your radars, but I have tried to combine Christmas card making and steampunk or industrial influences to maybe lure you a tiny bit into creating a little something for our special winter challenge over at SanDee&amelie's Steampunk Challenges!

There is still the whole of December to give it a go and by doing so get eligible for one of two prizes...

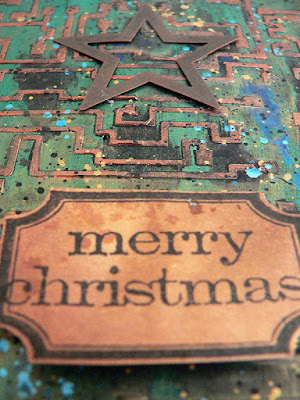
My creation for our "Anything Goes - Steampunk/Industrial" challenge is as technical as it is "bling-ish". lol


I have used foam board as the substrate to work on as it takes stencilling really well and has a more "massive" look to it than paper or card.

And I just had to use my newly bought DecoArt Americana "Short Circuit" stencil (of course)!


To create the background for the circuit I first painted my cut to size piece of foam board with DecoArt media black Gesso. Then I applied Vaseline in some spots with my fingertip and painted some DecoArt Elegant Emerald Metallic Lustre on top. The spots with the Vaseline didn't take on any of the Metallic Lustre so I could wipe off any excess from these spots with a soft, damp cloth to reveal the black paint underneath.


Next I sprayed on some spritzes of DecoArt media Turquoise Shimmer Mister. After that had dried I stencilled on the circuit using DecoArt media black Modelling paste and let dry naturally.

To highlight the circuit I applied some "Copper Kettle" Metallic Lustre using a flat and rather rigid piece of cut'n dry foam.  And to finish off my piece before glueing on the stamped label and metal star I sprinkled on some more turquoise Shimmer Mister as well as diluted DecoArt media Metallic Gold, Charcoal Grey and Carbon Black paint with a thin fine tip brush.


I hope to see you over at our challenge blog! Maybe I will get to see some awesome steampunk or industrial Christmas tree ornaments or cards! ;))

The challenge is open until the end of December! To get there just click on the image:

http://sandee-and-amelie.blogspot.co.at/


Hugs and happy crafting,
Claudia
xxx