Showing posts with label metal. Show all posts

Wednesday, 15 February 2017

New Stash/Forgotten Stash - SanDee&amelie's February Steampunk Challenge

Servus, hello, welcome and thank you so much for stopping by!

Today I want to share with you my latest DT project for SanDee&amelie's Steampunk Challenges. This month we have a theme and it is

New Stash/Forgotten Stash

which means that we want our players to create a steampunk or industrial style project on which they use either an almost forgotten item from their stash or something new (that they got for Christmas for example). Or both. ;)

After long consideration I finally decided to give to myself for Christmas the lovely Tim Holtz "Village Brownstone" die from Sizzix. And as I wanted to create a little steampunk house I also decided to use my (never really forgotten) Tim Holtz Diamond Plate and Riveted Metal embossing folders.


Alongside with these I used quite a collection of DecoArt's fab Metallic Lustres to give my steampunk house a metal look. 


And here it is:


I used some heavy black cardstock for cutting out the house parts and then gave them a coat of Black Shimmer Metallic Lustre for the roof and Silver Spark for the other pieces. I applied the Metallic Lustres as you would apply normal paint - simply wet a bristle brush and the Lustre too so you can take up enough "paint" for brushing it on.


Afterwards I dry brushed the dried pieces with DecoArt media black Gesso for a grungier look.


The windows and door were given a coat of Iced Espresso Metallic Lustre. 


To make my house sturdier I cut out a base plate from a piece of foam board so I could glue the house "around" it.


Using my mini hot glue gun I assembled the house parts after I had glued the door and window frames in place using DecoArt matte Decou-Page.


Then I distressed all the edges with black soot Distress Crayon. 


To add a bit more colour to my house I added dashes of Copper Kettle and Gold Rush Metallic Lustre here and there: 


et voilá:


I just love how very "metal" my house looks. The effect of the Metallic Lustres is just amazing!

If you hop over to our challenge blog you will be able to learn about the new or forgotten stash my teamies and our players have used so far. I would love to see you play along! As always we have two prizes to give away - generously donated by our wonderful sponsors DecoArt media and boozybear! So don't miss the chance to win!

Hugs and happy crafting!
Claudia
xxx


Saturday, 15 October 2016

My Own Little Farnsworth! Yay!

Servus, hi and welcome! I am so glad you're stopping by!
Today I have a little somethin' to share with you that I had wanted to do for a long time...but haven't dared to approach...until now!

Fans of the awesomely charming and fun TV series "Warehouse 13" already know what I am talking about as they know that awesome steampunk-ish communications device that Archie's team use to update each other on the latest artefacts and their powers and effects - the Farnsworth!
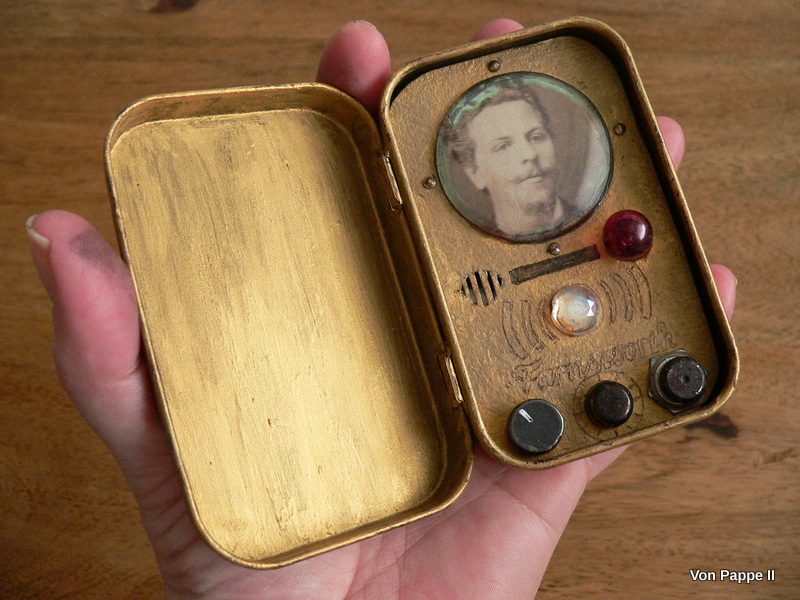
And here's my version of it - made from an altered tin.


It is my project for this month's "Anything Goes - Steampunk/Industrial" challenge over at 


- and I would love to see you play along with us soon! 


Don't ask me who this guy is that's talking on the phone...I haven't seen him before...maybe a new member of Archie's crew...


I started by searching my bits 'n bobs box for small buttons, screws and switches that I could use for my Farnsworth. A watch glass from my old watchmaker's cabinet was perfect for the little circle screen and the light bulb was turned from white to red using alcohol ink.


To help the DecoArt Metallic Lustre adhere to the tin I first gave everything a coat of matte DecoArt Decou-Page and then a coat of DecoArt media black Gesso. That luckily provided enough tooth for the Lustre to cling to. I used the Metallic Lustre like paint - applying it with a soft wide flat brush.


I cut out the openings for the light bulb and for the speaker.


Then I glued on all the pieces after I had "engraved" the "Farnsworth" logo using a black ball pen.


I stacked some thick corrugated card pieces to insert my finished operations board into the tin and added four gold half pears around the circle screen.

Voila! 


 This is the size of my Farnsworth - a bit small, but I couldn't find a larger tin so far. So a mini version will have to do for now.


It was great fun to make and the result looks astonishingly convincing! Well, at least to me...lol

Our Anything Goes - Steampunk/Industrial challenge over at the SanDee&amelie's Steampunk Challenge blog is still open until the end of the month! Make sure you check out the makes of Team A and B and let yourself be inspired by the variety of projects made by my awesome DT which I am so proud of! ;) Just click HERE to get to our challenge blog and I hope to meet you over there soon!

Hugs and happy crafting!
Claudia
xxx


Thursday, 15 September 2016

Steampunk Necklace Tim Holtz Style

Servus, my dear creative friends and followers!

Today I am sharing a little steampunk style necklace with you that I made using Tim Holtz' rectangle Ornate Frame Sizzix BigZ die with shrink plastic, DecoArt media Liquid Glass and some of the cool Tim Holtz idea-ology bits (the cog and the jump rings).

It is also my inspirational project for our September challenge over at SanDee&amelie's Steampunk Challenges (being part of Team B who always present their makes in the middle of each month).


I got the idea while I created this altered steampunk notebook, so I went ahead and die cut the lovely ornate frame from shrink plastic too (mainly because I wanted to find out if the detail of the ornate frame would get lost during shrinking...which it didn't. Yay!).


Before I went to shrink it using the heat tool, I sprayed the die cut frame using the turquoise DecoArt media Shimmer Mister.


A bit of a golden sheen was added using Gold Rush Metallic Lustre after the frame had shrunk to pendant size.


Then I gathered some small watch parts, a very (!!!) clean non stick craft sheet and the DecoArt media Liquid Glass. I simply placed the frame on the craft sheet and filled the opening with the liquid and placed my cogs and gears and other bits into it using a pair of tweezers.


Then I added some IndigoBlu gilding flakes....


...and put some more Liquid Glass on top. As you can see it looked quite uneven at that stage but as the Liquid Glass is self levelling...


... it had all turned into a flat surface after a few minutes.


All I had to do now was wait and let my pendant dry naturally. And be very very patient! *sigh
After I had used quite a thick layer of Liquid Glass I left my piece untouched for two full days. And I really managed not to touch it too soon!!!!
It would have been such a shame if I had left a fingerprint by testing too early!!!


Then I gathered my idea-ology jump rings, some idea-ology cogs and a turquoise bead from my stash and played around with all the bits until...


...I was content with the look of my necklace. Et voilá!


I hope you like my little easy-to-make pendant and the necklace! Please, hop over to our steampunk challenge blog to check out the makes of my teamies AND the projects already entered - there's so much inspiration there to gather! I hope to see you play along with us soon!

Hugs and happy crafting,
Claudia
xxx


Monday, 1 August 2016

SanDee&amelie's Summer Special 2016 - Altered Steampunk Notebook

Hi, servus and I hope you have all been enjoying a lovely summer so far!

As every year we are doing the two months long challenge for July and August over at SanDee&amelie's Steampunk Challenges so you can all enjoy the sun and a great time outside without having to worry about missing our challenge or the chance to win one of our prizes or make our Top5.

Team B (including humble me) are sharing their projects today to remind you of our challenge and provide you with additional inspiration. If you haven't checked out the makes of Team A at the start of July and our additional Extra Steam Power posts, I highly recommend you do so too! Just hop over to our challenge blog and get yourself a good dose of steampunk mojo!


We have three instead of two prizes to give away this time as lovely Glenda from boozybear steampunk chipboard pieces is generously donating another surprise package for a lucky winner!

I have altered a little notebook I have been given by my lovely friends who collect alterable stuff for me!


This is the little notebook in its humble beginnings:


I had a happy, messy play with shrink foil (not sure if this is the proper translation - maybe it is "shrink plastic" in English, but it says "Folie" (=foil) in German), some of my favourite steampunk stamps, DecoArt Dazzling Metallics, black Gesso and modelling paste, the new Tim Holtz Sizzix BigZ "Mosaic" die and a TCW gears stencil.

And this is the result:


Sizzix dies work great on shrink foil! As you can see I also die cut the rectangle ornate frame which I used for another project I am going to share with you over at the SASPC challenge blog later this month.


I used black archival stamping ink to stamp my images onto the frosted side of the cut out shrink foil pieces.


This image shows the rubber stamp and the already shrunk panel to its right so you can see how small shrink foil pieces get (about the third of the original size).


I have to admit that I stopped taking images a little later during the process as I got completely carried away while drybrushing....but I will try to explain everything in detail!

The book was covered with a coat of black Gesso first. Once that had dried I added black modelling paste through a gears stencil and let that dry naturally.


To make the stencilled texture visible I dry brushed the cover with different tones of DecoArt Dazzling Metallics (starting with Copper, then adding Moss Pearl and Teal in some spots). I also lightly dry brushed the cover with a mix of Light Buttermilk and Navy Blue Americana acrylic paints to tone down the metallic sheen a bit.


Sorry that there are no images of the single stages...I mainly dry brushed the cover with different metallic and matte paints and followed my guts until I was content with the look.


The good thing with acrylic paints is: you can go in and add and cover up and add until you like what you see. Acrylic paints are very forgiving as they dry pretty quick...so new layers can be added almost instantly to change the tones and looks.


This image of the finished book shows the different paints and tones I used - you can spot the Copper, the Moss Pearl, the Teal and the Orange Flicker Metallic Lustre:


I also used the Orange Flicker Metallic Lustre to stencil on the "Dream" word.


The edges of the shrink foil tiles were treated with Orange Flicker too. I used my fingertip to apply the metallic Lustre. Then the tiles were flipped over and given a thorough coat of heavy white Gesso at the backs before I glued them to the cover using matte Decou-Page.


I also painted the rubber band that keeps the book closed with Orange Flicker so it would match the design.


The back and spine of the notebook were painted with black Gesso too and then given light strokes of Orange Flicker and Cosmic Blue Metallic Lustres. Et voilá!


The advantage of using black Gesso as a base coat is that you can directly add the black modelling paste to it and that they form a great base for adding on paints (without the use of having to paint a base layer of a darker tone first). I also sprinkled on some gold and dark brown spray paints and stamped on a crackle pattern here and there for more texture:


And that pretty much sums up the whole process. I hope you like my little steampunk notebook and leave inspired!

There is time until the end of August to enter up to 5 projects (instead of the usual 3 projects per player limit) to our summer special challenge! So I hope to see you over there and play along soon!

Hugs and happy summer crafting!
Claudia
xxx