Showing posts with label storage. Show all posts

Tuesday, 18 February 2020

Fill it with Circular Shapes - Altered Tin for StencilGirl Products

Hi, servus and thanks for stopping by!

Time to share my latest project and video tutorial for StencilGirl Products! This month the theme for the creative team was "Frame it or fill it with circular shapes" and I have not only "filled" a substrate with circular shapes but I also used a circular shaped substrate - a ginger bread tin.


Altering boxes and tins is one of my favourite things to do as I find it very rewarding.

I have done a full video tutorial this time in which I show various ways of creating circular shapes like stencilling on tea or coffee pads for example. The full list of StencilGirl stencils and DecoArt Americana paints and products used is over at the StencilGirl Talk blog. Simply click HERE to get the blog post where you will also find the video and more images of the finished project.


I hope to see you over there soon! 

Hugs and happy crafting!
Claudia
xxx


Monday, 4 March 2019

Tea Time and Steampunk

...go together really well I found. ;)


See?
I was so happy when I found out that "Tea Time" is not only part of "Steampunk Time", but that you can also arrange the letters symmetrically. How cool is that? (and those who know me know that I love me a good dose of word and letters play ;)


There are some new fab wood shapes out in the Calico Craft Parts store - like the plain scrabble tiles I have used to put my letters (also from Calico Craft Parts) on...or some amazingly cool Mechanical Clockwork wood shapes like this one:


I have come up with a new way of painting these intricately detailed wood shapes so they look even more dimensional and defined and yet still keep all of the beautiful laser engraved texture and detail (because it easily gets covered up with acrylic paint if you apply it too generously).


Oh, and what a pleasure it always is to browse my stash of Mini MDF Wood Shapes - just to find perfect matches for designs I have in mind...and also one or the other bit to add to a design and create even more interest...


Of course I have used some of my favourite DecoArt products and paints to create some matte metallic bling (love the new Matte Metallics!), a subtle interference paint effect and - of course - cool crackle.

There's a detailed tutorial and loads of images over at the Calico Craft Parts Blog. I hope you will join me over there!

Hugs and happy crafting
and - as always  -
have a good start into the week!

Claudia 
xxx


Tuesday, 18 September 2018

Storing Stencils - a StencilGirl® Project

Servus, dear crafty friends! I hope you're all doing fine!

Today (and this month) it is all about studio storage over at the StencilGirl® Blog - and today it is my turn to share with you a little studio tour and how I store my stencils.

How do you store yours? Do you like to have them close at hand, ready to use with just one grab like I do?
Do you clean yours? I have stopped cleaning mine because I am not good at it and tend to bend over parts. And I have no space to keep a water filled large container by my desk to directly dump the used stencils in after use.
Do you sort yours by size or themes (or both)?

Well, if you hop over to the StencilGirl® Blog, on my post there today I am sharing a bit about my way of storing my stencils (and also some other stuff that I like to have close at hand or in my field of view for inspiration). I also have a tutorial for you that shows a possible way to store the smallest size stencils and have something inspirational to look at at the same time.


Hope to see you over there!

Hugs and happy crafting!
Claudia
xxx


Thursday, 13 September 2018

From Trash to Treasure - over at the DecoArt Mixed Media Blog

Hi, servus and welcome to a short invitation to my latest project that's going live on the all time inspiring DecoArt Mixed Media Blog!

Those who know me, know that I am a hopeless hoarder of everything alterable - especially boxes of all sizes and kinds - cigar boxes, wooden boxes, cardboard boxes, chocolate boxes (I even empty these myself - all for the sake of art!)...my wonderful family and friends are always on the lookout for empty boxes - so I never run out of any (only of space to store them in).

This time I upcycled a sturdy cardboard box that once held a new mobile phone - it was a wonderful format to work on!
And of course I had to use my newly bought Tim Holtz 3D embosslits alongside many of my favourite DecoArt and DecoArt media products too!

So if you want to find out what I turned these die cut and embossed (in a single go!) beauties into...


...and how I created the background for these beautiful paper embellishments...


...simply click HERE to get taken to the post and the DecoArt Mixed Media Blog! Hope to see you over there!

Hugs and happy crafting!
Claudia
xxx


Monday, 19 March 2018

Layering paints on Calico Craft Parts

Hi, servus and thanks for stopping by today! It is once more time to invite you over to the Calico Craft Parts Blog to check out my latest project and tutorial.

This time I have layered acrylic paints of different kinds in different ways to create a lot of depth and - who would have guessed - different patterns. I have combined DecoArt Americana premium paints and media, DecoArt Chalky Finish paints and DecoArt media fluid acrylics on my project to vary in texture, translucency and finishes.


As you can see I have also added a bit of stamping with some of my favourite Seth Apter stamps for additional texture.

To find out about the finished project and the different techniques I have used to create this layered mixed media effect, simply click HERE to get taken to the post over at the Calico Craft Parts Blog.

I hope to see you over there!

Have a good start into the week!
Claudia
xxx


Monday, 4 September 2017

How to store and display tiny treasures at the same time - a Calico Craft Parts Project

Hi, servus and thank you for stopping by, dear creative friends and followers!
It's once more time to invite you over to the Calico Craft Parts blog to find out about my latest project I have done with some of Calico Craft's latest craft parts!

Some of you already know that I love to go fossil hunting! Sadly most of my found treasures had spent the last two years stored away in closed boxes, wrapped up safely, but this way also hidden away from sight.
I simply didn't have a cabinet or other display to store them in AND have them at display at the same time...until Helen came up with the new tray kits in many different styles! They're just perfect and I will definitely be making more of these!


If you have some tiny treasures too that you want to store "museum style", my tutorial over at the blog might be the one for you!
I hope to see you over there! Have a good start into the week!

Hugs and happy crafting!
Claudia
xxx


Tuesday, 8 October 2013

Steampunk Storage - Try It On Tuesday's challenge and a new tutorial

Hello and welcome back, dear crafting friends, readers and followers!

Today it is time for a new challenge 
and this fortnight the theme is 
"Textures"! 

LOVE IT! 

My team mates obviously loved it too and created an awesome bundle of inspiration for you, so hop over to Try It On Tuesday to have a look around and be inspired!

This month we have

as our generous sponsor 

and there's the chance to win $10 dollars to spend in their store 
- so take a chance and join the challenges in October! ;)


It's also time for another tutorial. Yay! So get yourself a cup of tea or coffee as this is once more going to be a picture heavy post.

So here we go. This is my DT make for the "Textures" challenge and I so enjoyed playing with all of my favourite stuff - Acrylic colours, Metallic rub ons, dies, crumpled paper and crackle media!


For my storage box I used:
- a wooden goose eggs box, which I had hoarded since last Easter

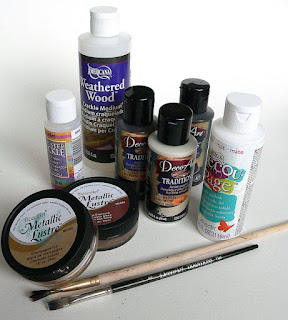
- some DecoArt products:
- DecoArt Traditions Acrylic Colors: burnt   umber, raw umber, medium white
- DecoArt Metallic Lustre: Iced Espresso, Champagne Ice
- DecoArt Weathered Wood Crackle Medium
- DecoArt OneStep Crackle
- DecoArt Decou-Page matte

- some brushes, baby whipes, glue
- box feet, metal bookplate, brads
- Sizzix and X cut dies: layered wings, gears
- Sizzix embossing folder "rivets"
- black card
- sandwich paper
- DI "walnut stain"


1. For a start I cut a lot of gears from heavy black card.


2. Then I cut a pair of wings from the same card. I used the Tim Holtz "Layered Wings" die from Sizzix.


3. I ran the wings' layers through the Sizzix using the Sizzix "rivets" embossing folder.


Tadaah:


4. Afterwards I glued the layers together to finish the wings. They were set aside to dry.


5. As my box had a paper label on it which I could not remove completely, this inspired me to add some texture using sandwich paper.

To do so I tore some scraps of sandwich paper to glue them to the box (and thus cover the peeled off paper spot on my box).


6. I glued some more scraps to different areas of the box using DecoArt Decou-Page matte and made sure that I created a lot of crumples by squeezing and pushing with my fingers while the glue was wet.


7. I used Decou-Page too for attaching gears to my layered wings...


8. ...and also for glueing the gears to the box.


9. Then I painted the insides of the compartments with DecoArt Traditions acrylic colour "burnt umber".


10. For the outside I used DecoArt Traditions acrylic colour "raw umber" and stippled the colour to the surface instead of brushing it.


As the sandwich paper showed through after the first layer I added another one.


11. I also painted the wings with the same colour from both sides.


12. After the colour had dried I glued the wings to the box after I had inserted two tiny brads.
At that state it looked like this:


Then I added some DecoArt Weathered Wood Crackle Medium with some spots of my box.  (See the darker shiny areas? That is where I brushed on the Weathered Wood)


13. As soon as they were touch dry I covered these spots with DecoArt Traditions acrylic colour "Medium White" and watched the crackle magic happen.


14. I rubbed on some DecoArt Metallic Lustre "Iced Espresso" and "Champagne Ice" for some highlighting.


This made the crumpled paper texture and the rivets pop out beautifully!

15. I cut a piece of card (from a left over paper scrap from a Tim Holtz wrinkle free distress technique session) for my metal label and after stamping on it I gave it a coat of DecoArt OneStep Crackle Medium. After that had dried I added another coat and that produced some fine crackles in which I rubbed some Distress Ink "walnut stain" to make them more visible.


16. For a finish I glued the label with two brads and some idea-ology box feet to my altered box and let dry. Done!


Some more close ups:


I hope you like it and have fun altering your own boxes! Can't wait to see your makes for the "Textures" challenge over at Try It On Tuesday either!

Hugs and happy crafting,

die amelie xx

Tuesday, 1 October 2013

Steampunk Tic Tac Toe - Sandee&amelie's Steampunk Challenge for October

Hello and servus from Vienna, dear Steampunk friends, readers and followers old and new!

I am glad you stopped by and I would love to invite you to our new challenge for october and we decided to play 

Tic Tac Toe 

this time 

So all you have to do is choose three ingredients in one straight line from the diagram shown over at the challenge blog and use them for your projects.

I decided to go for metal, texture and letters and altered an old espresso tin to turn it into a tea tin for my beloved Lady Grey tea bags.


"Where's the Steampunk element in it?" I hear you ask... so here it is:


 (not very much steampunk this time, but the altered metal of the tin itself looks very  "industrial" to me - so I dare say it is steampunk-ish at least. ;)

I bought an awesome embossing folder recently for Euro 2,99 only and I LOVE it! I ran a piece of Kraft Core through my Sizzix using this embossing folder, which creates lovely "grunge stripes".


You can see it to the left of the picture. You can also see (a part of) the tin as it looked before (and the alcohol inks and Distress ink I used for this project).

You can also see the piece of Kraft Core after I had run it through my Sizzix and blended it with Distress ink.
I had some left over die cut letters made from funky foam, which I used for my "Tea Time" label.

The Kraft Core was sanded and blended with DI "gathered twigs" after embossing which makes the grunge stripes pop out even more.

The tin was given a treatment with alcohol inks in earth tones before I glued the embossed and inked piece of card to it.

The tin's lid was given the same treatment only that I used an embossing folder with gears for the piece of Kraft Core I put on top of it.


Done! I played around with some embellishing for a while but removed all of it as I really love the simple industrial look of my tea tin as it is.


Hope, you like it too and I look forward to seeing your TicTacToe creations entered to our challenge soon! SanDee and our special guest for this month have prepared some awesome makes for your inspiration - so check those out! They would love to have you visiting their spots too!

Hugs and happy crafting!

die amelie xx