Saturday 22 September 2018

Rest in Peace, Myrtle Mulgrave! - Halloween Fun with Tim Holtz Dies and Bubbalux Craft Board

Hi, servus and welcome to another fun Halloween project today! It seems I am on a real roll this year with Halloween projects. Obviously reducing my design team commitments has been the right thing to do. With more time for projects that are just for fun (and just for me. myself and I) inspiration finds me more often and faster. And with all the awesome Halloween projects out there you just can't help being infected with the Halloween crafting virus, can you?

I have once more used the cool Bubbalux Craft Board (as in this project over HERE) - the white and yellow one this time - and once more I just loved the many different possibilities being given by this product and especially its sturdiness - it's perfect to create 3D projects that stay in shape AND are light weight at the same time.

I was inspired by some fabulous projects from some talented ladies that I recently saw (on the inspiring Tim Holtz Addicts facebook group), on which they were using the new Tim Holtz Tombstone Overlays (for the Etcetera Tags) to create the most fantastic tombstone projects.
Being in Austria, getting one of these is not only a matter of good luck but also of a long waiting time (due to shipping times from outside of Austria) - so mostly I am late to the party with latest releases...so I decided to find a way around that and create my own "tombstone overlays" using some of Tim's fab products from my stash - mainly his Alterations Halloween dies. That was great fun! And using his dies to cut the shapes from Bubbalux Craft Board just worked wonderfully!

So I have come up with this own version of a Tim Holtz Tombstone project. I hope you like it!


I have also done a how-to for you.

And here's the list of Tim dies and die sets I have used:

- Headstone (Alterations)
- Iron Gate (On the Edge Alterations)
- Pediments (Alterations)
- Trophy Antlers (Alterations)
- Labels (Thinlits)
- Garden Greens (Thinlits)
- Feather & Ravens (Thinlits)


I started with cutting out the needed pieces from white Bubbalux. As you can see I cut out some more pieces so I could try out different designs.


I removed the protective foil AFTER die cutting the Bubbalux pieces. This way any black foam residue from the dies was removed as well.


Then I sanded all the edges and cut off the top of the headstone shape (as that was going to be replaced by a pediment piece). I also die cut another bottom part of the Headstone shape so I could layer pieces to create the impression of the tombstone sitting on a wider stone base.


I added some lines and other detail to the pieces with hand embossing.


To bend the iron gate shape to create a little fence for the grave, I heated the Bubbalux with my heat tool and quickly bent it into shape around a jar. I held the piece in place with my fingers until it had cooled down.


Then I placed the shaped fence piece onto a flat piece of yellow Bubbalux and traced along the curved outside with a ball point pen. Using large scissors I cut out the drawn shape to create my base. I left an overlap at the back for the tombstone to sit on and even added another half inch to the base's depth for a better stand.


Using some of the lovely Tim Holtz Thinlits dies sets I die cut some twigs from sturdy white cardstock to decorate the tombstone with.


The little plate shape from the Trophy Antlers die was the perfect shape to put the portrait of Myrtle Mulgrave on. (May she rest in peace!)

I used black DecoArt media Gesso to prime all the die cut pieces. I stippled the Gesso on with an old and worn bristle brush. This way I already created some rough texture with my base layer. I let everything dry naturally (as heating the Bubbalux will make the pieces warp a little).


Once dry I stippled on some DecoArt media Texture Sand Paste and let that dry naturally as well.


In the meantime I heat embossed my smaller cardstock shapes and the Bubbalux base plate using Emerald Creek embossing powders Hammered Metal, Moss Stone Green, Clear Chunk Gloss and Vintage Ivy.


The hand punched portrait got three layers of the Clear Chunk Gloss embossing powder for a dimensional look.


Using a wide soft flat brush I dry brushed DecoArt premium Warm Grey acrylic paint onto the tombstone pieces. First I had glued the pieces together using superglue.


I also used superglue to assemble all the finished pieces.


The iron fence was loosely painted using DecoArt media Silver Metallic paint and Lamp Black Americana paint. I also added touches of the Silver Metallic paint to other parts of the tombstone to visually fuse all the elements. Et voilá!


Some detail shots:


...and once more the finished piece:


Thanks for stopping by, dear crafty friends! I hope you like my self made "Tombstone Overlay". ;)

And thank you, Floortex, for generously letting me have some Bubbalux to play with for free! 

Hugs and happy crafting! 

Claudia
xxx


Friday 21 September 2018

Boo! - an (almost) all Tim Holtz Shadow Box

Yessss! It is that time of year again - time to get out all my Halloween dies and stamp sets, which are mainly Tim Holtz design ones....yes, I simply can't help buying his stuff. Almost everything he designs is a must-have for me...lol
But I know I am in good company with being a Tim stash hoarder. And I know a lot worse ways of how to spend my pocket money ;)


Some of Tim's stamp sets simply call for being used for fun dioramas and shadow box projects - like the cute Haunted House set. Perfect to create a little Halloween scene shadow box!


I haven't done any steps images as I was being carried away during the process (I will add the links to the mentioned dies and stamp sets instead).
A process that started out while browsing my Halloween stash and deciding to use as many of my treasures in a single project as possible....lol. The project was also inspired by the lovely Holiday Shadow Box die set by Katelyn Lizardi. You can definitely do so much more with that one than a winter or Christmas themed shadow box (but everything you need to create one of these comes with the amazing dies set).

 I just used the main parts for the shadow box (the front and back and hills with the glue taps) and simply snipped off the leaves from the trees to get a spookier look.


I combined some of my other favourite Tim Holtz dies - the On the Edge - Graveyard die, the Drip Edge and Twisted Edge Thinlits dies and the Vintage Spirits die set - with stamped images from the Haunted Mansion and Mini Halloween #5 sets.

They all came together just beautifully! I prepared the background for all the die cut pieces by using an artists sponge and dabbing on mixes of grey, white and black for all the construction parts and mixes of reds for the Drip Edge and mixes of greens for the "boo" and the Twisted Edge. I used the same acrylic paints to colour part of the stamped images to visually fuse all the elements. 


Once all the stamped, painted and fussy cut parts had been darkened with black archival ink and an ink blending tool they were glued to the die cut "hills" with the glue tabs. The witch was fixed to the back of the front trees with sticky foam pads. 


The Graveyard was also stuck to the back of the front using sticky foam pads. This way there was more room inside the shadow box to create sufficient depth. 


I especially love the top of my shadow box front - it reminds me a bit of a toy theatre. 


To repeat the white from the top piece with the red eyed owl, I added the small quote to the bottom. 
If you have any questions, please, use the comments function or email me. But I think everything is quite clear. There's a short instruction included with the shadow box die set as well. If you want to add more than three layers, simply trim the glue tabs to a smaller width, so there's more room for more glue tabs on the bottom. 


The background was done before assembly of course. I used Tim's background stamps from the Haunted House set and also added acrylic paint splatters using a splatter brush. 


Some detail shots:


Creating this shadow box was such great fun! Halloween - here we go! I am all ready! 


Hugs and happy crafting!
Claudia
xxx

Tuesday 18 September 2018

Storing Stencils - a StencilGirl® Project

Servus, dear crafty friends! I hope you're all doing fine!

Today (and this month) it is all about studio storage over at the StencilGirl® Blog - and today it is my turn to share with you a little studio tour and how I store my stencils.

How do you store yours? Do you like to have them close at hand, ready to use with just one grab like I do?
Do you clean yours? I have stopped cleaning mine because I am not good at it and tend to bend over parts. And I have no space to keep a water filled large container by my desk to directly dump the used stencils in after use.
Do you sort yours by size or themes (or both)?

Well, if you hop over to the StencilGirl® Blog, on my post there today I am sharing a bit about my way of storing my stencils (and also some other stuff that I like to have close at hand or in my field of view for inspiration). I also have a tutorial for you that shows a possible way to store the smallest size stencils and have something inspirational to look at at the same time.


Hope to see you over there!

Hugs and happy crafting!
Claudia
xxx


Monday 17 September 2018

It's Calico Craft Parts Time!

Servus and thanks for stopping by my little creative space! It is Monday - which means it is time to lure you over to the Calico Craft Parts Blog, where I am sharing a teeny tiny shrine today - all done with found objects and teeny tiny mini Craft Parts from various Sheets of Mini MDF Wood Shapes.

I love to have a variety of these at hand as they are great for adding that little detail that makes your projects special. This time I turned them into "metal" bits and pieces for a small mixed media shrine.
You love shrines too? Well, then it is time to hop over to the Calico Craft Parts Blog to see the finished project! ;)

And if that hasn't convinced you, maybe a little sneak peek will do the job:


Hope to see you over there! Have a good start into the week and as always

hugs and happy crafting! 
Claudia
xxx


Thursday 13 September 2018

From Trash to Treasure - over at the DecoArt Mixed Media Blog

Hi, servus and welcome to a short invitation to my latest project that's going live on the all time inspiring DecoArt Mixed Media Blog!

Those who know me, know that I am a hopeless hoarder of everything alterable - especially boxes of all sizes and kinds - cigar boxes, wooden boxes, cardboard boxes, chocolate boxes (I even empty these myself - all for the sake of art!)...my wonderful family and friends are always on the lookout for empty boxes - so I never run out of any (only of space to store them in).

This time I upcycled a sturdy cardboard box that once held a new mobile phone - it was a wonderful format to work on!
And of course I had to use my newly bought Tim Holtz 3D embosslits alongside many of my favourite DecoArt and DecoArt media products too!

So if you want to find out what I turned these die cut and embossed (in a single go!) beauties into...


...and how I created the background for these beautiful paper embellishments...


...simply click HERE to get taken to the post and the DecoArt Mixed Media Blog! Hope to see you over there!

Hugs and happy crafting!
Claudia
xxx


Saturday 1 September 2018

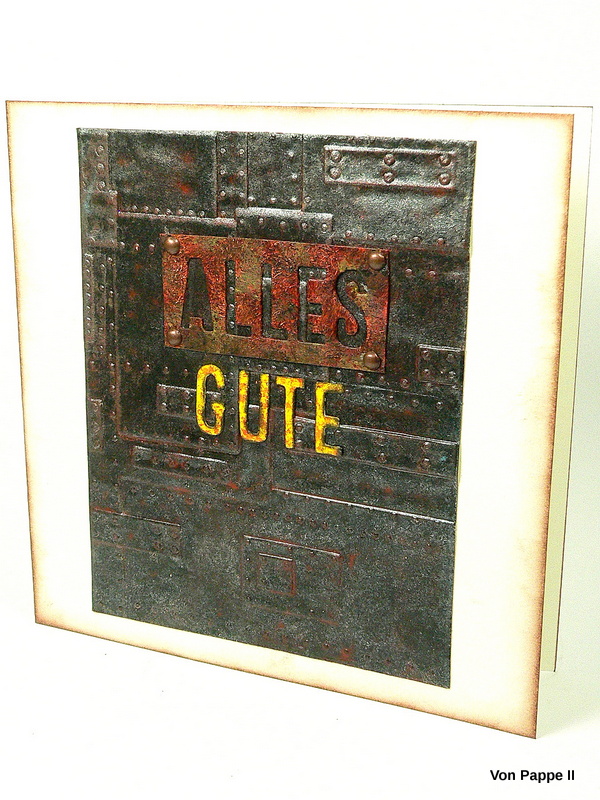
"Alles Gute!" - Steampunk Style Birthday Card for SanDee&amelie's Steampunk Challenges

Hi, servus and welcome back after the long summer break with our two months long summer special to a new challenge over at SanDee&amelie's Steampunk Challenges! We're back to monthly challenges as usual and the theme is once more an "Anything Goes - Steampunk/Industrial".
Lovely Maura, my new co-host, is awaiting you over at our challenge blog to present the new makes of the design team!


As it is my husband's birthday today, I have once more faced my personal all-time challenge and created a card. 


"Alles Gute" is German for "all the best" and as it had to be a male card, that was a great opportunity to play with my newly bought "Foundry" 3D texture fades folder from Tim Holtz's latest release. 

The birthday quote was also cut out using Tim's "Alphanumeric" dies set, using both - the cut out letters and the card with the negative space from the cut out letters to create a kind of industrial style sign. 

The result from the 3D embossing folder looks really cool! I followed Tim's advice and misted the paper before I ran it through the Big Shot three times. I used the heat tool to dry the embossed cardstock.


For even coverage I sprayed on a coat of Carbon Black DecoArt media Mister and heat dried my background (as I am an impatient girl sometimes).


Then I created my own "Mister" from one part DecoArt Zinc Dazzling Metallics paint and about four parts water. I thoroughly shook the spray bottle so everything mixed well and then sprayed on a thin layer.


While that was set aside to dry, I cut out my birthday quote using the Alphanumeric dies set and some washi tape to hold the letters in place while running everything through my Big Shot.


To create a quick faux rust effect on the sign-like word, I stippled on DecoArt premium paints Carbon Black and Quinacridone Gold Hue. I used a very worn bristle brush and mixed both paints wet on wet on the die cut piece until I was content with the look.


The letters of the second word were first painted with DecoArt Americana Primary Yellow acrylic paint and afterwards I stippled on the left overs from the Quin Gold premium paint on my palette.


The dried background was given a wash of DecoArt English Red Oxide media fluid acrylic paint.


I also blended the edges of the yellow letters with black archival stamping ink. I recently found some drop shaped cosmetic sponges with a cone-shaped tip and these work just perfect to get the ink into all the narrow corners and tiny openings.


I used a fine tip brush and matte Decou-Page to adhere the quote to the background. 


I also added some tiny copper brads to the rusty sign's corners... 


...before I mounted everything to the card blank with double sided sticky tape. 


zum Geburtstag, 
mein Schatz! 
xxx


Our design team has come up with some very different inspiring projects this month - so hop over to the challenge blog and get your dose of inspiration! I hope to see you play along with us this month! 

Hugs and happy crafting!
Claudia
xxx