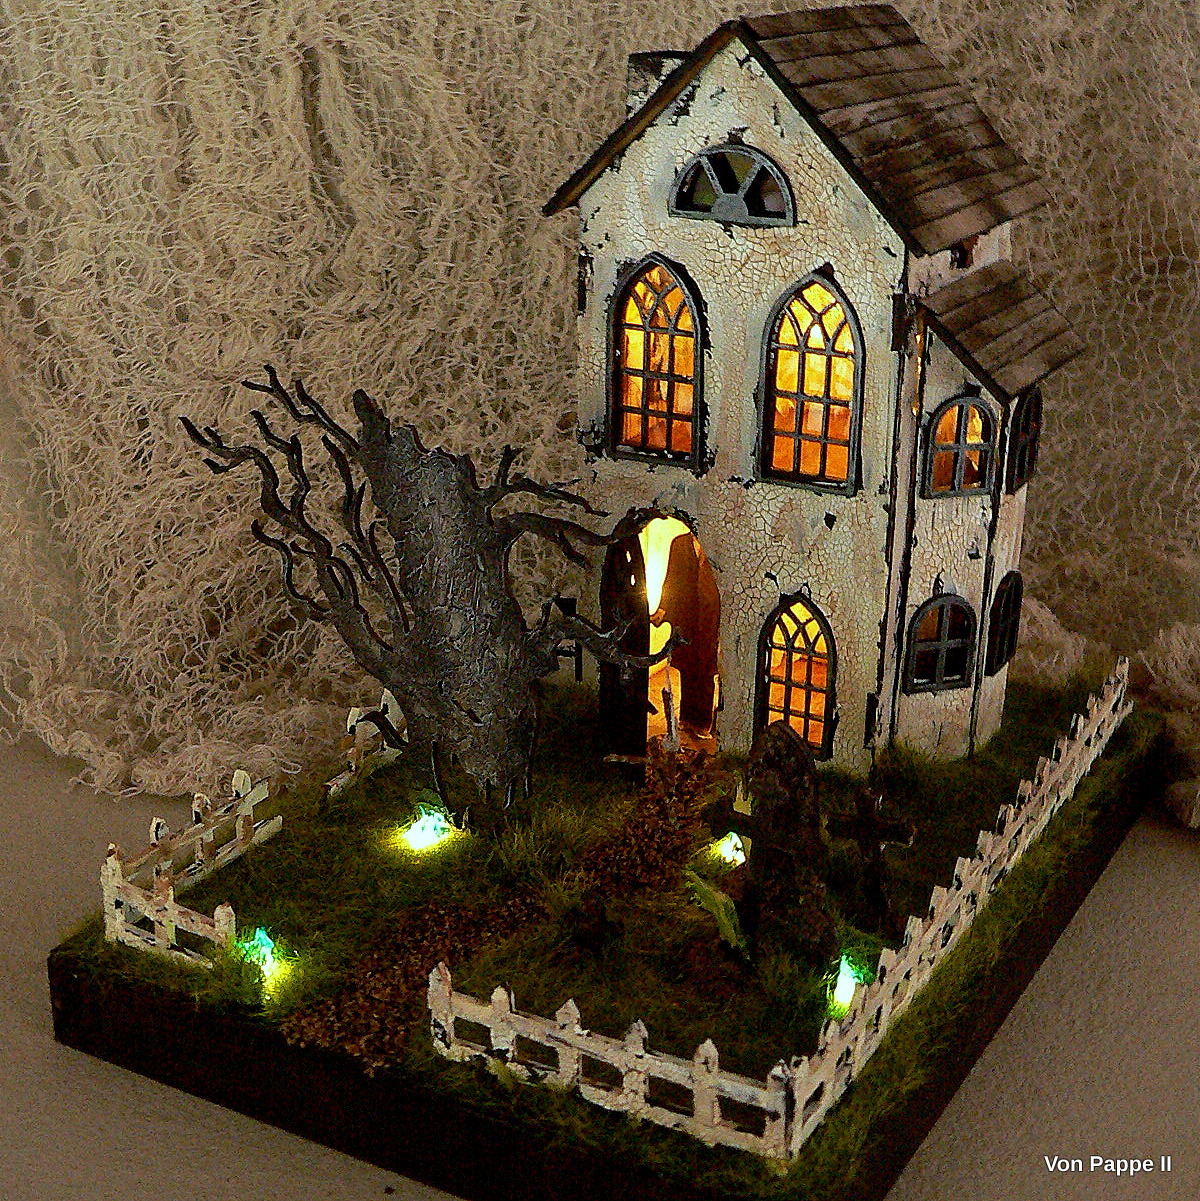
Hi, servus and welcome back to Bitterswick Manor...
and to Part Two of the How-To (part one can be found
HERE...or simply by scrolling down to the previous post ;) . I hope you are ready and eager to learn about how I did the panelling and the painting of the roof shingles and windows and the other final touches!
Part One ends with prepping the embossed, blended and cut into strips wood panels....
...and as I have already mentioned I also blended all the panels' edges with
black archival stamping ink once they were cut to size to fit in the particular areas around the whole manor.
List of products used in Part Two
(as I am sure I haven't mentioned all of these on the list from Part One)
Acrylic paints with a matte or chalky finish: beige, brown, pale green, dark green, medium grey
Metallic acrylic paints or Distress paints
Distress Inks Walnut Stain and Pumice Stone
Distress Stain Pumice Stone
Alcohol Inks Ginger and Rust
Sand or Texture Paste
Masking tape
Decoupage glue
Model railway flocking
Acetate from packaging left overs
Marble (or similar) pattern designer paper
I "measured" the needed lengths by holding the strips in place and making a little incision mark on the strip with my pointy detail scissors at the spot where the panels were to be cut off. If there were panels to be added to a rectangular space with the same width, I simply used the first cut to size panel as my model and cut the following panel pieces by holding my strip close to that panel on my desk.
Then - as I cannot stress enough ;) - I inked all these panels' edges before I glued them in place with the tacky glue.
Using several wood strips of different widths instead of always cutting panels off the same strip for the same area also added to the natural, hand made and random look of the panels.
Cutting the panels for areas that were to go in areas with slants (from roofs and dormers) needed a bit of eyeballing - I didn't go for the exact angles (which only made the panels look even more worn and slightly out of place), so that wasn't too much of a fiddly process - but I admit: it took quite some time. But as it was quite a meditative thing to do, time went by without me really noticing.
I was quite exact though with the cut outs for the window frames if needed (see picture above)!
That wasn't too complicated because these were mostly windows with shutters, so it didn't matter if the opening's width in the panel wasn't an exact fit with the window frame.
I used a black fine tip pen to mark the points where the cut out started and ended, eyeballed the depth of the incision needed and used the detail scissors to cut that piece off the wood strip.
Some parts of my manor weren't covered with wood planks - instead I wanted to have these look as if they had been made from bricks and then plastered and painted. For this I used a
chalky finish acrylic paint in a matching beige tone.
To add some
broken window panes I used
acetate from a left over packaging (the ones the Sizzix dies come in are my favourites! ;). I applied a mix of Rust and Ginger
alcohol inks (using an ink applicator felt on my blending tool) to it and then roughly cut the pieces to size to fit behind the windows - and making sure there was enough overlap for gluing!
I randomly cut some pointy shaped pieces off to create broken window panes to glue behind the window frames from the houses' insides.
I even used some of these cut off acetate scraps for the window in the manor tower and glued these in place one by one.
Creating the
roof tiles was quite easy - thanks to the
Village Rooftops die! I used about 25 to 30 strips for all my roofs and made sure I varied shingle patterns (instead of always cutting the strips at the same point for the same roof side).
The picture shows that I still hadn't glued the manor roof in place at that point - which made it a lot easier to handle while adding the roof tiles strips to it! I used medium weight black paper for this and added some
dry brushing with a
medium grey acrylic paint with a chalky finish (using a soft flat brush) later to highlight the tiles' pattern.
The
shutters and window frames were painted with
brown acrylic paint first and then with a
muted green on top. These also got a layer of dry brushing with the
medium grey chalky finish paint.
Some of the smaller roofs weren't covered with roof tiles but with more wood panels instead.
The chimney pipes, the manor tower roof plate and spikes were painted using a bronze metallic paint with a matte finish.
The planks for barricading the windows were done by cutting some of the wood strips I had made in half lengthwise and blending them with Distress Ink Walnut Stain. These were also blended around the edges with black stamping ink before being glued in place.
I also used some of the Walnut Ink blended wood strips on the manor's doors.
To vary the look of the wood used, I blended one of the doors with
Distress Ink Pumice Stone on top of the Walnut Ink to tone it down.
The windows that didn't have acetate panes were painted using a metallic acrylic paint. The window frames were all dry brushed with the Warm Grey chalky finish paint as well.
Then I used my blending tool and the black archival stamping ink to blend all the house's edges (where possible) - don't forget to blend the chimney pipes' and the porch step's edges too! ;)
Time to finally assemble the three house parts and mount them to the cigar box base!!!!
I had primed my base with a thorough coat of black acrylic paint and let that dry.
In the meantime I made five large "glue tabs" (about the size of 2 cm x 4 cm) from the brown Kraft paper I used to die cut the bay from, folded these in half lengthwise and glued them inside the bottom edges of the house parts so there remained "flaps"-overlaps that were folded at a right angle and glued to the cigar box lid (using the tacky glue again). I also added glue to the touching areas between the house sections.
The dried out lawn was done using model railway flocking.
To apply that evenly to my cigar box lid around the glued on house, I first masked the two pathways with painters masking tape and then applied a thin coat of Decoupage glue with a soft, flat brush.
While the spread glue was still wet, I placed a large sheet of dry, clean paper underneath my cigar box and simply poured the flocking right onto the areas with the wet glue and then tilted the project to have the excess fall off (as you would do with embossing powder) and onto my paper sheet.
I removed the masking tape while the glue was still wet and let everything dry naturally.
To create the tiles for the pathways I used the "Cobblestone" Sizzlits die - a bargain I made some years ago with one of the large Sizzix sales (and more than worth the investment of about 3.50 Euro!).
Yes - the tiny tiles were all separately blended as well! (but I promise it is really worth the effort as it adds so much to the realistic and worn look of the manor!)
I puzzled the single tiles in place and used tacky glue again to glue them on. As the designer paper I cut the tiles from was too bright (but had a lovely marble-ish pattern, which was why I used it), I toned them down with
Distress Stain Pumice Stone.
I left some areas to add some
Texture Paste, Grit Paste or Sand Paste to with a palette knife. These were painted (once dry) with a
dark green acrylic paint to give the look of moss or lichen sitting between the tiles and in some of the gaps from the wood panels around the house.
I think having a story in mind while building your house makes a huge difference. You think about what wind and weather might have been doing to the structures and how that might look today. Also searching images of abandoned houses on the internet is a great resource for creative input on how to make your finished manor look!
Details like the
tiny windows on the additions (I cut these from the extra window frames I had cut out at the beginning) make the house look more lively. I also
invented additional chapel windows and covered the original window openings from the Village Brownstone with some heavy black paper and glued the cut to size arched window frames on top.
Blending the edges of all the visible elements is quite a labour of love - but it definitely makes a huge difference!!! Also dry brushing roof tiles, window frames, shutters and doors with the warm grey chalky finish paint adds that particular weathered feel.
Varying the height of the house parts by simply shortening it helps making even more variations from the dies you have!
I also cut an opening into the house wall for the bay so it looks more "real" instead of something just glued on the outside wall.
Instead of using a cigar (or other) box you could also use an old book as a base to put your manor on.
But I love that my manor is more than "just" a decorative piece... ;)
I hope the How-To was helpful and inspiring! Questions? Please, use the comments section for this blog post and I will try to help. I will leave you with some pictures of the finished piece...
Hugs and happy crafting!
Claudia
xxx