Showing posts with label altered art. Show all posts

Monday, 7 February 2022

A Little Handmade Gift, a (not so) Secret Watcher and an Invite

Hi, servus! So happy to see you pop by my little creative corner! 

I hope you are all well and safe! Austria still isn't back to normal concerning Cov-19 rules and restrictions (due to still not enough people being vaccinated) and this year winter isn't a very charming or romantic one (at least not around our corner) - it has been storming for actually weeks and temperatures are too warm for snow that would last. But I am still hoping for at least a few winter walks in the forest with my dog girlie and in the meantime we are mostly staying at home, making cosy fires in our new fire place and I am bit by bit approaching a new crafting routine that fits in with the new life with two homes (and two crafting spaces). 

My mother-in-law has celebrated her birthday with us this weekend and I had altered a splint box to give to her as a little handmade gift. I really love her a lot as she is a good friend and also mother to me and a really great grand-ma to my son! She is a true treasure! 


I used Tim's gorgeous "Bloom" Colorize Thinlits dies set and the BigZ XL "Vintage" Alphabet die for the Initials. 


I started with priming my splint box with a thin layer of DecoArt Raw Umber Student Acrylic paint and after that had dried I applied an uneven coat of DecoArt Americana Crackle Medium and let that dry too. 


In the meantime I die cut all my pieces from the Bloom dies set from white cardboard using my little Side Kick (one of my most beloved tools I've ever bought to be honest. When I bought it, I thought of it as a pure luxury gift to myself, but it has turned out to be my go-to die cutting machine for all my smaller dies). 


I didn't cut the parts for each layer from coloured papers (which is of course the most clever way to do it), as I had planned to paint all the twigs and blossoms intuitively (and maybe slightly differently), starting with the twigs and then picking each next colour from my DecoArt Americana and media fluid acrylics stash as I proceeded. That meant a lot of fiddly painting of course, but you know me - I love me some thorough meditative fiddling from time to time. ;)

I arranged all the tiny die cut pieces in an embossing funnel tray, so I could see at one glance which layer would go on which base piece. 


In the end I used mostly colours that matched the vintage feel I was aiming for. Only the initials and stamen got a layer of bright yellow. I also used mixes of colours already used - this way everything just fused nicely. 


The box lid still needed a matching crackle background for my blooms and twigs - so I picked DecoArt Chalky Finish Acrylic "vintage" and applied a very thin layer with a soft wide brush to the totally dry crackle medium. The crackling process started almost immediately and as I had applied the medium by using random brushstrokes that went in many different directions, the cracks did so too. 


While the crackling chalk paint was drying, I glued all the painted plant layers in place (using a small detail brush and matte DecoArt Decou-Page) and heat dried everything. Then I added a slightly diluted wash of DecoArt "Patina"Vintage Effect Wash on top to tone it all down a bit and fuse it with the vintage crackle background. 


I heat dried that again and then it was time to glue everything in place with more Decou-Page! 


As a final touch I added a thick layer of DecoArt Triple Thick to the rose bloom and the initials and let that dry over night. 


I had added some DecoArt clear Crackle Glaze to the painted Initials and highlighted the cracks with Raw Umber Antiquing Cream afterwards, before I glued these in place and added the Triple Thick. 


At that time it started to get dark outside and I took a look out of my window - only to discover a secret watcher in a tree in our neighbour's garden...


A pheasant had already prepared himself to go to sleep. The picture isn't sharp, but the colours are there! Isn't he beautiful? He sat there and watched the workers at the site nearby and seemed quite relaxed. I learned only a few years ago that pheasants sleep in trees (to be safe from foxes and martens)...and I think they look a bit funny too (as they seem to be too big to sit high up in trees on thin branches). 

The next morning the Triple Thick on the box had all cured and my splinter box was done! 


I was really pleased with how it had turned out! The design of Tim's Bloom and Alphabet die goes so well with the vintage colour theme, doesn't it? 

So before I wish you some happy crafting there is just one more thing to do: invite you over to the PaperArtsy blog, where I am sharing my first project as a new design team member (just in case you haven't seen it on social media yet). 


The actual theme over at PaperArtsy is "Pattern Play" and my teamies have all come up with some really cool projects and ideas on that one too! So hopping over and checking it all out is a really rewarding and inspiring thing to do! I hope to see you over there! 


Hugs and happy crafting!

Stay safe!

Claudia 

xxx

Tuesday, 1 September 2020

Numeric Goddess - Revisited - for SanDee&amelie's Steampunk Challenges

Hi, servus and welcome back to a new challenge over at SanDee&amelie's Steampunk Challenges.

As usual we had our annual two-months long summer special challenge so everyone could enjoy their summer outdoor activities and still squeeze in some steampunk crafting, but now we are back to our monthly schedule, two prizes are once more waiting to be given away and the team has once more come up with some amazing projects for your inspiration.

I obviously needed that total break from crafting (in order to get back to a healthier daily routine) - so I haven't done any crafting during the last month (all projects and posts for August having been prepared and scheduled) - but instead of sharing no project at all, I have decided to present a steampunk project that I did for Calico Craft Parts two years ago and that you might not know yet.


My "Numeric Goddess" looks quite large in this picture, but actually it is a tiny assemblage piece.
If you want to learn about the craft parts and products I've used (and the how-to as well), simply visit the old blog post on the Calico Craft Parts blog HERE.

It's always amazing by how much mixed media you can "throw" on the smallest surface! A bit of crackle here, ...


...some wire wrapping there,...


...an improvised stand in steampunk style...


...and some found objects from my little treasure box on my desk 


et voilá! 


The number 7 is my lucky number, and my frozen charlotte was missing a head....this way the idea for this piece was born. Sometimes I just need to look at a random collection of bits and bobs on my desk (or in my little treasures box) and it sparks an idea for a project.

I hope you like her! Maybe one day she gets free to fly again...

The team and I would love to see you play along with us over at our steampunk challenge blog! Simply click HERE to get there and check out their fabulous makes! As always we have an "Anything Goes - Steampunk/Industrial" theme - so you are free to create away and enjoy what you love most. Please, make sure you've checked out our few rules though. These can be found right below our blog header in the "Da Rules" section. ;)

Hugs and happy crafting!
Claudia
xxx


Monday, 10 August 2020

Heroes - a DecoArt Project

Servus, hi and thanks so much for taking the time to stop by my little (quite quiet) creative corner.

I haven't posted much lately as I am having to take a break from some of my already few design team commitments - due to health issues that I can no longer ignore.
I am in the middle of a struggle with a panic disorder that has obviously built up during the last fifteen months (being caused by menopause having hit hard last year) and has now struck me full blow.
Shaky hands and panic attacks caused by just sitting down at my craft desk and trying to tackle (even far away) deadlines are a nasty thing to have - especially when it concerns a hobby you think (or thought) you love. So obviously I will need to find new ways to go on with being a creative (which I have no doubt I am). Gladly I am in the very lucky position that some of my design team terms have just ended and that I am also on design teams where members are being cared about; so special agreements could be made. This way I didn't have to completely leave them all!

Sounds worse than it is actually (or maybe it doesn't) - but there's no need to feel sorry for me. I've already hit rock bottom and finally accepted my current situation - so the only way from now on can be upwards again. ;)

But there are of course also better days when my muse seems to be around and when I obviously manage to not be fixed too much on a deadline or the needed perfect (uh oh! Killer!) result of a project. So this week is going to bring you even two new projects and tutorials instead! Today's post is the invite over to the DecoArt Blog, where I am sharing a little altered mixed media tray that was a true pleasure to create.


It originated during my attempt to do a bit of tidying up in and around my craft space - which I find often sparks ideas for new projects (I guess because it is definitely more fun than a proper tidy up). I was right about to store away the little tray (the post on the DecoArt Blog reveals what it held in the first place), when I saw the drawer with my hoarded Tim Holtz paper dolls....and there it was!

The quote and melancholic feel to it were inspired by Peter Gabriel's fantastic cover version of David Bowie's wonderful "Heroes" - a song that never fails to deeply touch me. I have obviously heard it lately (I think it was used in a TV series or documentary or so) and it seems it was still spinning round in my head and needed to come to the surface.


As always there is a detailed tutorial with lots of steps images to find on the DecoArt Blog. Simply click HERE to get to the blog and check it all out. I hope to see you over there soon! And don't forget to pop by tomorrow for another project and tutorial!


Hugs and happy summer crafting!
Claudia
xxx


Wednesday, 3 June 2020

Trash to Treasure Mixed Media Tray - a DecoArt Project

Hi, servus and how's everyone doing these days? I hope you and your loved ones are well and not affected too much by these crazy times!

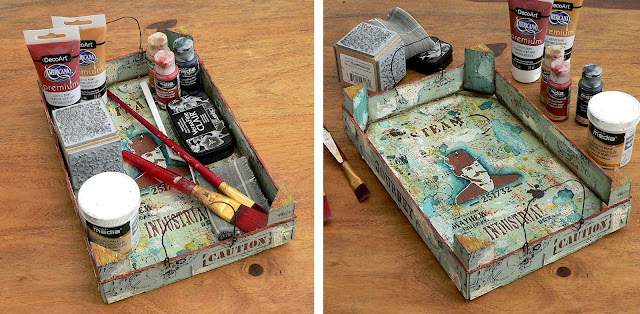
I would like to invite you to check out my latest DecoArt project that went live last week on their DecoArt Blog (not the Mixed Media Blog). I have upcycled a fruit crate this time and gave it an industrial style make over. Now I have a small inspiring tray to carry my paints and crafting stash to places other than my studio desk in case I want to do a little painting or crafting on my balcony for example (or on the not-crammed dinner table ;).


Just with the use of various DecoArt Americana, premium and media paints and products and some of my favourite Andy Skinner stencils and some stamps I turned this...


...into that: 


There is of course a detailed and fully stepped out tutorial with the list of products used and loads of steps images. To check these out simply click HERE to get to the blog post on the DecoArt Blog.


Hugs and happy crafting!
Claudia
xxx


Thursday, 9 April 2020

Bobbin Journal in a Jar for DecoArt

Hi, servus and welcome to the invite to check out my latest project on the DecoArt Mixed Media Blog!


I have decided to create a project that is perfect to showcase stamps from a favourite theme. I think I am not the only one who has favourite themes and therefore stamps collections of these. With me that would be collections of grungy texture pattern stamps, bugs and insects and ... mushrooms.


So if you want to find out how I've created my bobbin journal in a jar with loads of gorgeous stamped mushroom images, simply click HERE to get taken to the tutorial.


Hope to see you over there soon!
Stay safe!

Claudia 
xxx


Tuesday, 18 February 2020

Fill it with Circular Shapes - Altered Tin for StencilGirl Products

Hi, servus and thanks for stopping by!

Time to share my latest project and video tutorial for StencilGirl Products! This month the theme for the creative team was "Frame it or fill it with circular shapes" and I have not only "filled" a substrate with circular shapes but I also used a circular shaped substrate - a ginger bread tin.


Altering boxes and tins is one of my favourite things to do as I find it very rewarding.

I have done a full video tutorial this time in which I show various ways of creating circular shapes like stencilling on tea or coffee pads for example. The full list of StencilGirl stencils and DecoArt Americana paints and products used is over at the StencilGirl Talk blog. Simply click HERE to get the blog post where you will also find the video and more images of the finished project.


I hope to see you over there soon! 

Hugs and happy crafting!
Claudia
xxx


Monday, 17 February 2020

In These Very Woods - a Calico Craft Parts Project

Servus, hi and thanks for stopping by today!
I hope you're having a good start into the new week!

It's time for another inspirational project over at the Calico Craft Parts Blog and this time I've created a winter themed project - a door hanger box. The Door Hanger Box Kit is one of Calico Craft Parts' latest releases and it can be used for so much more than to hang it on a door - if you hang it on a hook in your craft room it can hold your ATC and smaller tag blanks for example or crafting tools...or other crafts stuff you like to have at close reach. And as it only hangs you can take it with you wherever you need it with just one grab.

And I found that particular sizes (mostly the medium sizes) of all the other wood shapes from their range are a perfect fit to decorate the door hanger box with! Yay!

This is a close up of the front. The sides have been decorated with beautiful newer and older wood shapes as well - there is a full list of the Calico Craft Parts and DecoArt products used in the blog post. Simply click HERE to get there and check out the how-to.


Hope to see you over at the Calico Craft Parts Blog soon!

Hugs and happy crafting!
Claudia
xxx


Monday, 13 January 2020

Rust it Up - for SimonSaysStamp Monday Challenges

Hi, servus and welcome to my second post and project as a spotlighted guest at SimonSaysStamp's Monday Challenges this January!


I am so honoured to be invited to guest with them this month and this week's theme definitely was just right up my alley:


Rust it Up

is the theme for this week's challenge and as the beauty of rust of all kinds is one of my favourite themes in general, I found it quite difficult for me to limit myself down to just a few products and items from my stash - but finally I made my choice and this is the result:


I have altered a cardboard box I once bought at a well known Swedish furniture store. It is part of a four piece desk organiser and the other three containers still sit on one of my shelves, waiting to be turned into something more pleasing to look at ;)


I've used the cool Voltage Sizzix die designed by my favourite dies designer - Tim Holtz! As it is a BigZ die it cuts through really heavy grey board - so my panel looks awesomely dimensional and turning it into a rusted and forgotten looking piece of tech gear was great fun! Here's what I did to create this panel:


I started with die cutting all the pieces on the Voltage BigZ die twice from thick greyboard. I stacked the base and circle shaped elements, but only used a single layer for the hand and the screws and washers.

I also cut a piece of acetate to size so it fit between the two circle shaped panels and coloured it using Ranger Caramel Alcohol ink and a piece of alcohol ink blending felt with the blending tool.
I had also stamped a scale - using the stamp from Tim's "The Professor" stamp set - onto some white card stock that I had cut to size using one of the die cut window shapes as a mask to trace around so I could cut it to according size to insert it after blending its edges with vintage photo Distress Ink using the ink blending tool.


This image shows how thick the two layers of greyboard are. The alcohol inked acetate was glued between the two upper layers.


Using Distress Paint antiqued bronze by dipping a soft flat brush into the bottle I painted the voltage indicating device and then sprinkled Emerald Creek Baked Texture Chunky Rust and Patina Oxide here and there on the still wet paint. This way I didn't need any embossing ink to make the embossing powders stick to the project's surface.


I added more heat embossing - this time using Ranger Verdigris embossing powder. Afterwards I dry brushed all the edges using black soot Distress Paint and a flat small bristle brush.


To do so I dabbed a bit of Distress paint on my palette on my glass media mat, then only loaded the very tip of my brush with paint most of which I wiped off on a piece of kitchen roll before I used the left overs on the brush to gently brush that to the edges.


The index hand was given a coat of barn door Distress Paint before I dry brushed its edges too and once that had dried I added a thin coat of Ranger Clear Embossing Powder.


One of the bent shaped panels I had die cut was primed with a layer of black soot Distress Paint and then heat embossed using the Aged Silver embossing enamel from the Stampendous Frantage Embossing Enameling Kit
Two small sticky half pearls were used as rivets and given a quick brushing over with black soot Distress paint.

Time to glue everything in place! Yep - that looked quite cool so far ;)


This is a before image of the cardboard container I was going to alter. I took my finished voltage indicating device and rummaged my paper stash for a matching designer paper...


...which was a sheet from Tim's Lost and Found paper stash. It was cut to size and I used the container to measure the height and length of the strip I needed. I also added a finger's width to have an overlap where the paper edges would meet.


Using Tacky Glue - as I had been using before - I glued the paper in place, making sure all the edges were neatly stuck to the box surface. To tone in the paper so it matched my voltage index even better I applied a layer of vintage photo Distress Ink around all sides.


Afterwards I blended the edges of my box using a piece of Ranger Cut-n-Dry Foam and jet black archival ink.


I had decided to add some affirmative quote to my desk organiser and picked one of the beautifully dimensional Tim Holtz idea-ology Quote Chips. It was toned in too using vintage photo Distress Ink and jet black archival ink around the edges.


And because the quote chip tells me to use my wings, I also stamped the order "fly" onto the Aged Silver panel using StazOn black stamping ink and some Hero Arts letter stamps.


Done!

My new desk tidy for my pokey tools, bone folders and drills was ready to use! Yay! 


What is it that you are going to rust up to play along in this week's 
Monday Challenge at SimonSaysStamp


Don't forget - there's a fantastic 


to be won by one lucky randomly drawn winner! 

All the products I have used to create my project can be found in their online store (just click on the product names in my write-up to get taken to the product on their shop site). 


Good luck and 
hugs and happy crafting!

Claudia
xxx