Monday 30 September 2019

Chamber of Horrors - a Calico Craft Parts Artist Trading Block for Halloween

Hi, servus and I hope you've had a lovely weekend!

Mine was just wonderful - my husband and I spontaneously decided to go on a weekend trip and stay at my favourite castle hotel - Castle Bernstein in Burgenland. We had some delicious wine and food there, being surrounded by historic furniture and traces of the castle's five hundred years of history, and we did a three hours hike in the beautiful woods surrounding the castle. We walked in the pouring rain but that didn't bother us at all as we saw five fire salamanders, a beautiful large toad and really huge mushrooms - actually loads of mushrooms, some were so large they reached my knee! It was like a hike through a magical forest no one had ever been in before us.

But back to business! It's my turn over at Calico Craft Parts to inspire you with a project and as there are a lot of genius new Halloween Craft Shapes in the store, I had to have a go at some of these!

A list of the Calico Craft Parts and DecoArt paints and mixed media products I have used is of course part of my post over at the Calico Craft Parts Blog. As are a lot of images and a tutorial. ;)


I hope to see you over there! Simply click on one of the images or the badge at the end of this post to get there. And watch out for Zombies - they are in search of some fresh brain!


Hugs and happy crafting!
Claudia
xxx


Monday 16 September 2019

How to Paint Faux Marble and a Spooky Coffin

Hi, servus and I hope you're having a good start into the new week. I've had a lovely weekend, doing some kayaking on Ottenstein Barrier Lake with my husband and son and my dog girlie Bluna on maybe one of the last really warm weekends as autumn is fast approaching.


And with it comes the wonderful and inspiring Halloween season - one of my favourite "crafty seasons" - not just because I love to create spooky stuff myself but I always find so many wonderfully spooky projects being shared around that time which I enjoy a lot (and most of which have my think "OMG! Why haven't I come up with this genius idea and project?!!!" ;) 

Today I am sharing a new project over at the Calico Craft Parts Blog which is hopefully at least a bit genius too and also my first Halloween project for this year - a 3D coffin painted in "Faux Marble Painting Technique" (a technique from my early days as an arts teacher). 


Of course I am sharing the full tutorial with loads of steps images over on the Calico Craft Parts Blog! Simply click HERE to get there or use the linked design team badge at the bottom of this post. 
(giggle...I love how the skull in the background kind of photobombs the picture...I hadn't created this effect on purpose and he does it on many more pictures and I only saw it when re-reading the post on the Calico Craft Parts blog to correct any typing mistakes. Makes me giggle now each time I scroll through the post). 


I also love that there are oodles of awesome spooky craft parts to find in the Calico Craft Parts "Halloween and Autumn" section. I guess I could do tons of Halloween projects without having to repeat myself...and adding texture and worn crackle to these with my beloved DecoArt and DecoArt media products is still something I enjoy a lot. 

Which brings me to one of my very favourite Halloween projects (and posts) I have done for and with Calico Craft Parts and DecoArt paints and products. You can get to it HERE if you want to find out more about it (as it comes with a step by step too). 


Well...time for me - after the weekend out in nature and off my studio desk - to get back to some Halloween crafting. Have you already started the crafty Halloween season? 

Have a great week!
Claudia
xxx


Thursday 12 September 2019

What to Make From Left Over Gameboard Token Chipboard Frames - a DecoArt Mixed Media Project

Servus and thanks so much for stopping by today!
This is another invite over to the DecoArt Mixed Media Blog, where I am sharing a project done using a left over chipboard frame that came with one of our numerous board games our friends, my husband and I love to play.

Most of these games have a lot of tokens and these come pre-punched but still in their chipboard frames for safer transport. I like to keep the frames as these are usually made from very sturdy chipboard and often they make for perfect frames to create little display trays from. Perfect for a collector of all things small and wondrous like me ;)

So this was how the frame looked before...


...and this is a sneak peek of how it looked after I had used some of my favourite DecoArt media products and paints on it.


There's a very detailed tutorial with loads of steps images over at the DecoArt Mixed Media Blog and I hope you will like it (and the finished project of course) ! I have already put it up on my wall as it displays some of my favourite shells and fossils. They have been stored away in a drawer for way too long - now I am happy that I can look at them every day. And as I am quite happy with how the tray turned out I am happy to look at that too. ;)

Hugs and happy crafting!
Claudia
xxx


Monday 2 September 2019

Mistaken for a Flower - a Calico Craft Parts Tag

Hi, servus and welcome back after the summer holidays!
I hope you have all enjoyed a great time outdoors and could cope well with the extreme heat!

Today's Calico Craft Parts project was done while I was at Lake Atter, enjoying our usual stay at our favourite summer resort. I had taken a tool box with me this year - filled with some of my favourite go-to media, paints and products, some prepared die cuts and substrates and a box of paper scraps of all kinds to chose from. I also knew that I would receive one of my Calico Craft Parts design team parcels there, so I had ordered some plain MDF tags and plaques in various sizes for whatever project would cross my mind during the holidays.

What would you pack for a five weeks holiday away from your studio?

It's really hard to decide, isn't it?  In the last years I always felt I was forced to leave too much good stuff at home, so I didn't take anything at all with me and focused on knitting or crocheting instead. But there were always moments when I was so inspired to do a specific project only to find that my studio with all the stuff I wanted to use for it was far far away and out of reach.

But this summer things were different due to a special item I bought last autumn....and I also found I obviously had packed a real good combo of stuff that worked pretty well for me - if you want to know more about that specific item and the other things I took on hols this summer I have a list and some pictures about that over in today's Calico Craft Parts blog post as well. ;)


This sneak peek already gives away some of the stuff I obviously had in my tool box...but what to use to create a butterfly's feelers from when you do not have any thin wire at hand? Well, this secret will be revealed over at the Calico Craft Parts blog too and of course there's a little how-to as well. 

Mostly it is found objects that spark creative ideas and during the summer holidays we spend a lot of time out in nature - mainly in the forest and on beautiful hiking trails around or up on the mountains there. We also go hunting for fossils and already have some favourite spots to go to. But this year an old big rusty nail which was a find right in front of the farm house where we spend our holidays in inspired me to create a tag and I hope you will love it as much as I do, once you have checked it out over at the Calico Craft Parts blog. Simply click HERE to get taken to the blog post there. 

Hope to see you over there!
Hugs and happy crafting!

Claudia
xxx


Sunday 1 September 2019

Upcycled "Inventor" Project for SanDee&amelie's Steampunk Challenges

Hi, servus and welcome back after our little summer break with the two months long summer special challenge over at our steampunk challenge blog. The start of September brings us back to normal (=monthly challenges over at SanDee&amelie's Steampunk Challenges) and this is my project for your inspiration and to kick off our September challenge:


As you can see the picture was taken on the balcony of our summer holiday place and this means I created this project with what I had at hand and the few media and tools I had taken with me this summer. In the last years I didn't even try putting together a bundle to take with me for some crafting and mixed media fun on a rainy day or when taking a break from too much sunshine - simply because I couldn't decide what to take with me and what to leave at home. But this year I managed to prepare some larger die cut shapes and tags and the Sizzix Sidekick I gave to myself (as a reward for over a year of bravery with several dental surgeries) also allowed me to pack some of the smaller Thinlits dies.

The Sidekick "travelled" in a small plastic container where I also stored the cutting pads and some other thin bits like the acrylic blocks for rubber stamping in.


And I used one of my oldest and also very first "luxury" craft items I bought when I started this hobby - the Tim Holtz Cargo Case Toolbox and filled it wih some of my favourite tools and media:


...some Distress and Distress Oxide Ink Pads and refillers, of course a black archival ink pad, a blending tool and several sponges for the different inks, a tiny bottle of DecoArt matte Decou-Page (in the middle section...the perfect size for travelling!), some tacky glue, some clear stamp sets, a palette knife, some Distress Crayons, assorted brushes, two PITT artist pens, a collection of my beloved DecoArt media fluid acrylic paints (these have the perfect height to store them in the bottom section) and media white Crackle Paint and Gesso, a tube of DecoArt premium Titanium White acrylic paint and lots of Sizzix Thinlits dies sets (almost all designs by Tim Holtz). As these are so thin and flat, I could put them in the bottom compartment of my cargo case too. Yay! I was so happy when I found that it all fit into this one toolbox.


I also had taken with me (in a wooden cigar box filled with various paper scraps) some larger die cut shapes done with BigZ dies I could not take with me (like the "Steampunk Parts", the "Trinket Frames" and the bulb from the "Filament" die) and also some die cuts done with Thinlits dies that were too wide to use with the Sidekick.


So I had a mix of various larger die cut pieces (also including some plain larger tags) and Thinlits dies sets, acrylic paints, Gesso and Crackle Paint, some markers, clear stamps and designer paper scraps to play with. But of course the tags I had prepared were too small for what came up in my head when I looked at all the stuff and possibilities to combine what I had...so what should I do?

I knew I wanted to use a lot of crackle media and paint washes and such, so I needed a substrate that could take all of these well and also be of matching size with the design I had in mind...gladly we had ordered a card playing game some days earlier and the sturdy card the envelope it came in was made of was just perfect!

I even managed to cut a kind of easel from the backside! Not beautiful to look at, but it worked just fine!


The front of the sturdy envelope was first covered with a glued on designer paper and then I scraped a lot of DecoArt media white Gesso across the whole front using a palette knife. Once that had almost dried I added washes of DecoArt media Prussian Blue Hue and Transparent Red Iron Oxide fluid acrylic paints. On top of that (after I let it dry in the sun) I scraped some white DecoArt media Crackle Paint here and there and let that dry and crackle in the sun again).

Once the crackle layer had dried I added a wash of Prussian Blue Hue to make the cracks more visible. I also added some Prussian Blue Hue and DecoArt Metallic Lustre "Gold Rush" splatters to finish off the background.


As you can see I got really messy. I used a styrofoam tray (from some bacon wrapped cheese sticks) as a palette to mix the paints and washes on.


detail shot: 


During drying times I had already primed and painted the die cut pieces I wanted to use. Here's a picture of how I had combined the die cut pieces.


I used DecoArt media Prussian Blue Hue, Titan Buff and Transparent Yellow Iron Oxide fluid acrylics on the piece with the porthole and ship's propeller, Quinacridone Gold, Titan Buff and traces of Prussian Blue Hue on the Filament light bulb and Transparent Yellow Iron Oxide, Titan Buff and Transparent Red Iron Oxide fluid acrylics on the piece with the left over shape from the "Trinket Frames" die and the cool propellers from the "Steampunk Parts" set. I also added DecoArt premium Titanium White acrylic paint to some of the mixes, where needed.


Once the paints had all dried, I glued the pieces together and then added washes of Prussian Blue Hue and/or Transparent Red Iron Oxide and Quinacridone Gold to tone all the parts so they would visually fuse. On top of that I scraped traces of DecoArt media white Crackle Paint here and there and later highlighted the cracks with another wash of Prussian Blue Hue.


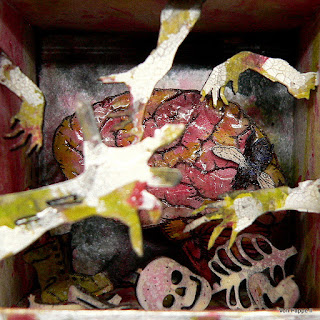
The Geo Insects were painted with Prussian Blue Hue media fluid acrylic paint...


... and then I dabbed on some DecoArt Gold Rush Metallic Lustre using my fingertip.


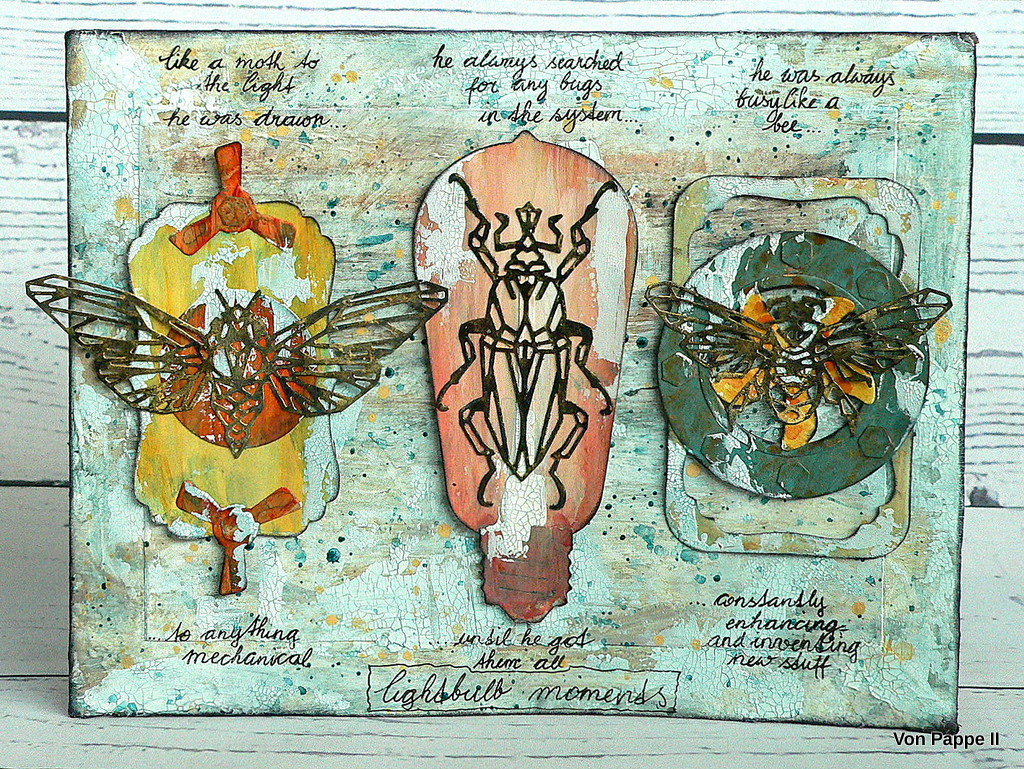
I added some hand writing using a PITT artist pen with permanent black china ink.


Then I used cut to size snippets of sticky foam tape to mount all the pieces to the panel with the crackle and splatter background. 


My "Inventor" panel was done!


I hope you like it! I definitely had great fun improvising and up cycling packaging materials to turn them into a piece of steampunk mixed media art.


I highly recommend you hop over to our Steampunk Challenge Blog now to take a closer look at my wonderful team's projects! And of course I can't wait to see what you will come up with!

Hugs and happy crafting!
Claudia
xxx