Tuesday 31 December 2013

Prosit 2014! Bonne année! Happy New Year!


to all my dear crafting/blogland friends, readers and followers, team mates and loved ones! May the new year bring to you all that you have been dreaming of! I wish you good luck, good health, a lot of success and joy and many many happy moments! 

Busserl,
Claudia x

Tuesday 17 December 2013

A big THANK YOU and MERRY X-MAS!

I only wrote a quick post yesterday (as it was a little hectic around here), but now is a good time to thank you all for your encouraging words on my health problems and for being there! I know - a lot of us haven't met yet and do not know each other in person, but we know each other in a very special way I assume: through our artwork - which often allows us a glimpse through the surface at a very special part of one's personality.

So it IS personal - even if we are "strangers" at a different level of "knowing" each other. And this is why your words and learning that you are with me in some way especially when times get rough really touched my heart and I am very happy that I stumbled upon this wonderful artsy and crafty blogland community to find all of you! Thank you all so much for dropping me those kind words and sharing some of my sorrow :) They really helped a lot!

I recommend that those who do not want to read about some personal health stuff and about the Hashimoto auto-immune desease, skip the rest of the text and scroll down to the end of this post (to see the image of the nativity scene ;). I really don't want to burden you against your will with this. 

Some of you know that for the last three years (the ones before the correct diagnose not counted in) I have been dealing with an auto-immune desease called Hashimoto, which affects the thyroid. It's a rather common auto-immune desease (I have learned) and can't be cured but treated by substituting the thyroid with hormones it doesn't produce sufficiently anymore.
An underfunctioning thyroid like mine may cause a really wide variety of nasty symptoms - each one individually not seeming too "severe" (I thought I had the flu or a "tiny burn out" most of the time before I was diagnosed - and of course felt like a loser) - but when those symptoms all come together you just feel as if you were about a hundred years old and/or (very!) flu-ish and worn all the time (not to mention that remarkable gain of weight). And it also causes symptoms that often look like a depression - anxiety disorders and nasty stuff like that.

But - and that's the really mean part of this - most of the time there really is a depression involved as well as most of the "Hashis" (as they are called) have been going through years (!) of pain, fear and sorrow because they felt sick but all the doctors didn't find anything that might explain their symptoms (and said it was a psycho-somatic thingie)...so they mostly get diagnosed as suffering from a depression but don't get any treatment for the thyroid. Which during all that time causes a real depression too of course - and then the symptoms start to mix and mingle...which definitely makes things a lot more difficult....

I guess I was among the lucky who have a good family doctor who spotted the real source of all those never ending "flues", "depressions", aching bones, tiredness,... rather soon, but it also took at least five to six years before we found out what has really been going on (I have gone throught the "psycho-somatic and burn-out thingie" too until the symptoms got so heavy that it became a lot clearer). So there's a real depression too - which was too hard to spot obviously. And it was that increasing depression that was taking me down during the last months and especially weeks - it needed three panic attacks and a lot of sleepless nights and the fear that I would not make it for X-mas to finally go to a specialist, who really helped me a lot by fiddling all the parts apart and spotting the true wrongdoer. So I hope I will be my old self on X-mas eve and be able to enjoy it with my loved ones.

Why do I tell you about this?
Because I know that there are a lot of Hashis out there, who - like me - are going through a lot of ups and downs.
Finding yourself in another "down" is the most frustrating part of this I guess. And often you don't have a specialist who (like mine) encourages you to listen to your own inner voice and your body instead of the blood test results and normal ranges. I learned that it really takes at least two years (I guess maybe even longer) for you to learn to divide which symptoms are caused by what and to find your individual level for your hormones where you feel best.
"It is only two years since you have been working on your thyroid's levels" my specialist said. "ONLY two years"...not to talk of the years before... but this summer I knew (and felt) that it IS possible to be well again, because I was THERE: I felt like my old self again, I was able to do sports again, I started loosing weight again... I was ME again.
And if there were no depression, I would feel just fine! So at least knowing that it is possible to find the perfect dose for you gives a lot of hope and strength (which you thought you would never get back) - and I want to give a bit of that hope and strength to all those out there who are going through the same hard times.

I know - it is hard (for me too) to accept that depression might stay one's companion for some more months (or even years), but it will go away one day (but you have to get the help of a specialist before you can stop taking your anti-depressants - as the thyroid needs some different hormones then in preparation! - which was the most important thing I learned when I visited the specialist)!

The doctor told me that I should be gentle to myself and not force anything. Take all the time and help I can get (especially the help from medication ;). Not fight anymore. Listen to myself. And to not give up!

Being creative is my means for escape, for feeling agile and active, for giving meaning to the fact that I sometimes am not able to run and jump around or manage a day's work like I feel I should, for turning "lost" time into "precious" time, for forgiving yourself and/or forgetting about the fact that some things in life haven't been going that well. And I guess a lot of you know what I am talking about ;)

I know that 2014 holds a lot of wonderful experiences ready for us on our creative journeys and I am sure that we will find our ways to enjoy the trip, find our own personal pace and explore new territory!

I wish you all a very MERRY CHRISTMAS AND ALL THE BEST OF 2014!


Hugs and thank you all once again!

Claudia x

Monday 16 December 2013

Altered Chocolate Box Book

Today I can finally share with you a project I made as a birthday present for one of my dearest long term friends - another chocolate box book I altered (and yes - I it was once again necessary - for the sake of art - to eat the chocolate first that was inside! Considering all the X-mas cookies I will be eating during the next weeks this is really a sacrifice *lol).


As she teaches chemistry and is a lover of artefacts too, I knew this was the right thing to make for her ;)

You can find a detailed how-to by clicking here (or searching the Tutorials page that can be found at the top of my blog - directly under the banner).

I glued some sandwich paper onto the box and created a lot of wrinkles while the glue was still wet. After this had dried I gave the whole box a coat of "Raw Umber" acrylic colour.

While this was set aside to dry I created the aged paper (using Distress Inks and the Wrinkle Free Distress Technique - an all time favourite of mine which I never tire to do honestly).


The insides of the box were covered with stamped and aged paper too.

I used the Tim Holtz "Laboratoire" stamp set, which I really love!


When the acrylic colour had dried I rubbed on some DecoArt Metallic Lustre "Gold Rush" with a piece of cut'n dry foam.

I toned down the bright red ribbon using a dark brown ink stain to match the rest of the design.

Done!

(Inside - rolled up, stuffed into a tiny vial and corked - was a gift coupon - selfmade of course - for one day's crafting with me in my studio ;)


She seemed to like it very much - and I hope you like it too! :)


Hugs, happy crafting and a merry X-mas to you all!
Claudia x

Tuesday 10 December 2013

At least a bit of X-mas crafting...

...happens over at my place too.


But as I struggle with some severe health issues concerning my thyroid (obviously overfunctioning right now) like being nervous all the time (sometimes even panic attacks), not sleeping, shaking hands and trembling inside until all my muscles ache, crafting isn't too easy at the mo. But as I promised myself not to let this get me down or hold me back from enjoying the pre Christmas season as much as I can, I managed at least to do some tags and presents wrapping.


And yesterday I also received two lovely (and the most awesome) parcels from two of my best (crafting) friends! They came in just at the perfect moment as I was really upset and sad and panicing yesterday - fearing that I might not be able to enjoy X-mas eve after all and ending up in hospital instead with no one knowing exactly why.

One came from dear Sandra - my dear friend and co-owner of SanDee&amelie's
Steampunk Challenge blog (honestly without her this blog wouldn't exist!) and the other was a swap I made with A...err, well, you will have to wait until after X-mas I am afraid (*chuckle) to learn more about that.


But I can already show you the parcel Sandra sent me for X-mas. (honestly I cried all the time while unpacking all the treasures she put in the parcel - I was so overwhelmed.) She and A. really saved me yesterday from a day mostly filled with dark thoughts and anxiety.


Oh my, Sandra really knows what makes my heart sing! Look at all the brilliant stuff! There were some awesome stamps in there as well as some wonderful stencils, die cuts, tags, embellishments... well, honestly I am still overwhelmed and soo happy!
And the swap parcel from A. contained a lot of loveliness too!

Thank you so much, Sandra and A.! I am so happy to have wonderful friends like you!

But back to the X-mas tags I made...


I cut small tags from light brown manila card using the Sizzix Tim Holtz "Tiny Tags & Labels" die. I stamped my favourite X-mas stamps (from Red Lead, Tim Holtz and mariannedesign) with black jet archival ink and a X-mas stamp I bought at Depot with red ink. Then I sprinkled some Distress stains "tarnished brass", "brushed corduroy" and "picket fence" onto them using a small brush. Done.

The names of the recipients will be stamped onto the tags too - using my letter stamps from HeroArts. Here are some finished parcels to show you how they look like when in use:


I hope you are all doing fine out there and enjoy the Christmas preparations and Advent joy!

Hugs and take care!
Claudia x

Sunday 1 December 2013

A Very Vintage Christmas! - Our Creative Corner's December Challenge

Welcome back , dear readers, followers and crafting friends,

to another edition of Our Creative Corner's challenges!!! Laura, who is your lovely host for this month's challenge, chose

A Very Vintage Christmas


which means you are to use neutral colours only!

Seems the 1st of the month will be a double-feature day over here in the future as it presents TWO new challenges - the one over at Our Creative Corner AND at SanDee&amelie's Steampunk Challenges! So, please, check out both as they are really worth a look and I hope both provide a lot of crafting fun and inspiration for you. 

Back to the Very Vintage Christmas:

I admit this was a rather hard job for me to do as I rather seldomly dare create "vintage" combined with that touch of delicacy neutral colours add to this sort of makes.


I used a lovely stamp from Red Lead for the cones and a script stamp with X-mas greetings for the background. The flourishes were die cut using the Tim Holtz "mini flourish" Alterations Sizzix die. Some sprinkles of dark brown and gold for more texture and a velvet ribbon added to the bottom for a more festive feel. I also added some tiny blots of clear stickles for a bit of "snowflake bling" - done!

I hope you like it and you definitely should check out the vintage X-mas makes my awesomely talented teamies have prepared for you over at the challenge blog!!!
I so look forward to see your entries (which will definitely put me in a very merry mood ;)

As usual some close-ups:


If you also want to know the new challenge over at SanDee&amelie's Steampunk Challenges, scroll down to the previous post. ;)

Hugs, happy crafting and enjoy the pre-Christmas period!!!! (I definitely will ;)

Claudia x

I enter this tag to the following challenges:

Fashionable Stamping Challenges - In the Holiday Spirit
The Artistic Stamper - Anything Goes
Simon Says Wednesday Challenge - Anything Goes


Santa's New/Pimped Up Vehicle! - SanDee&amelie's Steampunk Challenges

Ho, Steamin' Ho!

Time for a new challenge over at SanDee&amelie's Steampunk Challenges!

This month - what else could it be - we go for a X-mas theme, but of course with a steampunk twist to it! ;)

We want you to create a new vehicle for Santa - or to pimp up his sleigh and thus create

 Santa's New/Pimped Up Vehicle!


But first let me thank you all for your awesome entries to our last challenge! You rocked it again! :)

Back to Santa's vehicle - in my case Santa decided to spare his reindeer the hard labour of pulling his overloaded sleigh and switch to something more modern - a rocketship. ;)

And of course he has his reindeer with him still - only on board of the rocketship instead of pulling it. (Thanks to the new and totally silent propulsion engine he still won't be heard when flying over all the homes of children, waiting for him to come down the chimney ;).


For my tag I used a background I had treated with some dry embossing on aluminium foil (which was glued to a piece of card) first and alcohol inks afterwards. I created the stencil for my rocket's shape by folding a sheet of plain card in half and drawing only half of the shape to the front. Then I cut it out and unfolded the card - voila - a symmetrical shape of an air and space craft!


The holly leaves on the bottom are meant to be the flames bursting out of Santa's rocket. The mystletoe looks a bit like smoke... so how does this new technology work? (Of course this will be kept a secret ;).

And look - there's Rudolf sitting on Santa's lap, peeping out of the rocket's window ! Seems he enjoys his ride too (or maybe he is helping Santa with driving the new modern vehicle?)  ;)


I hope you enjoy the pre-Christmas period and have fun creating a new vehicle for Santa (or simply pimp up his old sleigh to turn it into a steampunk wonder)!

Looking forward to see your creations entered soon!

Hugs and happy crafting,

Claudia x


I enter this tag to the following challenges:

Fashionable Stamping Challenges - In the Holiday Spirit
The Artistic Stamper - Anything Goes
Simon Says Wednesday Challenge - Anything Goes


Friday 29 November 2013

beauty in decay

Ever visited pinterest and searched for the word "rust"?
It's incredible what a large number of people have pinboards over there showing rust in all its various kinds - and they all are (at least to them and to me) sooo beautiful! I often ask myself what it is that attracts us this much with rust or even other kinds of decay...just think about drift wood, pebble stones, fallen leaves, condemned houses, old theaters with wall papers peeling off and revealing a lot of layers underneath! 


Is it that feeling that we are allowed a glimpse through time - back in time but foward to the future as well? As if rusted objects - worn by time and nature - take us on a time travel at high speed. How will I look like when I will be seventy? Which kind of traces will time have left with me then?


I honestly love faces of people that show their wrinkles. From seeing them you can tell if the person has been leading a happy life or one filled with a lot of sorrow and bitterness. There's hardly anything more beautiful than smile wrinkles, isn't it?


Wrinkled faces of old people also often evoke some deep respect in me. They tell about experience and wisdom. Maybe I feel this kind of respect too when I look at timeworn and rusted objects that have been withstanding ages obviously.


During the summer holidays we visited my husband's uncle, who is a dedicated collector of timeworn and old things that tell stories too (and who has revived and renovated an old car all on his own during six years of searching and restoring).

He gave me a lot of rusted treasures from his shed for my creative work after taking a look at my blog - and I guess he was happy that he had found someone who shares his love for old and timeworn things. We spent a long time in his shed where he showed me a lot of the treasures he had found at flea markets and we enjoyed it so much.

 The two keys I used for the two panels were just one of his generous gifts (thank you so much, Uncle Helmut! :).They still have the labels on them that indicate their former purpose.


I also found (and fell in love with) a wonderful watchmakers cabinet on ebay some weeks ago and immediately knew that I wanted it for Christmas. As my wonderful husband loves what I do and supports me in it wherever he can, he immediately said "yes" and we were lucky to win the object. It's filled with over thousands of watch glasses in various sizes and I can't wait to incorporate them (bit by bit) into my future artwork!


He generously allowed me to already use two of them for this two panel project ;) :-X


But back to beauty and/in decay. We seem to mingle our idea of history and time with the look of timeworn objects, don't we?

They touch our souls and I love to question myself why.
Time travel, time that changes us and everything (but cannot be changed by us in return), time as our companion (and sometimes enemy), time as our (healing) friend, .... if you take a look at the incredible lot of ways humans deal with the phenomenon of "time" you get an idea about the power we attribute to time (and about the power it really has upon us).


And where does time ever get visible? In decay - caused by weather, water, wind, air or constant use.


One of my arts teachers at university (who taught "design" among other things) told us that the best working and most loved tools reveal themselves by their traces of use and wear...

...handles being "sanded" down by a thousand times of being held in sweaty hands, steps of stone stairs being sanded down by the feet of millions and billions of visitors walking on them, .... "You will recognise the most beloved tools by their signs of wear and abrasion" he said and I still love this saying as there's so much truth in it!


As I took a lot of pictures this time and I want to spare you the endless scrolling down I decided to offer you a closer glimpse on my two panels via a slide-show. I hope you like them!


You can click through the images of the slideshow by using the forward arrow button if the slideshow is too fast ;)

Hugs and happy creating,

Claudia x

Materials used: painting board, fine sand texture paste, two clock glasses, Adirondack Alcohol Inks, Ranger Distress Inks, DecoArt Traditions acrylic paints, eyelets, wire, rubber stamping (Prima) and embossing with Ranger embossing powder "Rust", stencils (Tim Holtz and TCW), scrapbooking papers and dictionary pages, copper plates and a Sizzix metal embossing folder, Artemio letter stamps, Ranger black jet archival ink

Monday 25 November 2013

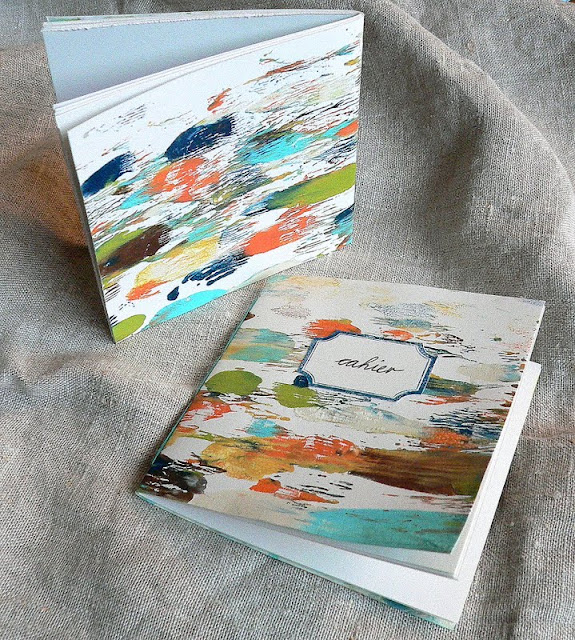
Last minute selfmade presents: colourful notebooks with DecoArt acrylics

Still in search for some artsy last minute selfmade gifts for X-mas? Well, how about making some really easily and quickly made colourful notebooks?


If you are as addicted to collecting unique booklets to write or doodle in as I am and/or you know other people who are too then this is the right project to make ;)


All you will need for making notebooks like these are:

- DecoArt Americana acrylic paints ( I used Bleached Sand, Yellow Light, Bahama Blue, Coral Blush, Olive Green, Green Mist, Dark Chocolate, Pumpkin, Golden Straw and Navy Blue)
- a spray bottle filled with water
- a brayer
- some sticky tape and some glue
- baby wipes
- kitchen roll
- a pack of white dividers (available at any bureau shop) - which will spare you a lot of cutting to size
- a transparent sheet (from your bureau stuff) and a white sheet of paper to stuff in
- thread, scissors, a punching needle, a sewing needle, a punching mat
- a label stamp
- a brush

I recently bought a Gelli Plate (after half a year of rolling all the pros and cons in my mind), but before I owned that really fun and easy to handle tool for monoprinting I used a lot of different surfaces for the monoprints I did with my pupils.
One of them was simply a transparent sheet fixed to the table with some sticky tape (and filled with a sheet of white paper so the colours can bee seen more clearly).


 1. Well,  let's get started: get your transparent sheet and fix it to your table too. (as I know me being a very messy crafter I fixed it to my craft sheet first).


2. Get a stack of dividers ready and the DecoArt Americana acrylics. Apply dots of various colours randomly onto your transparent sheet.


3. Now comes the most important part: the trick with the brayer!

Don't roll it over the whole sheet in different directions but keep moving it with hardly any pressure(!) from left to right only (or right to left only if you are left-handed) and do only very short distances at once - then lift the brayer and put it down some centimetres further to roll on...and so on.
That way the colours will not mix too much and a lot of space will remain uncovered (which will let the white of the paper you print on show through). Don't clean your brayer after this - put it aside. You will need it in a sec. Your transparent sheet should look like this now:


4. Place two dividers onto the transparent sheet and use the colour covered brayer to press them down. Roll the brayer firmly over the whole sheets, then lift them off the ground (if you brayer too long some of the paper might stick to the transparent sheet as the acrylic colour then works like a glue once it has dried too long).


The sides you covered with your brayer will become the insides of your booklets' covers. They will look like this:


The outsides should kind of look like this: bright and colourful. Let dry (or speed up with a heat tool). Clean your brayer and surface with some spritzes of water and some kitchen towel.


5. Take a pile of dividers (depending on how many pages you want your notebook to have), put one of the prepared covers on top and cut off the side pieces where the two holes are.


Use one of the dividers to create a stencil for the holes you will have to punch for the sewer binding. Fold it in half and mark four spots.


Punch holes through all the layers using a punching needle and a punching mat.

6. Choose a thread of a matching colour for your colour design of the cover and take a large sewing needle. Use doubled thread and the length of about your arm. This should do for sewing the binding twice.


Start with the second hole from the left and from the inside, then slide the needle through the hole left to it from the outside to the inside again. Then through the hole you started with to the outside again and through the third hole to the inside and through the fourth hole to the outside again. From there through the third hole to the inside again... then repeat the whole procedure.


This way you should have done a kind of weaving  and the thread should be doubled everywhere. Tie the ends together on the inside of your booklet with several knots. Then cut off the excess thread.


Now you can carefully fold your booklets. The only thing left to do is create a label.


7. Get a label stamp (mine is from Red Lead), the DecoArt Americana Navy Blue, a soft brush and the transparent sheet again and spread some of the colour on it. Dip the stamp into the thin layer of paint and stamp onto some white card.


8. Cut out your labels, do some handwriting on them (or leave them plain for the person who will receive this lovely gift) and glue them to the covers. Done!


Hope you have a lot of fun making your own and will be giving away a lot of these colourful booklets! They are so easily and quickly made!


Hugs and happy crafting!

Claudia

http://decoart.com/andyskinner/