Monday 30 May 2016

Welcome to the Freak Show!!!


Well, well....are you ready for a dare? If you feel you are in for some mysteriously weird and disturbing sights I recommend you hop over to the Calico Craft Parts Blog to find out more and take a look behind the curtains! A detailed tutorial awaits you too. ;)

If you are simply in the mood for some online shopping then the Calico Craft Parts Shop is the right place for you!


I hope to see you over at the blog of course!

Hugs and happy crafting,
Claudia 
xxx


Sunday 29 May 2016

Wood, a Word and Something Wild

...is the theme over at Creative Carte Blanche and I finally found the time to create something inspired by these three things (so I could slip in my project almost at the very last minute...phew!).
To get to their post, click HERE.

The first idea that hit my mind almost immediately when reading "something wild" was "wild wire". I guess it was sparked by my love for stave rhymes mainly...but I love working with wire too. And wild wire is even better! ;)

So here's my entry for Creative Carte Blanche's May call:


It is a fact that we often tend to keep ourselves from wandering and exploring the world by the restraints of our own thoughts and concepts. And even if our feet and will were free to go out and make new and amazing experiences, meet new people and learn new things, we forbid them to do so because of some old family beliefs that we have been carrying around with us for ages and that no longer have to be a "truth" to live by! But it is so hard to recognise them as they disguise as old friends who (pretend to) keep us safe and comfortable.


So freedom of will exists! It's there - but it is being held back or silenced by our fear of the unknown or of conflicts that might cause someone to no longer love us (which mostly turns out to not be true at all!) The rusted wire is meant to symbolize these selfmade chains.

My substrate to create this piece of mixed media art from was a small wooden house which I bought at a sale at a home decor shop.


I love to alter things and add crackle, texture, layers of paint and antiquing media to create timeworn looking objects that tell a story (which they hopefully do ;).
So to start with I gave the house a thorough coat of Raw Umber heavy body acrylic paint. Over that I added some DecoArt Media white crackle paste through a stencil and let dry naturally.

To make them look more aged the feet were given a coat of DecoArt Media Satin Varnish and then a coat of heavily diluted DecoArt Media Antiquing Creams Carbon Black and Raw Umber.


The feet fragment is a piece from one of Prima's "Milagros" sets. I simply removed the tiny loop screw it came with and inserted my rusty wire in the hole.

I applied some washes of DecoArt Media Quinacridone Gold and Transparent Yellow Iron Oxide over the stencilled flourish and front of the house shape. The base was covered with DecoArt Media Texture Sand Paste first and covered with the washes too.


Being a huge fan of Michael DeMeng's online workshops, I adapted some of his typical patterns - like the little "flames" around the house's sides.

Using DecoArt Media fluid acrylics and DecoArt "Teal" Dazzling Metallics paint I added the turquoise dots and edge and painted the little dotted flames around the house's sides. These were toned down with a wash of DecoArt Media "Transparent Yellow Iron Oxide" afterwards.


also a


Grab button for Creative Carte Blanche” width=


Thank you, Creative Carte Blanche, for the inspiration
- I had a wonderful time in my studio thanks to your call -
and thank you, my dear (true) visitors and friends, for stopping by!


Join The challenge!
I would also like to enter this project to the May challenge over at Mixed Media Place, as some of the colours were inspired by their lovely mood board.


Hugs and happy crafting! 
Claudia xxx


Thursday 19 May 2016

Let's Hit the Beach! The New Dare at Emerald Creek!

HI and servus!

It's time for a new challenge over at Emerald Creek Dares and this time it is all about summer, the beach and water fun themes.


I recently stumbled over some cheap wooden houses at a dollar store - so I decided to create one of these gorgeous beach houses I adore so much from one of them:


Emerald Creek products used:


I also used various Distress Paints, Distress Spray Stain "broken china", a Tim Holtz idea-ology Chit Chat sticker, an old book page, a black permanent marker and Ranger Matte Medium.  

Here's how I did it:

First I used some masking tape to create a stripe pattern and mask the roof and door:


Next I dabbed on some embossing ink using an embossing dabber and poured some of the fantastic Chinese New Year embossing powder over the whole piece. I heat embossed my red stripes:


Then I masked off the red stripes - covering them with masking tape and did the yellow stripes with the Easter Parade embossing powder. 


I painted the door and roof using Tim Holtz Distress Paints. I also covered the sides of the beach hut with red Distress paint.


Next I chose the lovely waves stamps from Nicole's lovely "Upstream" stamp set to create my ocean waves.


I stamped them onto some blue designer paper using white opaque stamping ink and heat embossed the images with Ultra Puff White embossing powder:


To increase the contrast and make my waves more visible I sprayed on some "broken china" Distress Spray Stain:


I also used Distress Paints "mowed lawn" and "black soot" to customize the lovely key charm and hearts brad to add to my beach hut.


Some "mustard seed" Distress paint was smudged with my fingers onto some yellow patterned paper to prepare my background for the "Carmen" stamp which I intended to use to create my sun.


The image was torn into shape (instead of fussy cut) - so I had some white border around the stamped sun. I glued the sun to the back of my wooden house using a strip of transparent acetate (which was a left over from some packaging). 


The waves were fussy cut and glued to my strips of beach sand (which I had cut from some old book pages that had been glued onto some heavy card to make it more sturdy). 


A little fish that is jumping for summer joy was added the same way as the sun - using transparent acetate that was glued to the back of the house block. 


I stole borrowed one of my son's "Kappla" bricks to mount all my pieces to. 


The key for the beach hut and the welcoming heart sign were glued on using Matte Medium and left to dry naturally. 


I love how the Emerald Creek embossing powders sparkle....that reminds me of the sun sparlking and dancing on top of the ocean waves and its dancing reflections on beach houses, old boat houses and piers (which is pure summer feeling for me):


So now that you have seen my project I would like you to hop over to the Emerald Creek Dares blog to also check out the fabulous summer beach projects my talented team mates have created! And maybe we can even lure you into playing along! ;) 

Hugs and happy crafting,
Claudia 
xxx


Monday 16 May 2016

Finding Nemo? - A Calico Craft Parts Shadow Box from Deep Under the Sea


Yoo hoo and servus!

Just a short invite over to the Calico Craft Parts inspirational blog where I am sharing my latest project today! I would love to see you over there and maybe we can find Nemo together....

I also want to thank all who left such encouraging comments on my last project over there (which was my very first as their official DT member...so this was a special post and that made all the lovely comments even more important to me than usual...well, I guess you know what I mean;) Thank you all so much! I really appreciated that! Mwah! XXX I hope you will like my new project as much! ;)

And if you haven't already taken a look at my inspirational project for our challenge over at SanDee&amelie's Steampunk Challenges, I hope you will do now. Simply scroll down to the previous post or click HERE.


Hugs and happy crafting,
Claudia 
xxx


Sunday 15 May 2016

The "Geistesblitzgenerator"!

Servus, hello and welcome back to my little creative spot!

I am glad you stop by and before I continue I want to thank all those who have been taking the time to leave their comments with me since I started this blog - I really appreciate that a lot and they also mean a lot (of encouragement) to me. So thank you very much! (We all know that comments are what keeps us going, don't we? ;)

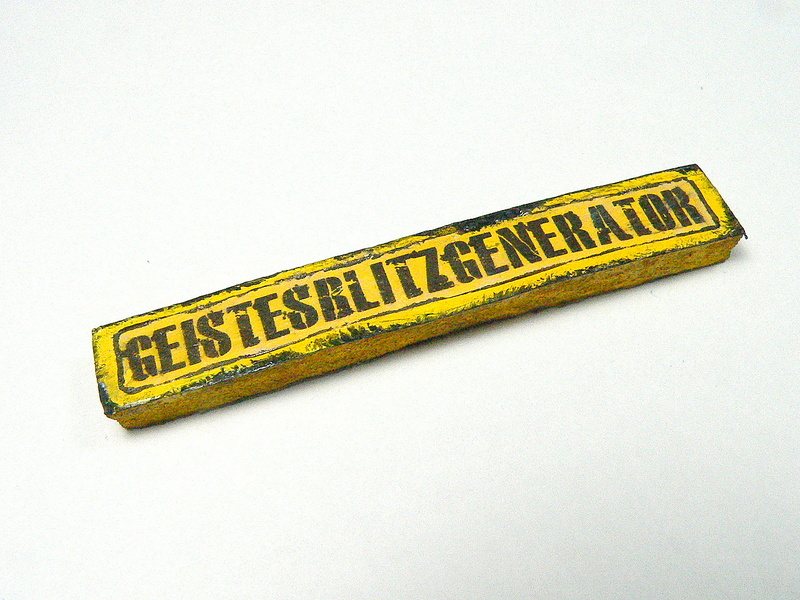
Well, here's my new invention! The "Geistesblitzgenerator" - which is German for "flash of genius-generator". By sharing this project with you today I want to invite you to take a look at or even play along with our actual "Anything Goes - Steampunk/Industrial" challenge over at SanDee&amelie's Steampunk Challenges.


The idea originated from several days of mojo-less suffering - trying to figure out what I could create for our steampunk challenge. I knew that I wanted to use some of the awesome steampunk chipboard pieces from our second prize sponsor "boozybear"...and I knew I wanted to arrange them to give a machine-like impression. But which kind of machine?

The final kick off needed came from our short trip last weekend when we visited one of my favourite places - Castle Bernstein in Burgenland. There is a small museum at the foot of the castle hill that shows old mining equipment and machines and I took a picture of this little digger:


I loved the rust working through the coat of yellow varnish and all the rusty texture!


And my plan was to recreate this exact look - but I still didn't know what kind of machine I would want to "build"...well...as usual when this happens I decided to simply start and find out where the project might take me...as long as there was yellow and rust and loads of gears...


So here's what I used:


parts of three packs of boozybear chipboard pieces


I started with playing around with the "mechanicals" and "lightbulb" chipboard pieces until I had found the "right spots" to make them look  a bit machine like. Then I glued them to the wooden block (a find from the sales section of a home decor shop) using matte DecoArt Decou-Page.


Next I gave everything a thick (stippled on) coat of Raw Umber heavy body acrylic paint. After that had dried I stippled on two layers of DecoArt Americana "Primary Yellow" acrylic paint.


After that had dried, I applied DecoArt Media Texture Sand Paste in some spots - using my fingertip and a small palette knife.


I let that dry too and then started dry brushing the piece with DecoArt Media Fluid Acrylics "Raw Umber" and "Dark Grey"


I also added first shades of English Red Oxide - dry brushing it on and also applying a light wash.


Then I built up layers of paint - dry brushing them mainly onto my piece - using an old bristle brush and a soft flat brush. 

Paynes Grey:


Quinacridone Gold:


Paynes Grey again:


I also added mixes of  Quinacridone Gold, English Red Oxide, Transparent Yellow Iron Oxide and Diarylide Yellow here and there for more depth and richness in colour.


I painted some drip lines too and toned everything down with a wash of English Red Oxide.


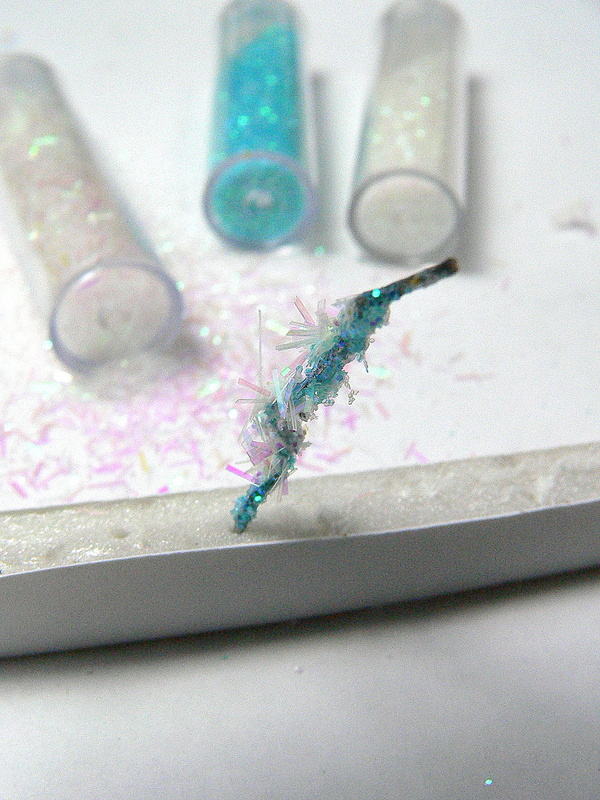
Next I needed the icy blue spark that jumps from the lever to the light bulb. I used a little bit of wire and applied some matte Decou-Page to it with a soft brush. Then I dipped this piece of wire into various sorts of glitter and let that dry:


I drilled a tiny hole into the chipboard and inserted the wire into it - fixing it with matte Decou-Page. Once that was dry I added some dashes of Primary Yellow to blend my spark in.


The ramifications were painted directly onto the lightbulb using a white gel pen and a light blue marker. 

I still needed a sign though. As I didn't have a stamp that matched, I searched the internet for a stencil font I liked, mirrored the word on the computer and printed it out in matching size.


I used DecoArt Americana Decor Image Transfer and applied it to both: my prepared substrate (cut from foam board and painted with acrylic paint) and the front of my cut out word. Then I glued the word face down onto the substrate and made sure I applied thorough pressure so there would be no bubbles. 
After that had completely dried (best wait for several hours) I used a soft sponge and added clear warm water to my "sign" to soak the glued on paper. With soft pressure and rotating motion I rubbed off the paper with the soft sponge to reveal the letters - voilá:


Then I used the same paints I had used on my machine to "age" my sign:


I fixed it to my wood block using two short pieces of rusty wire that I inserted into two drilled holes at the side.


I added a bit of matte Decou-Page (using a fine tip brush) to the holes and wires to make sure everything would stay in place.

 Done!


Now I will never run out of good ideas! Yay! And I can outsource a lot of brain activity (or rather replace missing brain activity? lol)...
Here are some more close ups, if you like. But first I will give you the link to our challenge blog - over HERE. ;)


I hope you enjoyed your visit today! And I hope I will see you soon over at our steampunk challenge blog! My teamies have prepared the most stunning inspirational projects for you! So make sure you check them out! I promise you will get a bundle of fantastic steampunk inspiration! 

Hugs and happy crafting!
Claudia 
xxx