Monday 24 June 2019

"Jewels" - a Calico Craft Parts Project

Hi, servus and thanks so much for stopping by!
I hope you are enjoying summer as much as I am! I will soon be heading off for our annual summer vacation in the beautiful Salzkammergut region and I am already looking forward to be surrounded by mountains, lakes, forests and pastures full of lovely flowers, butterflies and other beautiful insects.

Those who know me know that I love insects - especially beetles as I always wonder how evolution could create living little jewels of such delicacy and amazing detail! Today's project is all about my love for beetles and insects in general. It's an ATC done on one of the numerous different ATC blanks from the Calico Craft Parts store and I have used my beloved Mini Wood Shapes on it. The whole finished project and some information on the how-to and craft shapes and DecoArt products used can - as always - be found over at the Calico Craft Parts blog (you get there by clicking HERE).


Hope to see you over there soon!

Hugs and happy summer crafting!
Claudia
xxx


Tuesday 18 June 2019

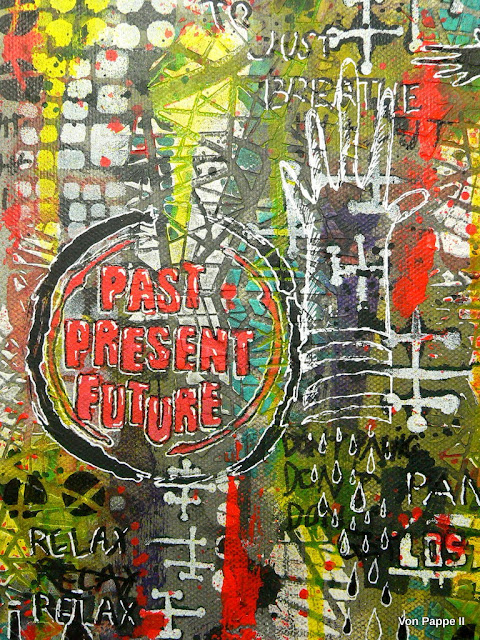
A Struggle, a Canvas and Jean Michel Basquiat - a StencilGirl® Project

Servus and welcome to the invitation over to the StencilGirl® Talk blog, where I am sharing my latest project as a (returning) member of their new 2019-20 Creative Team.
(Thank you Mary Beth and Carol for having me again!!! Mwah! XXX)

This month's theme for the Creative Team is to create an abstract or summer themed piece of art.
I obviously went for the former.


(detail shot)


I received some fantastic new stencils to play with and I have used some older stencils alongside some of their latest designs to create a canvas that took a life on its own even before I realised it and that - in the end - reflects my actual state of struggling with nasty symptoms from an obviously heavy under function of my thyroid (due to the chronic Hashimoto's disease).
It isn't clear why and when thyroid levels have started to go down again after a long period with (not perfect but) good blood levels and without any heavier symptoms - it is very likely that menopause has lead to a change of hormones levels that now make me struggle with the really nasty stuff like fatigue, muscle pain, weakness, dizziness, feeling cold, anxiety, panic attacks and (no surprise) high blood pressure that does not respond to medication as easily as it should...


(detail shot)


That is nothing that can't be quickly fixed by adjusting medication - it actually takes months until hormones levels adjust - so I will have to hang in there for a bit longer I'm afraid. And it is nothing that scares me really as I have already been there and done that once or twice during the last years (but only once that heavily). What makes it really hard at the moment are the panic attacks that come out of nowhere and that make it almost impossible to find a proper dosage for blood pressure medication as I can never tell if it is the anxiety or an approaching panic attack that raises blood pressure or if blood pressure itself really is too high.
The thyroid expert I am seeing believes that my blood pressure will be back to normal as soon as thyroid blood levels are back to my personal level of well being. In the meantime my general practitioner added some beta blocker to my medication (to slow down my high pulse rate) but that isn't good for the metabolism of artificial thyroid hormones I have to take...so it very likely will make me slip into under function even deeper until (in two weeks hopefully) my second visit with the thyroid expert will hopefully solve this particular issue and my hormones dosage will be properly adjusted.


(detail shot)


My general practitioner has never heard of beta blockers interacting badly with thyroid issues (which is only an issue with specific forms of thyroid diseases, with others it is a proper and helpful medication actually) and he didn't believe me when I mentioned it (actually he said I must have misunderstood something the other doctor had said). My general practitioner really IS a good doctor (I can call myself lucky that he is one of the rare GPs who even know and consider Hashimoto's disease as a possible diagnosis with symptoms most other GPs regard as typical signs of burnout or depression) - but he is no expert obviously. But he is the one I need to go to for adjustment of blood pressure medication...well...this means I will have to be patient and try to relax and hang in there as good as I can for several more weeks (or maybe months). This means the struggle will continue and I need to prepare for this and find a way to deal with this situation.

So for now I try to accept things as they are and to accept situations when I find myself crying over practically nothing or hyperventilating because of a panic attack, or being a total scatterbrain most of the time...simply because I found that when I try to fight, things start to feel even worse and only make me feel more desperate, weak and exhausted. But sometimes I am just not prepared well enough to be able of utter "acceptance"... and then I slip into "struggling mode". Often this happens so automatically or slowly that I realise it too late and at a level of exhaustion or helplessness that makes me panic again. And I try to accept that this will happen again, too...


(detail shot)


I usually do not talk about my Hashimoto's disease issues and what they do to me, but this time I just felt I needed to because the canvas I did for StencilGirl® is an exact image of my momentary struggle and anxiety. I tried to create something bright and jolly to kind of escape struggle mode for at least some hours (during the creative process) - but it didn't work this time. You can read about this and see the "before and after" stages of the canvas over at the StencilGirl® Talk Blog alongside a detailed step by step (as always).


I know I am not the only one who is struggling with chronic (or recurring) health issues and I really didn't write this post to trigger compassion. I know we all know about those (mostly) secret struggles or battles many of us are facing and know that we all understand and care - without having to express it in words. But I wanted you to understand what it is that you see in the canvas, because something in me forced me to express it visually. Maybe you also feel it too when looking at my canvas - and now you can name it. It's struggle. And it is me - trying to face struggle and deal with it. And the style of the canvas is obviously influenced by the art of Jean Michel Basquiat (I love his art and have a print of one of his paintings hanging in my living room...not to mention the illustrated books about him and his - sadly very short - life and the impact his art has made).


Wishing you all good and struggle-free times!
Take care!

Claudia
xxx


Friday 14 June 2019

Sun, Sea & Sand - a new Themed Collection over at Mixed Up Creative Academy

(advertisement)


Hi and servus!

Some may already have heard (or seen) that I have recently joined the fabulous Mixed Up Creative design team around wonderful Katy Leitch and become a resident tutor there.

Mixed Up Creative offer several platforms that provide step by step and video tutorials, in-depth workshops and masterclasses on specific mixed media techniques, articles all around being a creative, inspiration via high quality project pictures and so much more. There's the free Mixed Up Creative Blogbut workshops, masterclasses and themed collections can be bought separately via the Mixed Up Creative Academy platform and some of these are even included when you purchase the monthly Academy PLUS subscription with which you get new courses every month, plus discounts on workshops and masterclasses that can be bought separately, freebies and prize draws.

Today I would like to announce the first "Themed Collection" to which I have contributed a project and step by step tutorial (as a new resident tutor on their design team). It's perfect to get you in the right summer holiday mood - the "Sun, Sea & Sand - Themed Collection"!


You'll find all the info you need if you click on the link right above the picture. This Themed Collection can be purchased for £10.95 and offers nine awesome projects - some have a written step by step with pictures, others are video tutorials - but they all are just amazing and so inspiring! You do not have to be a pro to be able to recreate the projects, effects and techniques shown but even if you are already an experienced mixed media crafter you will still find loads of inspiration and maybe even some new tipps and tricks to learn from.

I really am so proud to be part of this and to be able to work alongside all those inspiring and talented designers! This is the official sneak peek at my project - the pirates themed "Sunken Treasure" (a highly textural altered bottle). And as you may have noticed I am no good at this kind of advertising stuff at all...lol.


All projects come with detailed lists of products used and info on where to get these. And you get nine projects for the price of less than £ 1.22 each!  I call that a real bargain ;) . I hope you will enjoy the projects and tutorials of this lovely Themed Collection!


Thanks for stopping by! 


Hugs and happy crafting!

Claudia
xxx


Monday 10 June 2019

Ahoi, ahoi! - a Calico Craft Parts Project

Servus, hi and ahoi, dear crafty landlubbers!

This is my usual short invitation over to the Calico Craft Parts Blog where you can check out a little maritime themed project I've made for your inspiration.


The sneak peek image is meant to already get you in the right mood (and of course to lure you over to the project post with the finished project and a little how-to).

I hope to see you over there!


Hugs and happy crafting!
Claudia
xxx


Wednesday 5 June 2019

Wellbeing Through Creativity - Join Me and 21 Other Creative Tutors in an Amazing Six Weeks Wellspring Summer School

(this blog post contains advertising)

Hi, servus and thanks so much for stopping by on this special day!

Special for me, because I am announcing my first Video Class I have put together and recorded for you and that is part of a six weeks long fantastic creative summer school named Wellspring 2019  and is offered by Mixed Up Creative over at their Mixed Up Creative Academy platform.


This is how lovely Katy, the mastermind behind Mixed Up Creative and this summer school explains what Wellspring 2019 is all about:

Wellspring is a six-week summer school focussing on the power of creativity for self-care. We’ll look at how you can learn to use your creative time in ways that can be beneficial to your mental wellbeing. In a series of 25 detailed lessons, we will explore topics around the creative self, challenge you to look at how you work and what blocks you may have, consider how and why art can be so good for your soul, and make lots of fun projects along the way. Plus, you’ll learn more about how and why art can be therapeutic from mindfulness and art therapy experts.


OMG! I just love being part of this!!!!
I guess we all know how much creativity and well being are connected and about the therapeutic effects of creative processes, but here you will find over twenty classes that will in one or the other way show you how to nurture your creative self and soul. To take a peek at the projects your tutors have designed for Wellspring 2019, simply click on the link at the bottom of this post or watch the short video right here.


My project is all about facing those parts of our personalities that we do not feel comfortable with - anger and frustration. And it is about unveiling the energy hidden or locked away within these feelings. It is about becoming whole and accepting all the facets of our personality - which is a crucial factor when it comes to wellbeing and self-care.
Looking at it from the creative side, we will be tackling the much feared topic of self-portraits - but in a new and totally stress- and failure-free way!
And you can even attend this class without having to dig deep down into your selves and still profit from the technique shown to grow your confidence with portrait painting. And of course you can also profit from the psychological effect behind the project without having to create the perfect self-portrait. Either way - I hope my class will help you as much in increasing your wellbeing as it did with me.


For those who want to save a few bucks...there is an early bird price that runs until Thurs, 13th June.


There will be some pre-school classes that start on 14th June.
These remain open until 30th June, at which point registrations will close.
Wellspring Summer School officially starts 1st July and will offer 25 lessons spread across six weeks in July and August. There will also be a private facebook group where tutors and students can discuss and share their progress.


More information and all the deets you need to know can be found here:


I can feel an exciting summer filled with creativity and well being
lying ahead of us!
Hope to see you over there! 

Claudia
xxx


Saturday 1 June 2019

Assimilated - an SASPC Project for our June Challenge

"We are the Borg. You will be assimilated. Resistance is futile!"


Welcome and thanks for stopping by to take a closer look at today's project I have made for our June challenge over at SanDee&amelie's Steampunk Challenges!


Oh, my! I loved watching the Borg and Captain Jean Luc Piccard and his crew from "Startrek - The Next Generation". You too?

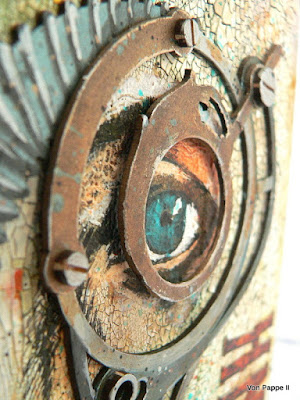
So when I saw the cool "eyepiece" chipboard kit from boozybear it made me feel quite nostalgic and I immediately had to think of a Borg themed project for the June challenge over at our Steampunk challenge blog.


Doing a background that is one completely crackled surface was inspired by the awesome "Crackle Masterclass" over at the MixedUp Creative Academy.

I used DecoArt media white Crackle Paste on a thick wooden panel that had some chalk letter quote on it (from the sales section of a home decoration store) . I always browse the sales sections of these stores for cheap alterables. ;)


I spread the crackle paste with a palette knife and made sure I didn't cover the panel too evenly. This produced a beautiful mix of differently crackled areas.


I stamped an eye onto a paper tissue in black archival stamping ink to use the top layer of the stamped tissue and decoupage it on top of the crackle surface.


But first I had to draw the missing parts of the face. The eye surrounded by the "eyepiece" was put in place first as this was my focal element. The nose and mouth were added with a permanent black ink PITT marker (I used the medium sized tip marker and the brush tip marker).


Time to glue the stamped eye in place. I used DecoArt Paper Decou-Page this time as it is more liquid than the matte Decou-Page and therefore does not tear the tissue when you glue it in place with a soft brush.


Then I misted the dry panel with DecoArt media Misters and also some dark brown Distress Stain spray. I added, dabbed off, sprayed some water on top to dilute the added paint sprays, dabbed off again, added more....until I was content with the look. Heat drying was no problem at all as the crackle had been done a day earlier and obviously was completely dry. Also none of the crackle came off during this heavy treatment with loads of paint and water. Really cool!


To make the face more prominent I painted in the highlights with a soft brush and DecoArt Americana Snow White acrylic paint.


Then I went in with a wash of DecoArt media Quinacridone Gold fluid acrylic paint to paint the shades.


The irises were painted in DecoArt media Cobalt Teal Hue fluid acrylic paint.


The finished face so far. 


To paint the eyepiece I used DecoArt matte Metallic paints Pewter and Aged Bronze.


On top of some of the parts I added a wash of Carbon Black DecoArt media fluid acrylic paint.


While the eyepiece was set aside to dry I die cut the letters for my Steampunk word (using the cool "Wonderland" font die from Tim Holtz) from thin greyboard. The letters were painted using DecoArt media fluid acrylic Transparent Red Iron Oxide.


Then I drew the shades with the black permanent PITT marker before I stamped some faux rust texture on top using black archival stamping ink and an Andy Skinner stamp.


I found the eyepiece needed another metal tone, so I painted some parts with Silver DecoArt media fluid acrylic Metallic. I diluted the left overs on my palette and loaded a brush with these to sprinkle them on the dry eyepiece.


I lightly smudged the edges of the two smaller pieces from the eyepiece chipboard kit with DecoArt Silver Sparkle Metallic Lustre. A very thin wash of media fluid acrylic Quinacridone Gold was added on top of all the pieces.


Some washers and screw heads from my beloved Calico Craft Parts MDF Mini "Hardware" sheet
rounded up the design just beautifully. I painted these in Silver and Quinacridone Gold.


I used DecoArt matte Decou-Page and Tacky Glue to glue the eyepiece, screw heads and letters in place.


Some detail shots:


Over at the challenge blog you will find more inspiration made by our amazing design team! I hope you like my Borg inspired project and I also hope to see you play along with us this month. Two prizes are waiting to be given away to two randomly drawn winners among all proper entries...and of course our players' entries are worth taking a closer look at too ;)

I just love how our players and the design team always share so many amazing steampunk designs and ideas over at our challenge blog! Together we are all making SanDee&amelie's Steampunk Challenges such a special mixed media steampunk and industrial style place to meet at. And this makes me very happy and the proudest challenge blog owner ever! Mwah! XXX

Hugs and happy crafting!
Claudia
xxx