Showing posts with label leather. Show all posts

Thursday, 14 March 2019

Hand Painted Folklore Style Jewelry - a DecoArt Mixed Media Project

Hi, servus and welcome to a short invite over to the DecoArt Mixed Media Blog, where I am sharing my latest project.

DecoArt have recently released a new product - "Stylin" Multi Surface Fashion Acrylic.
Being a hoarder of all sorts of alterable stuff I luckily (hahah!) had some leather scraps hidden in the backs of my shelves that now called to be used for trying these out and creating some gorgeous wearable fashion mixed media art.


I have recently started to explore folklore art because I love that it is close to doodling but also combines this with a playful way of designing and an exuberant painting style that is related to the tradition of former painters' "horror vacui", which is a Latin term used in art history for "fear of the empty space" and describes painting styles that aim for complete coverage of a surface with loads of detail, shapes and patterns instead of have filled and painted in space contrast some empty or negative space (as is more usual with contemporary art). 

As you can see folklore style even makes me, the grunge girl,  go for bright and joyful colours. ;) 

More info about the Stylin paints, the full tutorial and many detailed steps images are waiting for you over at the Mixed Media Blog
I have also taken steps images of the painting process so you can follow and recreate the cuffs if you don't want to go for an own design. 

Hope to see you over there soon!

Hugs and happy crafting!
Claudia
xxx


Sunday, 1 June 2014

"Flaming June" - an image impulse challenge at Our Creative Corner

Servus and welcome back to my creative spot!

You are just in time to learn about the new challenge for June at Our Creative Corner for this month which is hosted by lovely Julia this time.

"Flaming June"

She chose one of her favourite paintings from Romantic painter Lord Leighton as an impulse and wants all of us to use the rich orange tones from his painting as the main colours of our makes! To see the painting and to learn more about the details (so you can join in and get eligible for any prize wins or making Top3) hop over to Our Creative Corner!

So Julia says: "use bright orange tones as the main focus".....sounds easy at first, doesn't it? But I found that I really struggled with finding a theme where orange might fit as the main focus....funny thing is: I love orange (especially wearing orange clothes), but I found that I hardly ever use it with my projects...I had never noticed before honestly. 

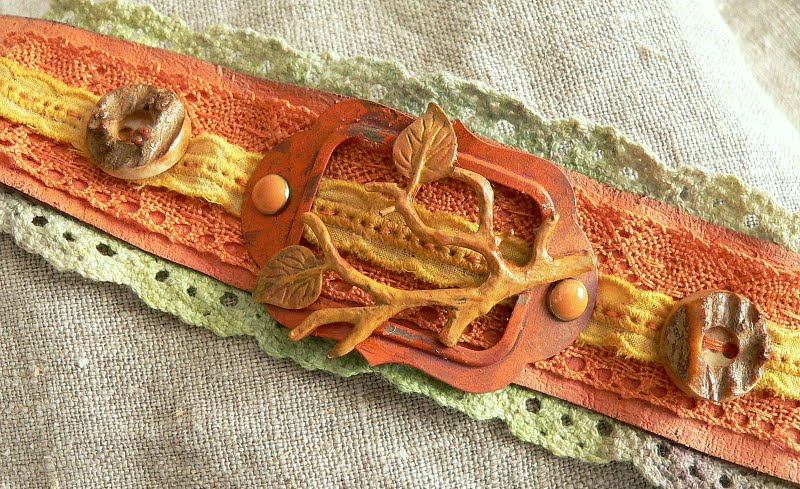
It was a lucky incident that finally let me come up with something I really like: I had my new Vintaj patina kit out for play and used it to practice on some metal embellishments. And there was an orange lace ribbon lieing on my desk as well (I guess it fell off my box with ribbons when I was searching for some other fabric for a different project some days ago)....when I took both and held them against each other I found that they would make a lovely bracelet! I had always wanted to create one of these gorgeous cuff bracelets made from leather, lace and vintage embellishments!


So I grabbed some beige leather scrap and tried to tint it orange - using almost anything I had at hand: orange mists, orange fabric paint, orange spray paint and distress stains...and it worked (but don't ask me what it was that finally did the trick *lol - I assume the whole mixture)! Yay!


To have a contrasting colour - as is the blue sky in Lord Leighton's painting, which makes the orange of the dress pop even more - I died some white lace ribbon using Colour washes. Then I rummaged my various treasure boxes and drawers (especially the one with the old buttons from my grandma and the one with the metal embellishments I got from fabulous Retro Kraft Shop :


http://www.retrokraftshop.pl/en/


...and after I had coloured the lovely bronze metal branch and the label with the Vintaj patinas, I was ready to sew it all together. And as there is a plant in Lord Leighton's painting, I decided to use a plant (the metal branch) too ;)


It was a bit fiddly as you first have to punch all the holes for the sewing needle to go through the leather and then have to find them again while sewing ribbons to the leather strip from front and back...but the result was so rewarding (at least for me)!


I love how it looks on my wrist and honestly I would never have come up with a colour scheme like this if there hadn't been Julia's tricky challenge theme (so thank you, Julia! xx) ! I had so much fun dyeing all the ribbons and the leather I used and the Vintaj patinas worked great!


I love that I could use some of the buckhorn buttons from my grandmother's collection too and that they add so perfectly to the design! This way I can carry something that belonged to her with me and have her close.


I am sure that this won't be the last bracelet I did, as I had a ball creating it (and still have a lovely collection of old vintage treasures to be used up). I hope you like it too and can't wait to see what you will come up with for Julia's challenge!


We have a prize sponsor too this month and it is Tando Creative! So join in to get the chance to win some of their awesome goodies!


Hugs and happy crafting,

Claudia xx

Tuesday, 8 January 2013

"Keepsakes"


A dear friend of mine recently gave me some awesome cigar boxes for altering. (Thanks, Alexander!)

For a start I wanted to try the "faux leather technique", which is shown here at Technique Tuesday, who are having a DT call right now! (Check it out if you are interested!)


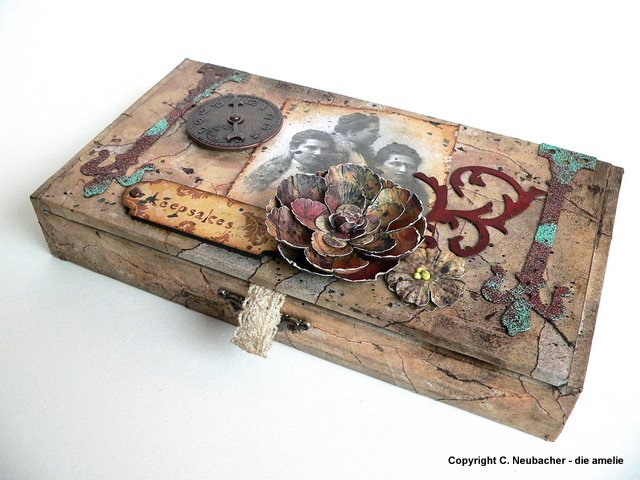
So, as shown in the wonderully made tutorial, I first covered the box with torn pieces of masking tape all over. Then I blended the surface with Distress inks "rusty hinge", "vintage photo" and "walnut stain" using the blending tool.

This picture shows a "before and after":


To give it a glossy finish the whole box was covered with clear embossing powder and heat embossed, which gives it a stunning leather-like look! (I admit, I really was surprised by the effect as I hadn't expected it to be that "leather like").


 Then I cut out two hinges using the Sizzix Alterations die from Tim Holtz and heat embossed them with Ranger embossing powders "Rust" and "Verdigris". They were glued onto the box using special power glue as the normal crafting glue would not work with the embossed surface (so pay attention for good results).


What remained to do was embellishing the box with some nice "goodies" as distressed and inked copies from pictures of my ancestors, Prima flowers, Tim Holtz die flourishes, key holes, clock faces, gears and a self made label to indicate the box's purpose.

The "keepsakes" label was made using one of the Xcut "Dielicious dies and stamping the quote (surrounded by a flourish design in "Sepia" archival ink, which is a stamp from Rico Design's "Ornamente" stamp set).

...at last some spritzing and spraying with darker tones of Maya Mist and Mr. Huey's colour sprays for an even more used look and for the inside of the lid a cover, using some scraps of my paper stash....done!


Here are some close-ups and views, which I hope you will like!
Thanks again for visiting and a big hug!

die amelie xx


I am also entering Simon Says Stamp and Show's challenge "Embrace the Old", Loves Rubberstamps "Use Dies or Punches" challenge, Fashionable Stamping Challenges "Surprise Us" and Vintage Stamping Challenges' "Vintage" challenge with this project.


Tuesday, 11 September 2012

Emergency kit for Witches

Inspired by Laura Carson's lovely projects on her Arfully Musing blog, I just HAD TO create this altered Altoid's tin box modelled on her gorgeous apothecary! (click the link to see her awesome stuff!)

As I love to write, draw and try to produce most of the afforded stuff myself, I did not use lots of collage sheet scraps or bought embellishments, but thanks to those awesome friendly people out there in the web, I found some wonderful spooky freebies, which were very inspiring and useful!!! Thank you so much at this point!

So behold, honourable witches and sorceresses, our fabulous apothecary: "The practical Witches' Companion"!
Very helpful for witches, who love to travel and have the most essential ingredients and tools with them. A handy accessory for the resourceful, modern mobile witch! To provide full safety, the "Companion" can be locked (key and lock included in delivery)!
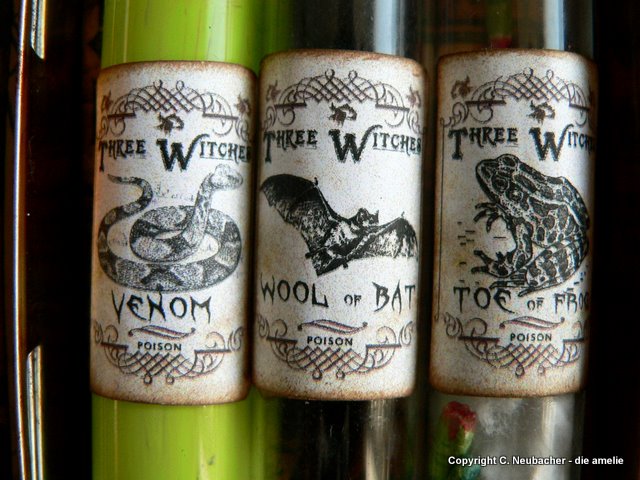
It usually comes with three ingredients, safely bottled in carefully corked, reusable glass vials. According to the witch's individual magic preferences, various combinations of ingredients are available. "Teeth of Wolves", "Muddled Mummy", "Spider Venom", "Devil's hair" and "Eye of Newt" to name only a few. Your witchcraft's success is our goal!

The shown version contains the ingredients "Wool of Bat", "Toe of Frog" and snake's "Venom", our top seller in the popular "Webbed Potions" design.


Once you open the outer cover, which is held in place by delicate metal fittings and a pure leather string, the list of contents on the left, the key and the lid of the travel box come to the fore.


After unlocking the light aluminium travel container, you can easily open the lid, which on its'inside shows a lovely group portrait of the honourable company's foundresses, the "Southwick Witches". On the right - as you can see - the vials are safely held in place, perfectly designed to fit.


The official "Wicked Seal of Approval" on the back guarantees 100 % quality of contents and materials used in our products!


We are looking forward to count you among our satisfied customers!


I entered the challenges from Try it on Tuesday , Fashionable Stamping Challenges , Pin And Tack and Anything But a Card with this project.

Products and techniques used:
Ranger distress inks "rusty hinge" and "vintage photo", Ranger embossing ink, blending tool, black fine tip marker, AAI "rust" and "sunset", embossing powder "copper", heat tool, some halloween print out freebies (labels and witch-photograph), papers from "The Timeless Type Stack" and BoBunny's "et cetera" collection, leather cord, two old pieces of jewelry, stamps from Tim Holtz ("Witch Hazel"), My Mind's Eye (Lost&Found Halloween), flonzcraft (frame) and Prima's "Printery" stamp set, black felting wool, air drying clay, felt tip pens, green acrilyc paint, brush, glue, scissors, Altoid's box, thick cardboard,  white card, an old key, three corks and three glass vials from my friend's lab.