Showing posts with label My Mind's Eye. Show all posts

Wednesday, 11 September 2013

Witch Myrtle's Favourite Travel Case

Hello, dear readers and followers old and new,

welcome back to my tiny spot! I am so glad that you stopped by again (or even for the very fist time!) and I am ever so thankful for all the lovely comments you leave with me. They really mean a lot to me and I know I have been MIA for quite some time now (due to our long school holidays and all the preparations for my son's start at the new school directly after returning home - gosh, they grow up sooo fast!) I hope you forgive me that I have just started to try catching up with visiting your blogs and leaving some lines there.

Today I want to share my first Halloween make with you. I made it on the first day with enough spare time to sit at my workdesk and although I had planned to do something "quick and easy" it turned out as a whole day's project in the end ;)

Last Halloween you met the three witches Amealia, Prudence and Porticia who live together in a flat sharing community. They had some problems when you saw them the last time, but those luckily seem to have been fixed shortly afterwards. ;)

Well, they have a very dear friend, Myrtle Twizzlethwaite, who is one of the youngsters among the witches' community.  Young witches often get used special items from their witch ancestors. So did Myrtle. She got her Grandma's Travel Case - a very practical item, even though it is not as modern as the tiny Witches' Emergency Kit I showed you last autumn. But it provides a lot of space for travel equipment and therefore Myrtle is using it very often and with pride.


Myrtle's Grandma became very forgetful and absent-minded during her last years - so she put on the "Poison" stickers as a reminder of the dangerous load the travel case carried then. A lot of the labels on the travel case are remnants of Myrtle's Grandma's great times as a highly notable witch...which makes the travel case even more precious to Myrtle.


And maybe you have already spotted Archie, Myrtle's Hercules guard beetle in there.

Every witch has an animal partner with her - some love to have ravens by their sides, some love the company of snakes and lately some have started choosing small creatures like mice, rats and even beetles or spiders (which some of the old fashioned witches think is humbug and just a short-lived fashion).

But Archie has already proven very useful, as he drives off  pickpockets by his rather ghastly sting (which is extremely hurtful and makes a victim puke for four days).


Archie always guards Myrtle's Spellbook, which is the most important thing a witch owns.


Myrtle also carries a crib with her, as she still is not too firm with some of the spells.

As you can see she has been using it quite a lot and has also added a lot of handwritten notes to it during her first years as a graduated witch.


One of the compartments holds a pencil and some stamps, as Myrtle loves to travel and write postcards to her friends and family from all over the world.


The tiny metal tin once held a dangerous poison but now holds Myrtle's earplugs, as she is a very light sleeper.


But the most important things Myrtle carries with her are her tiny bottles with spells ingredients - from simple ocean salt over glowing termites, poisonous spider bones, ancient scarab's shine, hornet's sting, bristles and wings to concentrated pumpkin crystals.


The "Happy Haunting" pennant on the case's handle is a memory of Myrtle's very first studies trip to "Blocksberg Manor", THE meeting point and seminar hotel with the best sorted library of the world.


 With this project I'd love to enter Frilly and Funkie's "Anything Goes" challenge.

I leave you with some more close-ups and a materials list and hope that you enjoyed your visit!
Hugs and happy crafting,

die amelie - Claudia x


Materials used:

cardboard, glue, scissors, ruler, hole punch, crafting knife, cutting mat, crafting sheet,  DIs "spiced marmalade", "walnut stain", "vintage photo" and "gathered twigs", Distress paint "brushed corduroy", DecoArt Traditions Acrylic Colors, DecoArt "Weathered Wood" Crackle Medium, 7Gypsies label stickers, new Tim Holtz stamp sets "Poisonous" and "Laboratorie", alcohol inks, masking tape, MyMindsEye brad, Prima brads, stamps from Martha Stewart, archival ink "jet black", leather from an old leather rucksack, corked vials from idea-ology and Vaessen, papers from Echo Park's "Chillingsworth Manor" stash and Graphic45.

Tuesday, 9 July 2013

Altered Tin

Hello and welcome back, dear crafting friends, readers and followers old and new!

Today I want to share a project with you I made for my very best friend, who is like a sister to me. As I know she loves all things that tell stories too, I decided to alter a tin that once held some X-mas candy and turn it into something "old" with a story to tell for her. (I will reveal the content of the box later ;).


So I first "dremeled" the blue and gold ornaments off the surface and gave it a
treatment with alcohol inks afterwards. Then I stamped some bird images onto the box some of which I heat embossed with "rust" embossing powder, others I stamped using black jet archival ink.

I dyed a piece of lace using DI "vintage photo" and glued it around the box to add some texture.

I also added some rust and patina acrylic colour tones for more interest. As embellishments I chose a brad and two chit chat stickers, which I covered with Distress crackle paint "clear rock candy". Done!


Some more close ups as usual ;)


Stamped images are from TJ Designs "Birds of a Feather" stamp set, chit chat stickers are Tim Holtz, alcohol inks used were "rust", "espresso" and "pewter" and the brad comes from My Minds Eye. Acrylic colours used are DecoArt Traditions "Phtalo green and blue" and "burnt siena".

I enter this project with SimonSaysStampandShow's "A little Stamping" challenge, as I only did a little stamping and the stamps I used were small too ;).

Thank you for stopping by and hugs,
die amelie x

Tuesday, 6 November 2012

Fashiontime

It's fashion-time at FunwithATCs challenge blog and I can proudly call myself a member of their new DT!!!

Sadly, I am not at all a fashionista, so the chosen topic "Fashion" was quite out of my comfort zone. But, please, go and have a look at the fabulous ATCs the new DT made!!! They really are worth it!

At least the Tim Holtz paper got me on the right track. ;)


I used Distress inks "pumice stone", "rusty hinge" and "vintage photo", Tim Holtz and Graphics 45 stamps, washi tape, a brad from My Mind's Eye, some cord and a piece of ribbon.

Thanks for your visit!
Hugs,

die amelie xx

Thursday, 25 October 2012

Tag on arched ATC

For the Fun with ATCs challenge "Tag on ATC" I created this arched ATC with - of course - a Halloween theme.

(Hope, the ticket counts as a tag ;)


I also enter Try it on Tuesday's challenge with this ATC. They are having a DT Call running until Nov. 20th! So check this out if you are interested!


For this ATC I used stamps from RedLead, My Mind's Eye, Inkadinkado and Chocolate Baroque. Distress inks used were "walnut stain" and "black soot". Embossing was done with Ranger "copper" embossing powder and the background paper is from the lovely paper stash "Lost Halloween" from My Mind's Eye.


The two wings of the ATC are closed with a thin rough cord, fixed with two punched out card circles, which were attached to the ATC with small copper brads.


Hope you like it!
Hugs,
die amelie xx

Monday, 8 October 2012

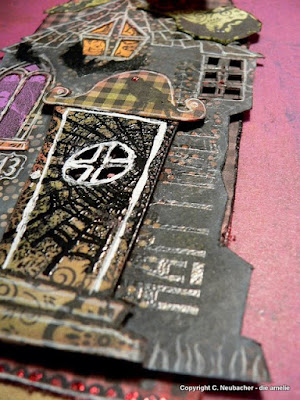
My own "Rickety House"

I already know this year, what I will get for Christmas - it's a Sizzix (hoooray!!) and some dies with it as well of course! One of them is the gorgeous "Rickety House" from Tim Holtz...

...it still is a long way untill X-mas and I am not always very well at being patient. So I made myself a rickety house stencil from cardboard after a sketch on my own. Well - the cutting took quite a while (so I will be sooo happy, when I get my presents on Chrismas eve!!!! Yessss!) and I had to do it twice. The first time I cut the sketched house's shape directly through the thin drawing paper into the thicker white cardboard, which became my stencil. And then I outlined the stencil with a white marker on the paper I had chosen for my rickety house and cut that out as well.

At that point I wasn't quite sure what project I would use it for, but I felt that I just HAD to do a rickety house today, diving deeper into a "Halloweenish" mood each day.

I ended up with a large three-dimensional tag. I mostly end up with tags *lol

But first have a look at the papers I used for this one  - and you can see the stencil of my rickety house (it could be "the old house from Rocky Docky" too, I guess - one of my favourite songs when I was a small girl and which I used to sing very often with my Grandma - which maybe is the reason, why I love rickety houses very much ;).


I wanted to have some "inhabitants" for my R.H. (short for ....well you know ;) - maybe Dr. Death, Edgar Allan Poe or the wicked witch from the northnorthwest. That depended on the openings of the windows and which stamping images suited these best.

As it happens most of the time when I am crafting, things settled into their places on their own, the project being in advance. Some embossing here, some chalk-ink-blendig there. A little bling on the raven's eye and the border at the bottom. The perfect ribbon and maybe an embellishment - so I had a lovely time playing around today and this is the outcome:


The shape of the house was attached to the tag using sticky foam pads, the door was fixed onto the house the same way.

Some close-ups should show the finer details (click pictures to enlarge):


Materials of interest used: Distress inks "spiced marmalade", "pumice stone", "black soot", "peeled paint", embossing ink, Ranger fine clear embossing powder, black "Sternenstaub" embossing powder, stamps from RedLead, Tim Holtz, My Mind's Eye and Inkadinkado, white gel pen, stickles "X-mas red".


I am entering Catered Crop's "Halloweens Recipe" challenge and Everybody-Art Challenge blog's challenge "Lesezeichen/Tag" with this project.


Wednesday, 3 October 2012

Tag Album "creepy.crawly."

Maybe you know that too: you have just received gorgeous new stamps but the inspiration won't come....

Well, I found some really awesome Halloween stamps at RedLead! And when they finally had arrived, I still had no idea for a Halloween project that got me going.

Yesterday evening, finally, I stumbled upon Frilly and Funkie 's "A Different Kind Of Tag (Plus A Theme)" and THAT (thank you so much, FaFs!!!) turned the switch. So today I started my "Four Tags Halloween Album", also keeping in mind, that I wanted to use my beloved flonzcraft stamps (frame on cover and all the flourishes and borders in the project are flonzcraft stamps. Skeletton as well), as I was invited to a wonderful new challenge blog, called "Vintage Stamping Challenges" , which is sponsored by Flonzcraft (which I think, is absolutely fabulous!!). So I planned to use some of my flonzcraft stamps too, to enter their challenge too.

I also enter the challenges from "ABAC" with my sparkling front cover and all the embossing, from "Loves Rubberstamps", as I luckily found "scarecrow" and "Halloween" in the word cloud for the actual autumnal challenge and the one from the "Smudger Challenge Blog", where "anything Halloween" is asked for.

This time I decided to do a size 5 tag project, as it fitted my stamps best.
This is how it looks like:

First I cut out four tags from four sheets of some of my paper stashes ("Chillingsworth Manor" from echo park and "Olde Curiosity Shoppe" from Graphics 45) and - for the binding - a strip out of corrugated card the same width as the tags, but twice the length plus about a centimetre for the album's back. 


Then I also needed something to attach the tags to. So I folded a small accordion, where I wanted to glue the tags in between. I did twice the amount of creases, to have spare folds between the singel tags, to provide space in the album for things attached to the tags.

Hope, you can see it here:


Stamps used for the tags and the cover are from: Tim Holtz, flonzcraft, My Mind's Eye and RedLead.
Distress inks used: "peeled paint", "pumice stone", "mustard seed", "spiced marmalade", "black soot", "barn door" and "antique linen".

Here are the four tags the booklet contains:

 (Click on pictures to enlarge)

Spider webs on the tags were embossed with white, black and deep red "Sternenstaub". Images were stamped with archival black ink and Distress ink "black soot".


The cover was first sprayed with Glimmer Mists "Marmalade" and "Pomegranate" and Maya Mist "Espresso Brown", afterwards partially painted with the "Snow Cap" acrylic paint dabber and the edges blended with black stamping ink.

 (This is the backside of the cover).

For little "Darla's" glowing red eyes (see third tag) I used "Xmas red" Stickles and for the embossed title "efco embossing powder "red superglitter".


I attached various ribbons to the tags, glued them into the folded accordion and then the whole bundle into the pre-cut and folded cover.

Here some more close-ups as usual!


Hope, you like it!
Hugs,
die amelie xx