Monday 24 December 2018

Calico Craft Parts Christmas

Servus and merry, merry Christmas, dear crafty friends!

Over here in Austria we celebrate Christmas in the evening on 24. December. And we only put up the tree today - so while you are (possibly) reading this post I might well be climbing up and down a ladder to decorate the tree...or be finishing the last dishes for our Christmas dinner...or be hunting for spider webs in forgotten corners (lol).

My Calico Craft Parts Monday has accidentally fallen on this very day, so there's a short post with my personal annual Top 3 makes as a member of the Calico Craft Parts design team over at the Calico Craft Parts blog. I would like to use the opportunity to thank Helen and Louise for having me on this amazing team and for being given the opportunity to work with the wonderful craft parts! I still love using them a lot and they still are a wonderful source of inspiration and a wonderful product to add to my artwork! I am looking forward to an inspiring and fantastic 2019 with loads of new inspiring designs! Thank you so much, ladies! Mwah! XXX

I loved browsing the images of this year's projects and I have made a collage of (almost) all the Calico projects I've made this year - three of these have made it into my personal Top 3, which are being presented over at the Calico Craft Parts blog. Click HERE to get to the post.


Merry Christmas 
and a 
Happy New Year!

See you in 2019! 
Hugs and happy crafting!

Enjoy the holidays!

Claudia
xxx


Tuesday 18 December 2018

A quick self made last minute Christmas present and card - a StencilGirl DT Project

Hi, servus and welcome to an invitation over to the StencilGirl Talk blog, where I am sharing a tutorial on a Christmas card and a little self made present (just in case you are in need of something hand made to give to a loved one) - done with two lovely Christmas themed stencils from their wide wonderful range.

Here's a little sneak peek image to lure you over to the blog ;)


Simply click HERE to get taken to the post with shots of the finished card and present and a detailed step by step.

Hugs and happy Christmas crafting!
Claudia
xxx


Monday 10 December 2018

A Very Vintage Christmas with Calico Craft Parts

Hi, servus and sorry  for being a bit late with my usual invitation over to the Calico Craft Parts Blog, where I am sharing some self made vintage Christmas decoration pieces that can be used to decorate your tree or your Christmas parcels.

I've been struggling with a nasty and persistent gastrointestinal bug for about four weeks now and finally it is starting to get better, but I have been very tired and feeling exhausted during the last weeks - so there's a lot of household keeping and Christmas preparations to be done and caught up with. I hope you are enjoying the Advent season and are already in a festive mood!


This lovely cardinal on my little tag is just one of a small series of tags I've made. There's more to be seen and even another project with a short tutorial!
Click HERE to get taken to the post at the Calico Craft Parts blog with loads of images and the full how-to!


Hugs and happy crafting,
Claudia
xxx


Saturday 1 December 2018

SanDee&amelie's Winter Special Challenge Reminder and an (almost) Steampunk-Christmas-Tag

Hi, servus and welcome to a little "reminder-tag" today that I have made for our reminder post over at SanDee&amelie's Steampunk Challenges. Our winter special challenge is in full swing and there's one more month left (until the end of December) to play along. Some of my wonderful teamies have created a little steampunk-Christmas something for you too - so I highly recommend you hop over to our challenge blog to check these out as well! ;)


Over there we're also announcing the new DecoArt prize bundle for 2019...erhemm...erhemm... ;)

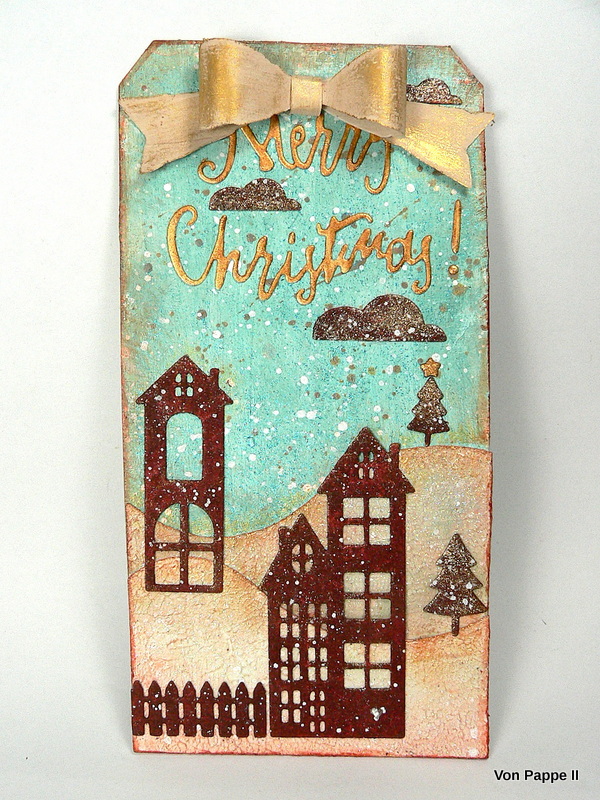
I haven't taken steps images of the creative process this time, but the pictures of the finished tagshow the process pretty well too...


I hope I could at least catch a bit of the bling from the cool DecoArt Glamour Dust paints I have used on top of other DecoArt paints and blingy products. ;)

Here's what I did to create my tag: I started with DecoArt premium white Gesso that I scraped onto the die cut cardboard tag using a palette knife. I tried not to work too evenly so some streaks remained visible. The die cut hills were given coats of dabbed and scraped on premium Texture Medium. Dabbing the palette knife into the wet Texture Medium and lifting it and repeating that process all over the surface created a lot of lovely texture that I later dry brushed with DecoArt premium paint Quinacridone Gold Hue.


This way the texture became visible just beautifully! I later added a thin coat of DecoArt "Ice Crystal" Glamour Dust paint on top to mimic the glittering snow on the hills...


To create the rusty houses I painted the die cut house shapes with Viva Decor Rusty Paper and also added a very thin layer of Rusty Patina once the "rust" paint had dried. Stippling on the paint instead of brushing created a gorgeous textural surface that enhances the impression of rusty metal house shapes beautifully.


I painted the sky's background with DecoArt Vintage Effect Wash "Patina". This paint is very translucent and a great medium to add just that tad of vintage feel to your makes (it is meant to be used on top of home decor pieces...but you know me...lol). I have used Vintage Effect Wash "Beige" on the bow (and traces of DecoArt Gold Rush Metallic Lustre on top).


To have my die cut "Merry Christmas" quote really pop and look festive, I used DecoArt Extreme Sheen "Bronze" that I applied with a thin soft brush before I glued the quote in place with DecoArt matte Decou-Page. I also used the Extreme Sheen on the little star on the Christmas tree...


The rusty clouds were given a light coat of Rusty Patina as well and the sky also got a coat of Turquoise Sparkle Glamour Dust for even more glitter from the falling snow. Using Titanium White DecoArt premium paint and a splatter brush I added the falling snow once all had dried and was glued in place. Only the bow and quote were fixed to the tag afterwards so they had no white paint sprinkles on them.


Dies used were from a set of little houses, clouds and trees (that I do not remember the name of), the hills and quote are from the Sizzix "Home for the Holidays" dies set by Tim Holtz and the bow is a Tim Holtz die too (from the "Fold Up Bows" set).


The SASPC team and I wish you a...


HERE's the link that takes you to our challenge blog ;)


Happy holidays and happy crafting!
Claudia
xxx