Monday 27 February 2017

Homo hahahbilis

Servus, hi and welcome back to my little creative corner, dear craftin' friends and followers! Thank you so much for stopping by!

Today I want to share with you another project I did as a member of the wonderful DecoArt media Design Team.

At times DecoArt team up with other manufacturers and this time it is Stampendous and their team whom the DecoArt media DT will do a blog hop with to celebrate the new Andy Skinner stamps! So look out carefully this March and visit the Stampendous and DecoArt media blog and their other social media platforms to not miss the kick off of a fantastic blog hop!

Three of my wonderful teamies will be part of this event and some more team members - including myself - will be featuring projects on their blogs during the next days and be showing off with Andy Skinner's new Stampendous stamps and the fab products from the DecoArt media line. So loads of inspiration are about to fuel your creative mojo! Here's my share - enjoy!


This skull of "Homo hahahbilis" as he has been named by its discoverer, Dr. Rufus Bellows, has only recently been excavated and forces anthropologists all over the world to accept that there has been another, much earlier and totally different human species that had the most amazing qualities and seems to have developped in a totally different direction than its later "colleagues".

So far scientists who have carefully examined the specimen dare assume that this much older species had its own means of protecting themselves against predators like the giant sabre-toothed tiger. They believe that these early humans could squeeze their own noses to have some acid liquid squirt from the inner corners of their eyes that would harm the attacker's eyes and thus win them enough time to escape.
They also have come to believe that the ostentatious red tufts of hair on the back and sides of the head were a kind of visual warning sign for predators to indicate that they were inedible, maybe even poisonous (like you still see it with certain caterpillars today for example).

***

The title "homo hahahbilis" was suggested by my son and I love it!!!! He also came up with "hoho erectus" which is just as genius, but I think we will have to wait until Christmas to meet this guy. lol

To create my mixed media foam board panel I used Andy Skinner's new "Skuldoggery", "Unexplained" and "Handle With Care" Stampendous stamp sets alongside the cracke stamp from his older "Industrial" set and of course a lot of DecoArt media fluid acrylics, Misters and Gesso.

I started with covering up a sheet of heavy mixed media paper with torn scraps of old magazines and dictionary pages. This time I used DecoArt's "Antique" Decou-Page as it already has a slight brownish tint to it and I thought that would add beautifully to the grunge look I was aiming for.


Once that was dry, I applied two thin coats of heavily diluted white Gesso to tone everything down a little. 


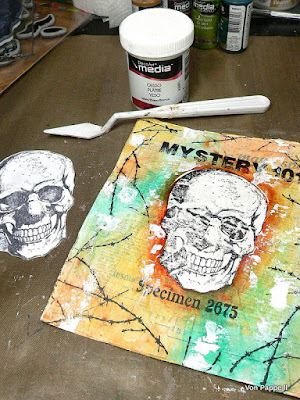
I stamped the clown skull image onto some heavy cardstock and cut out the skull shape with a precision knife so I could use both - the stencil and the mask. Then I placed my stencil onto the prepared substrate and thinly stippled on some white Gesso using one of DecoArt's Dual Sided Paint Pouncers


Next I stamped the skull image onto the dry shape using black archival stamping ink. As the surface was a bit uneven because of the glued and layered on paper scraps the image didn't come out too crisp - but I was expecting that and there is an easy way to fix that.
Of course I could have stamped the image onto a separate piece of paper and glued it on but I wanted to create a single layer piece this time and doing it this way it also fused the image with the textural background.


Then I stamped on the words and the barb wire and let everything dry thoroughly. 

I started adding washes of Transparent Yellow Iron Oxide, Quinacridone Gold and Phtalo Green-Blue. To make the skull pop from the background I painted a shading around it with Quin Gold. 


I placed the cut out skull mask on top of the stamped skull and scraped on some white Gesso as well as some Green Gold and Quinacridone Gold using a palette knife. I let the Gesso and each paint dry before I added the next one.


Then I toned down the skull with a light wash of Yellow Oxide.


The black areas that had gone missing because of stamping onto an uneven surface were painted back in with Carbon Black using a small soft brush. 


Then I started shading my skull image by adding Yellow Oxide to those areas that were in the shade. 


The light areas (that would be hit by the light of a punctual source like the sun) were highlighted with Titanium White as well as the teeth. 


This way the skull pops even more from the flat looking background. 

Time to paint the nose and shade it as well. 


The red hair was stamped on using True Red DecoArt Americana acrylic paint and the chin-beard stamp from Andy Skinner's Skuldoggery set. 


I covered the skull with the cut out mask again and added Red and Black sprinkles using the DecoArt media Misters. I also sprinkled on some white and turquoise Shimmer Mister paint. 


For a finish I stamped on a lot of scratch patterns with black archival stamping ink and mounted my finished painting to a piece of cut to size foam board using matte Decou-Page and four metal brads. 


I wrote the name onto the label and fixed the label holder to the foam board with two thin brads. 


I painted and doodled some structure in black to the red tufts of hair. 


This image shows how the layered on paper scraps create beautiful texture that shows through (see black areas):


And once more the finished piece:


Homo hahahbilis will probably remain a great mystery to the science world, but maybe there will be some more finds that will help reveal the secrets of this wondrous species. 


Hugs and happy crafting!
Claudia
xxx


Wednesday 22 February 2017

Good Things Come in Small Packages - a Canvas Corp Brands Project

Servus and welcome to my first ever invitation for you to check out my full tutorial on this project over at the really inspiring Canvas Corp Brands "The Creative Studio" blog!

As I am pretty new to all the other fab product lines they offer besides the Tattered Angels Glimmer Mists and other fab spray paints (that were among my very first crafting products I bought when I discovered crafty blogland), I was more than positively surprised by the wonderful and wide range of canvas substrates they offer as well as the 7 Gypsies papers and their newly released "Architextures" that I will have to lay hands on soon.

My first project as a Creative Crew Member for Canvas Corp Brands though is rather simple and quick and paper crafts related as they offer beautiful brown Kraft paper bags in various sizes too. And I love working on Kraft!

So this is the finished project:


And here are some of the Canvas Corp Brands products I used to create my little gift bags:


If you are interested in the full tutorial or even in more inspirational input from the rest of their DT, simply click HERE to get to the CCB Blog.


Hugs and happy crafting!
Claudia
xxx

Monday 20 February 2017

Hooowwwl!!!

Servus, dear creative friends!
It's time for another invite over to the Calico Craft Parts blog where I am sharing my latest project. 


is the title (and also part of my creation) and I hope you will be brave enough to hop over to find out who's howling. ;)

Here's a quite mysterious little detail too to lure you over to the post where you will find a step by step as well as some inspiring Calico Craft Parts of course ;)


I hope to see you over there soon!

Have a good start into the week! 
Claudia
xxx


Saturday 18 February 2017

Who is Having a Creepy Crawly Christmas Too?

I know this may be an odd time to share something Christmas-sy...but in a way after Christmas already is before Christmas, isn't it? So, please, bear with me when I share some awesome handcrafted goodies I got from my wonderful and talented friend Kerstin from Scrapbook Dreams last December.

Once again last year in November I found that I will have to start doing my Christmas crafting much earlier this year - maybe already in September or late August as I am  obviously always late with it and then create crap because of being under timely pressure. And it takes a lot of the fun and joy out of it when feeling under pressure, doesn't it? At least my mojo has the habit of saying "good bye" the closer I get to deadlines.

And then there's my birthday in December too (that I hardly have the time myself to celebrate as it is rather close to Christmas and by then I am always in the final spurt of the last preparations for Christmas Eve)...

But Kerstin obviously started early enough to create the most fantastic Christmas tree ornaments and this fab door hanger as a birthday gift for me!!!


It hangs on my studio door (when needed) and I love the all seeing eye on that coffee cup and the smell of good coffee being represented by the wire!


But the tree ornaments she did really knocked us all (my son, hubby and me) off our feet!


Kerstin knows about my soft spot for beetles (and insects in general) and these two ornaments are just so incredibly insanely fun and charming and made with so much thought, love and labour!!! I love them to bits!!!!


Every time I look at this little joyful fellow ringing the two Christmas bells (and spreading loads of festive steampunk Christmas joy this way) it brings a veeery huge smile on my face. So who needs reindeer and a sleigh anymore! lol


The other guy seems to be a rising star among his crawly fellows! 


The cute little steampunk fox with the pen nib ears seems to be a rather shy dude (which makes him especially charming).

And from last Christmas on in my household there's the "Christmas Egg" for breakfast - simply because Kerstin sent this wonderfully decorated Christmas hat that I am now using as an egg warmer.


Thank you so much, dear Kerstin, for all the beautiful, heartwarming, wonderful gifts you sent me! I feel truly blessed to have you as my friend! They are all treasured and in use and I cannot wait for next Christmas to decorate the tree with your fab ornaments again!!! You're the best and I love you loads! Mwah!

Claudia
xxx


Wednesday 15 February 2017

New Stash/Forgotten Stash - SanDee&amelie's February Steampunk Challenge

Servus, hello, welcome and thank you so much for stopping by!

Today I want to share with you my latest DT project for SanDee&amelie's Steampunk Challenges. This month we have a theme and it is

New Stash/Forgotten Stash

which means that we want our players to create a steampunk or industrial style project on which they use either an almost forgotten item from their stash or something new (that they got for Christmas for example). Or both. ;)

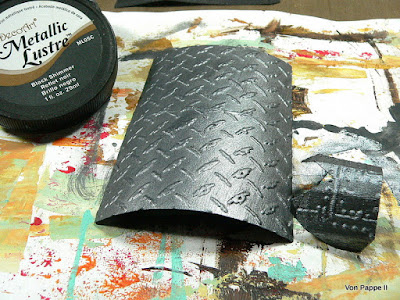
After long consideration I finally decided to give to myself for Christmas the lovely Tim Holtz "Village Brownstone" die from Sizzix. And as I wanted to create a little steampunk house I also decided to use my (never really forgotten) Tim Holtz Diamond Plate and Riveted Metal embossing folders.


Alongside with these I used quite a collection of DecoArt's fab Metallic Lustres to give my steampunk house a metal look. 


And here it is:


I used some heavy black cardstock for cutting out the house parts and then gave them a coat of Black Shimmer Metallic Lustre for the roof and Silver Spark for the other pieces. I applied the Metallic Lustres as you would apply normal paint - simply wet a bristle brush and the Lustre too so you can take up enough "paint" for brushing it on.


Afterwards I dry brushed the dried pieces with DecoArt media black Gesso for a grungier look.


The windows and door were given a coat of Iced Espresso Metallic Lustre. 


To make my house sturdier I cut out a base plate from a piece of foam board so I could glue the house "around" it.


Using my mini hot glue gun I assembled the house parts after I had glued the door and window frames in place using DecoArt matte Decou-Page.


Then I distressed all the edges with black soot Distress Crayon. 


To add a bit more colour to my house I added dashes of Copper Kettle and Gold Rush Metallic Lustre here and there: 


et voilá:


I just love how very "metal" my house looks. The effect of the Metallic Lustres is just amazing!

If you hop over to our challenge blog you will be able to learn about the new or forgotten stash my teamies and our players have used so far. I would love to see you play along! As always we have two prizes to give away - generously donated by our wonderful sponsors DecoArt media and boozybear! So don't miss the chance to win!

Hugs and happy crafting!
Claudia
xxx