Hi, servus and welcome to the start of our October challenge over at SanDee&amelie's Steampunk Challenges! Once more it is time for a little steampunk crafting fun - and who knows...maybe it is you who will win one of the two prizes we're giving away each month! Please, check out the rules and details - alongside the teamies' fantastically inspiring makes - over at SASPC!
I've created a fun tag this time - playing around with
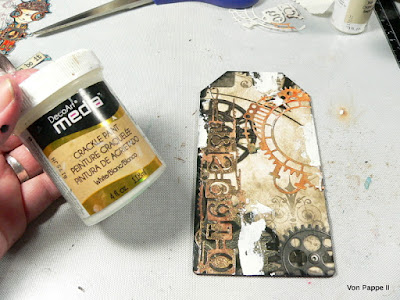
DecoArt media fluid acrylics and Crackle Paint,
Seth Apter's Wow embossing powders, some steampunk and industrial themed dies, background papers,
Calico Craft Parts and the cute
"Robot" stamp from Aall & Create.
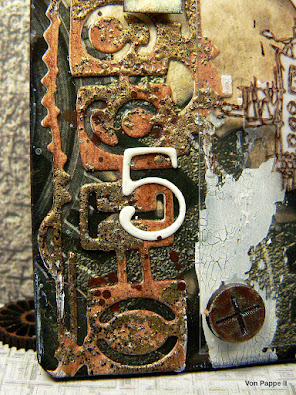
Using stamps with sketchy images is a bit tricky as you cannot fussy cut the stamped images without losing a lot of character from the design - so I decided to stamp the image onto some acetate with StazOn ink and paint the back white - using an acrylic paint marker.
In a final step the acetate got fixed to the finished tag background using small black sticky foam pads that I covered on the top with some
Calico Craft Parts screw heads.
The background was done first of course - using a designer paper from my holy paper stash (yes, I am trying to use up my long hoarded stuff....lol). That was glued to a sturdy Calico Craft Parts MDF tag with matte Decou-Page glue, trimmed and finally inked around the edges with black archival stamping ink.
The die cuts were cut from sturdy white cardstock and then got painted using DecoArt media fluid acrylic paints in a watercolour-y way. I layered Burnt Umber, Quinacridone Gold and English Red Oxide quite randomly. Afterwards I partially heat embossed one of them using Seth Apter's Weathered Gold embossing powder.
In addition to that I spread a little white DecoArt media Crackle Paint here and there on the tag with the very tip of a palette knife.
To repeat the white from the stamped image and crackle paint I then also used the left overs from one of the die cuts - the white numbers - and added them to the background with DecoArt matte Decou-Page.
The acetate got fixed to the tag - done!
I hope my little "brave robot"-tag has put you in the right mood for some steampunk crafting! I promise; the makes of my teamies over at our challenge blog will add even more fantastic inspiration! I hope to see you play along!
Hugs and happy crafting!
Claudia
xxx