Showing posts with label die. Show all posts

Monday, 13 January 2020

Rust it Up - for SimonSaysStamp Monday Challenges

Hi, servus and welcome to my second post and project as a spotlighted guest at SimonSaysStamp's Monday Challenges this January!


I am so honoured to be invited to guest with them this month and this week's theme definitely was just right up my alley:


Rust it Up

is the theme for this week's challenge and as the beauty of rust of all kinds is one of my favourite themes in general, I found it quite difficult for me to limit myself down to just a few products and items from my stash - but finally I made my choice and this is the result:


I have altered a cardboard box I once bought at a well known Swedish furniture store. It is part of a four piece desk organiser and the other three containers still sit on one of my shelves, waiting to be turned into something more pleasing to look at ;)


I've used the cool Voltage Sizzix die designed by my favourite dies designer - Tim Holtz! As it is a BigZ die it cuts through really heavy grey board - so my panel looks awesomely dimensional and turning it into a rusted and forgotten looking piece of tech gear was great fun! Here's what I did to create this panel:


I started with die cutting all the pieces on the Voltage BigZ die twice from thick greyboard. I stacked the base and circle shaped elements, but only used a single layer for the hand and the screws and washers.

I also cut a piece of acetate to size so it fit between the two circle shaped panels and coloured it using Ranger Caramel Alcohol ink and a piece of alcohol ink blending felt with the blending tool.
I had also stamped a scale - using the stamp from Tim's "The Professor" stamp set - onto some white card stock that I had cut to size using one of the die cut window shapes as a mask to trace around so I could cut it to according size to insert it after blending its edges with vintage photo Distress Ink using the ink blending tool.


This image shows how thick the two layers of greyboard are. The alcohol inked acetate was glued between the two upper layers.


Using Distress Paint antiqued bronze by dipping a soft flat brush into the bottle I painted the voltage indicating device and then sprinkled Emerald Creek Baked Texture Chunky Rust and Patina Oxide here and there on the still wet paint. This way I didn't need any embossing ink to make the embossing powders stick to the project's surface.


I added more heat embossing - this time using Ranger Verdigris embossing powder. Afterwards I dry brushed all the edges using black soot Distress Paint and a flat small bristle brush.


To do so I dabbed a bit of Distress paint on my palette on my glass media mat, then only loaded the very tip of my brush with paint most of which I wiped off on a piece of kitchen roll before I used the left overs on the brush to gently brush that to the edges.


The index hand was given a coat of barn door Distress Paint before I dry brushed its edges too and once that had dried I added a thin coat of Ranger Clear Embossing Powder.


One of the bent shaped panels I had die cut was primed with a layer of black soot Distress Paint and then heat embossed using the Aged Silver embossing enamel from the Stampendous Frantage Embossing Enameling Kit. 
Two small sticky half pearls were used as rivets and given a quick brushing over with black soot Distress paint.

Time to glue everything in place! Yep - that looked quite cool so far ;)


This is a before image of the cardboard container I was going to alter. I took my finished voltage indicating device and rummaged my paper stash for a matching designer paper...


...which was a sheet from Tim's Lost and Found paper stash. It was cut to size and I used the container to measure the height and length of the strip I needed. I also added a finger's width to have an overlap where the paper edges would meet.


Using Tacky Glue - as I had been using before - I glued the paper in place, making sure all the edges were neatly stuck to the box surface. To tone in the paper so it matched my voltage index even better I applied a layer of vintage photo Distress Ink around all sides.


Afterwards I blended the edges of my box using a piece of Ranger Cut-n-Dry Foam and jet black archival ink.


I had decided to add some affirmative quote to my desk organiser and picked one of the beautifully dimensional Tim Holtz idea-ology Quote Chips. It was toned in too using vintage photo Distress Ink and jet black archival ink around the edges.


And because the quote chip tells me to use my wings, I also stamped the order "fly" onto the Aged Silver panel using StazOn black stamping ink and some Hero Arts letter stamps.


Done!

My new desk tidy for my pokey tools, bone folders and drills was ready to use! Yay! 


What is it that you are going to rust up to play along in this week's 
Monday Challenge at SimonSaysStamp? 


Don't forget - there's a fantastic 


to be won by one lucky randomly drawn winner! 

All the products I have used to create my project can be found in their online store (just click on the product names in my write-up to get taken to the product on their shop site). 



Good luck and 
hugs and happy crafting!

Claudia
xxx


Thursday, 16 May 2019

More Forest Magic in a Shrine - a DecoArt Mixed Media Blog Project

Oh, well....this post was originally just meant as a short invitation over to the DecoArt Mixed Media Blog, where I am sharing my latest project today, but I got stuck somehow right at the beginning and that has then become a longer blurb about some thoughts and feelings that came up while trying to do this write up and coming up with a fun and inviting message to lure you over (obviously "fun and inviting" wasn't really my thing today...lol).

 You do not need to read that at all and I am definitely not offended (as I won't know anyway) if you decide to just click HERE to get taken to the DecoArt Mixed Media Blog post and tutorial. ;)
I just wanted to share what crossed my mind today and what it is that sometimes makes writing up invitational posts or even designing as a design team member a bit tricky for me. And maybe I am not the only one who feels like this at times...It's the the part written in italic letters at the bottom of this post. ;)

So some detail shots will do the job maybe even better than a witty write up...?


You know me...the forest is one of my most favourite themes and source of inspiration and in this project I tried to capture what I love most about the forest: kind of woven visual layers of interesting shapes, amazing textures like bark, lichen on trees, thicket, soil and rotten leaves, ferns, mushrooms and all the other little wonders you can find if you just look closely...

To make this shrine project yours (instead of just a copy) you should of course use your favourite theme, cutting dies and embossing folders. But there's another reason why you should do that: because I am sure that if you combine a theme you love with the designs and colours you love, this will already create magic almost all by itself. Magic right from your heart. ;)

I hope you will like my finished project and tutorial and I would also love to see your "love shrines"!

Hugs and happy crafting!
Claudia
xxx


PS: still not sure what it was that made me fumble with this write up for over two hours...maybe some aftermath from my stay at the hospital and the stressful last weeks. ;)


It's funny...when starting the write up for this post I felt I needed to apologise for sharing once more a forest themed project, but then I also felt this wasn't something I should need to apologise for, right? 

Not just because even though it is a repetitive theme it still is a new and also different project, but also because one should not need to apologise for having a favourite theme that can be interpreted and re-created in countless variations and ways. But still I obviously feel that little fear of maybe boring you with all my "forest love"...

I guess it is my fear of someone just reading the blog post title and thinking "oh, dear...she did it again...just more of the same...how boring!!!" And maybe this fear relates to our quite competitive ('cos most of the time business related) crafting community's need for always sharing something new that surprises or even sets a new trend all (or most) of us want to follow...

And obviously I am infected with this way of thinking too...which is quite strange, because I - as an arts teacher - know pretty well that there are a lot of well known artists in art history that focused on a single theme and/or technique - and therefore became real masters in doing it...and none of their work is boring at all or feels like boring repetition...on the contrary: it is their mastery we enjoy and appreciate. 

Not that I see myself any close to a master, lol. 
But I find I keep returning to a few themes over and over again - because these are themes I love or feel especially well with when being creative. And when I look at my pinterest boards I find I am also looking out for mostly the same "loves" of mine - be it techniques, media used, themes, styles or colour schemes. You know what I mean? We have our specific favourites or "loves" - they make us not only feel good, but they also are what motivates us and feel especially fulfilling when we get creative and kind of "celebrate" them by expressing them in as many ways we can. 

What do you think?


Friday, 1 February 2019

"Let's play good bulb, bad bulb!"

...is probably my worst pun ever. LOL

...but I have been hoarding a cute little bulb dies set in my stash unused for ages it seems and when I recently tried to reorganise my cutting dies it (re-)caught my attention and the idea for a fun little mixed media steampunk tag was born.


Welcome to the start of our "Anything Goes - Steampunk/Industrial" challenge over at SanDee&amelie's Steampunk Challenges! And no need to mention that the reorganising of my dies came to a sudden halt because I had to create this tag...lol

It has been quite some time since I have shared a tutorial over here on my own blog and I guess I needed a bit of a time out from it...but this time I just felt I wanted to share the process with you (even if I still sometimes think that there are so many people out there who do much more inspired and professional projects and tutorials...). 


I used the Tag & Bookplate die to cut a tag from black cardstock. The cut out tag was embossed using the Foundry 3D Texture Fades embossing folder and to make my tag  more sturdy I glued an MDF tag from Calico Craft Parts to its back and then cut off the excess once the glue had dried. 


I simply made sure the holes of the MDF and the cardboard tags matched when gluing both together.


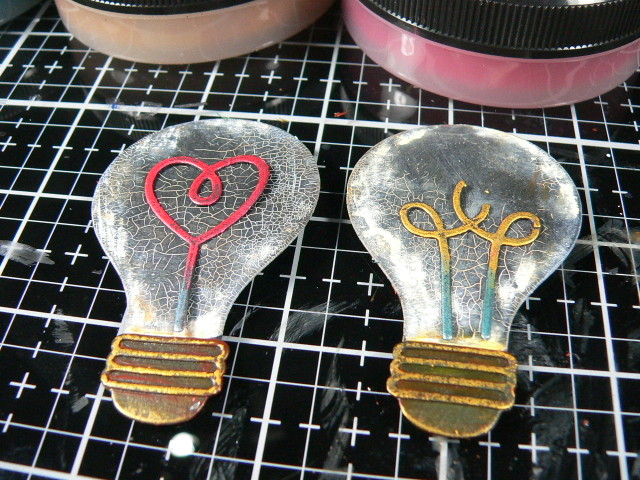
I had also cut two light bulbs and their filaments and threads from black cardstock and covered the glass part of the bulb with a thin coat of matte DecoArt Decou-Page because I later wanted to use DecoArt media clear Crackle Glaze on top.


While the bulbs were set aside to dry, I die cut some extra gears using my newly bought Sizzix Sidekick (which was a treat to myself after ten months of bravery with (almost) regular visits at the dentists, having three implants and several root treatments and extractions done...thanks to my former dentist who managed to make me feel on the safe side when in fact there would have been several teeth to be taken care of urgently).


But enough whining...let's focus on some good and fun stuff instead! I put the two bulbs in place (without gluing them on) to find good spots for my gears to go in and then glued these to the embossed background. The bulbs though still needed more treatment before they could be fixed to the tag for good.


I even used some of the cut off sections of the same gears and glued them in places where they looked as if they came out from behind the embossed riveted plates.


The bulbs got a thorough coat of clear Crackle Glaze that I brushed on with a soft wide flat brush. Then I put these on the heater to speed up the crackling process.


In the meantime I dry brushed the tag using DecoArt premium acrylic paints Cobalt Teal Hue, Diarylide Yellow and Quinacridone Gold Hue. These are perfect for dry brushing! I always started from the outside and worked my way towards the centre area but left that black. This way the focus gets drawn to the centre with the bulbs in it.


Voilà - first layer of Cobalt Teal Hue finished!


A mix of the Quin Gold Hue and Diarylide Yellow gave a lovely colour  to brush on top of the Teal.


In the meantime the heater had done its job and the crackling had turned out just beautiful!


To make the cracks more visible I used DecoArt media Titanium White Antiquing Cream.


Brush on, let dry and then wipe back with a soft damp cloth until you're content with the look. It's as easy as that!


On top of the Antiquing Cream I added a quick wash of the same mix of Quin Gold Hue and Diarylide Yellow. As the Antiquing Cream gets reactivated during this process and could be washed off, I only loosely and in one single soft stroke added the wash and dabbed off any excess with kitchen roll.


I also painted some rusty tones to the threads of the bulbs...

...and a thin border around the tag in the same colour and in dry brushing technique again.


DecoArt Metallic Lustres Radiant Red, Brilliant Turquoise and Orange Flicker were used to add a bit of metal bling and sheen to the raised areas of the embossed tag and the bulbs' filaments and threads.


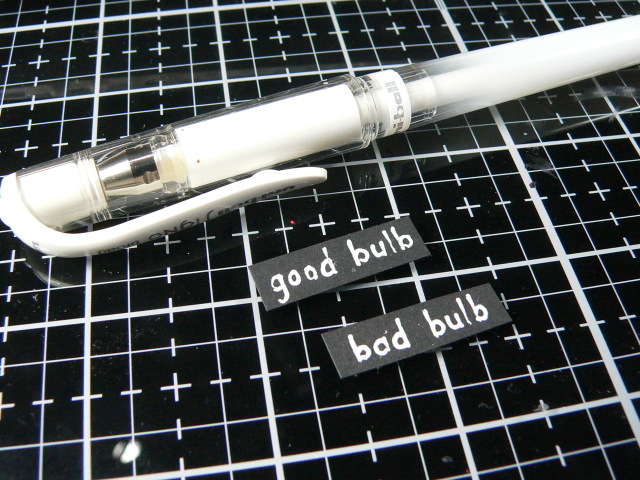
I hand wrote my words on some black cardstock scraps using a white gel pen and cut them to size.


Now all my finished pieces were ready to go on the tag. I used black sticky foam pads to fix everything in place.


Done! 


Some close ups:


and once more the finished tag.


It was great fun to create (oh...by the way...the bulbs dies set is an old one and was from memory box I think) and I hope you like it as much as I do. With that said I would like to invite you over to our February challenge and to take a look at my wonderful teamies' makes for another dose of steampunk/industrial mixed media inspiration! Simply click HERE to get taken to our challenge blog. There's time until 28th February to play along and maybe make our Top5 or win one of our two fantastic prizes! I hope to see you over there and can't wait to see what you will create!

Hugs and happy crafting!
Claudia
xxx